How to crochet bag bottom in 3 different ways – Free Crochet Tutorial
This post includes affiliate links.
This is a free crochet tutorial for three different ways to create crochet bag bottom. The rounded rectangle can be used as a bag bottom or shoe shoes. The tutorial contains photos and videos.
I am so excited to bring you this tutorial on how to crochet bag bottom in three different ways.
I love when there are more than one way to achieve the same result. In this case, you can choose a technique that suits you the best and is the easiest for you to crochet.
Whether it be for a crochet bag or even the soles of a pair of slippers, one typically begins with a rounded rectangle.
But what if your project requires a tight stitch with no gaps? Very often we need the bottom of a crochet bag to have no gaps at all.
This stops your items from falling out through the gaps and losing them.
What if the front loop only method is the only method you know? You might not necessarily like it or enjoy making it that way.
If you would like to expand your knowledge on alternative ways to crochet bag bottoms as rounded rectangles, please continue to the tutorial below.

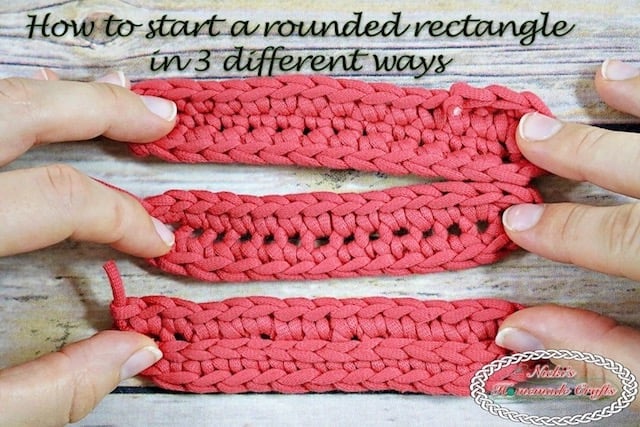
3 Different Ways To Start a Rounded Rectangle
When creating bags or even shoes/shoe soles in crochet, one usually, (depending on the pattern), starts with a rounded rectangle.
By making a chain and then crocheting single crochets (or any other stitch) into each chain on both sides of the chain.
When using this technique you usually create gaps or holes like you see below.
In order to prevent or fix these holes or gaps, you have a couple of different options.
Firstly, you can crochet the surface slip stitch over the starting chain to hide the gap.
Secondly, you can start by crocheting into the back bump instead of the front and back loops of the chain.
Let me show you what I mean.
Crochet Bag Bottom First Technique: Crochet into the front loop and back loop separately
Let’s say you create a chain of 8 as your foundation chain.
Then you are asked to crochet 1 sc in chain starting on the 2nd ch from the hook.
Well, you will then also need to crochet on the other side of that chain after crocheting 3sc in the corner (green and blue colored below).
But by doing so, most crocheters will start crocheting first in the front loops only.
Then place 3 sc in the corner (here light green) and then crochet into the back loops only when crocheting on the opposite side of the chain.
Whereas this technique works, for most people it will create large gaps.


Crochet Bag Bottom Second technique: Surface crochet used as a fix for technique one
In order to fix these gaps, you can use the second technique which is the surface crochet.
You will crochet over those gaps and close them using the surface slip stitch crochet.
This technique is like creating a chain but over the existing “bars” between the gaps which I show you in the pictures below. The yarn runs in the back.


The first technique can be used with no problem, unless you can’t have gaps.
In which case you have to fill them with the surface crochet.

Crochet Bag Bottom Third technique: Back bump instead of front loops
Technique three uses the back bump of the foundation chain.
This technique also eliminates gaps right from the beginning.
That means that technique 2 is not needed after, which saves you time.

So, instead of going into the front and back loop of the chain when going around it to create round 1, you will crochet into the back bumps of the chain (instead of the front loops).
Secondly, you crochet normally into the V’s that are now visible on the opposite site.
That technique makes the gaps disappear and makes the bottom more sturdy and saves you time and yarn. Win win all around.

I have used this technique for my Multipurpose Crochet Bag and it has worked perfectly.
Video Tutorial
Do you still not understand what I mean? No problem!
Watch my video tutorial below for a very detailed visual explanation.
I hope this helps and will clarify all leftover concerns or questions.
If you enjoy video tutorials, why not subscribe to my YouTube channel too?
Subscribe to my Youtube Channel here:
[youtube-subscriber channelID=UCSI4OeQQnxVQEAwMGeTCn1Q layout=full subscribers=default]
Final Thoughts
I hope you love this crochet bag bottom tutorial as much as I do.
If you love it, please use the social media share buttons above or below and share it with the world and your friends.
Do not forget to pin it to your Pinterest Board so you can easily find it later.
That way you will find it easily again when you need it and also provide the world and your friends with the ability to gain extra crochet knowledge.
And to top it off, you help me as it allows me to create more content that you love already and want to see more of – free crochet patterns and tutorials. So, thank you for sharing.


