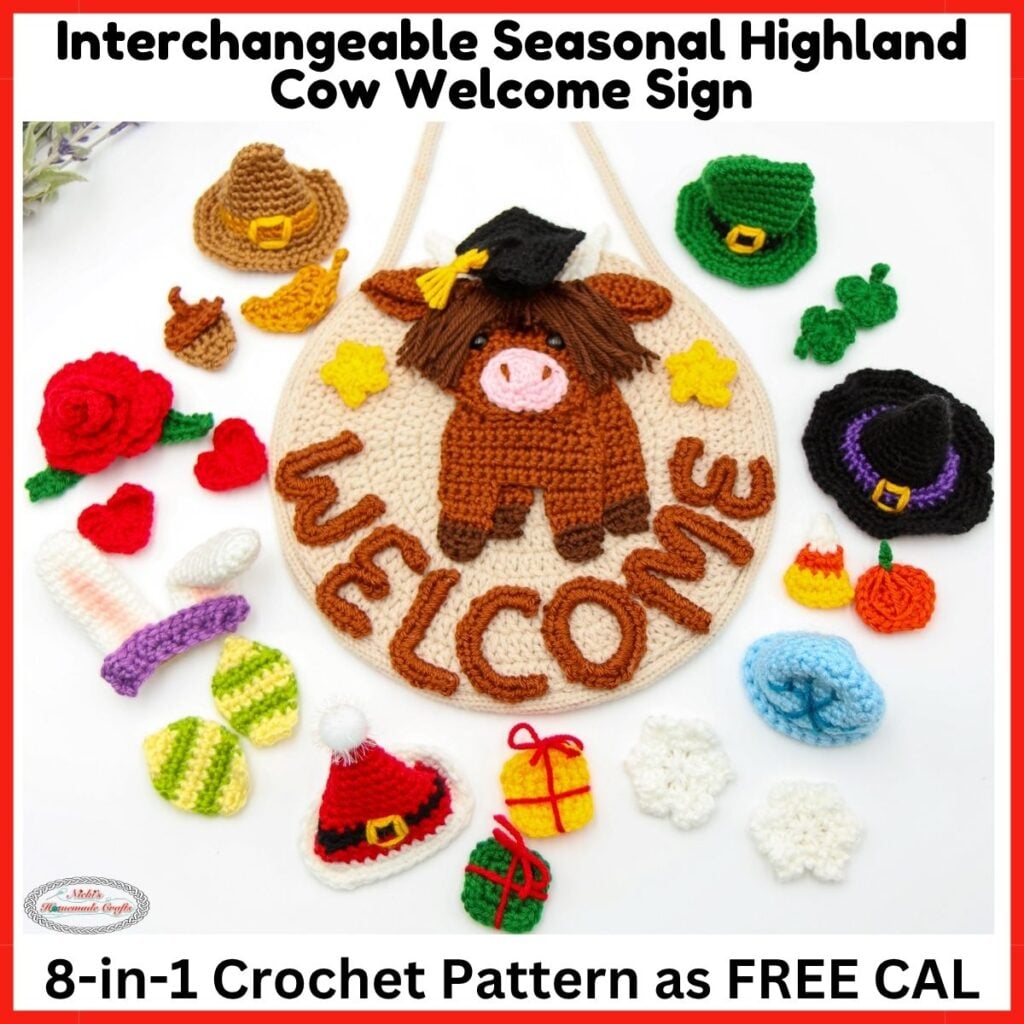
Free Highland Cow Crochet Welcome Sign Pattern – 8-in-1 Interchangeable Seasonal LIVE CAL + Prizes
This post includes affiliate links.
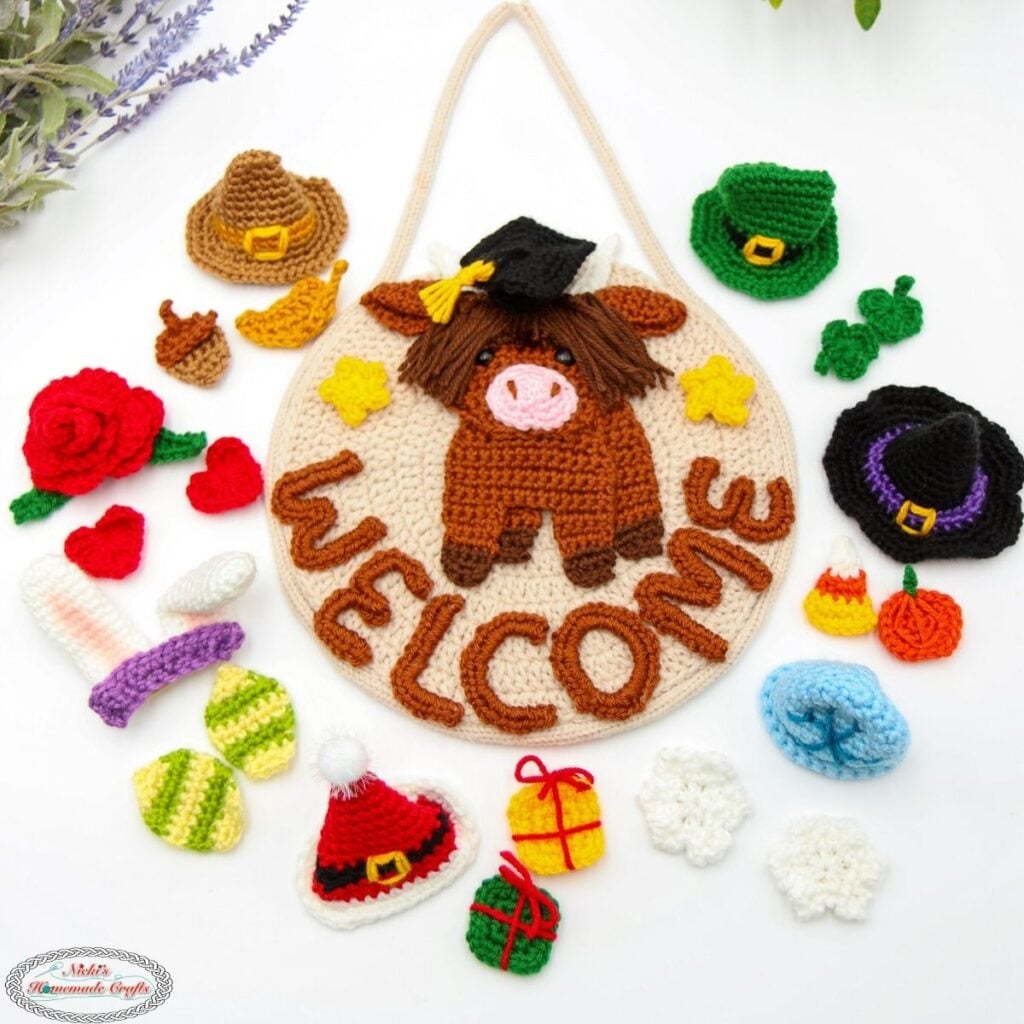
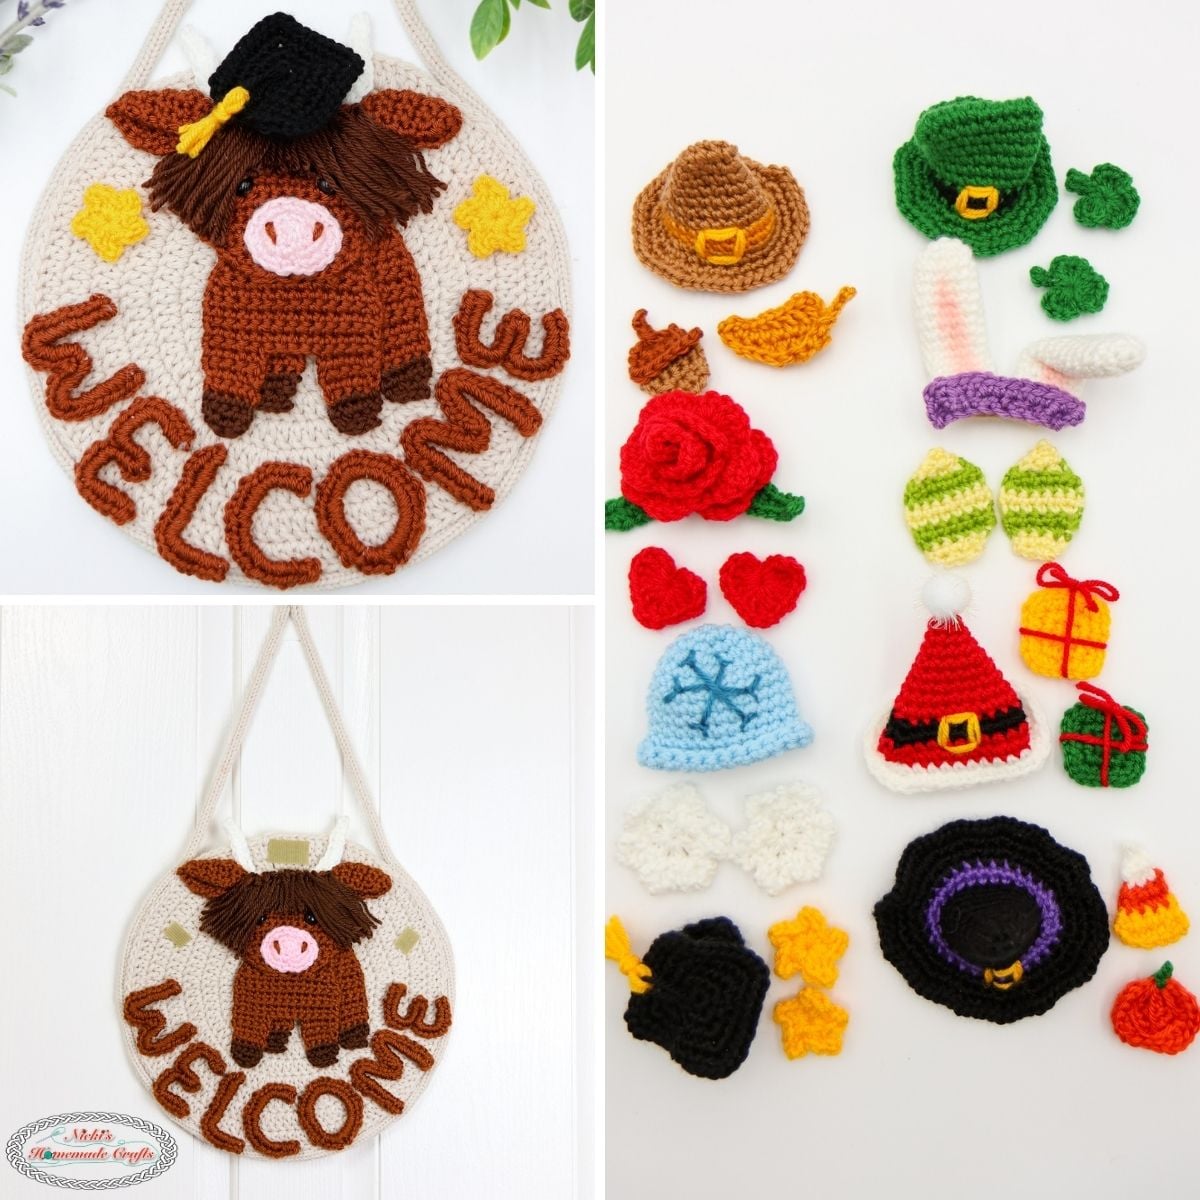
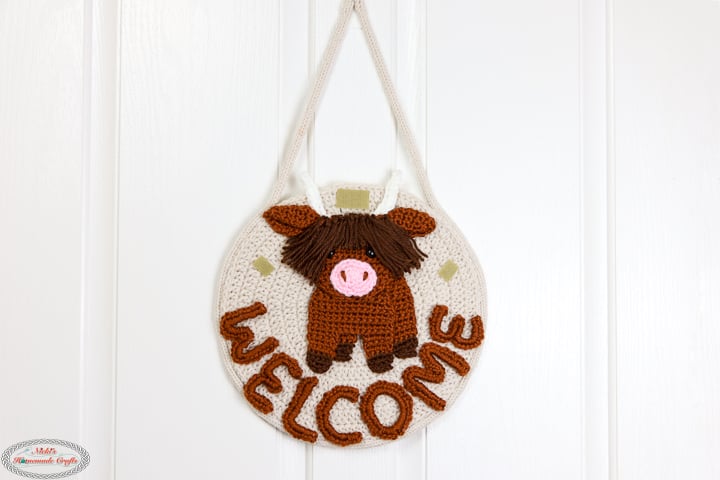
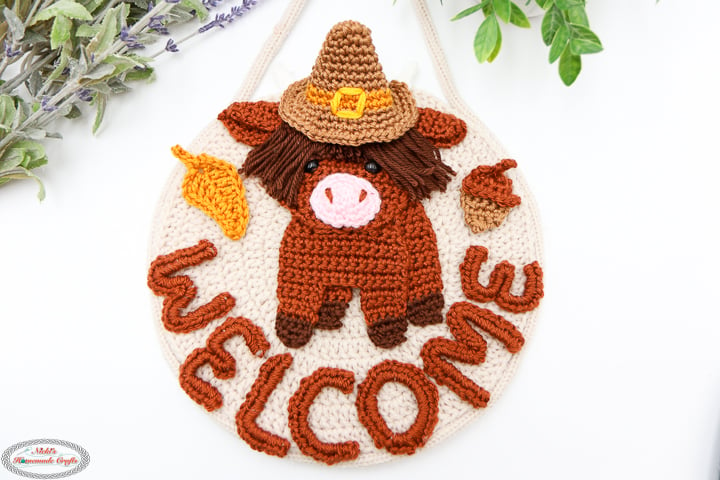
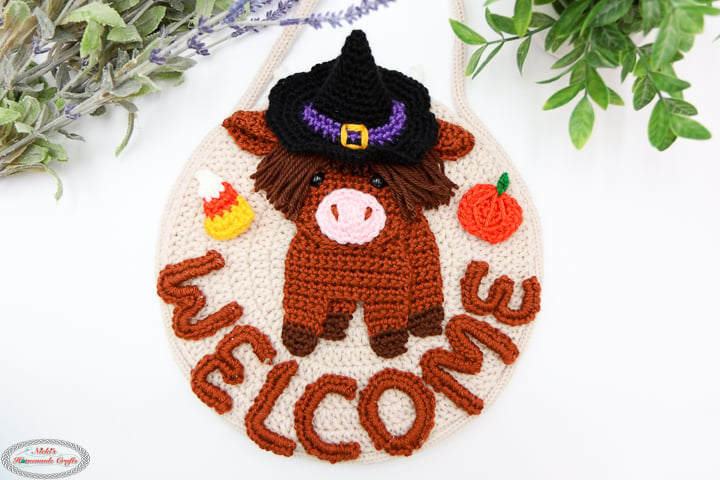
These Highland Cow Welcome Signs have been going viral everywhere… but I couldn’t find a crocheted version anywhere—so I designed one! 🧶🐮 And not just any version… this one is fully interchangeable with seasonal crochet pieces for Christmas, Halloween, Easter, Fall, and more!
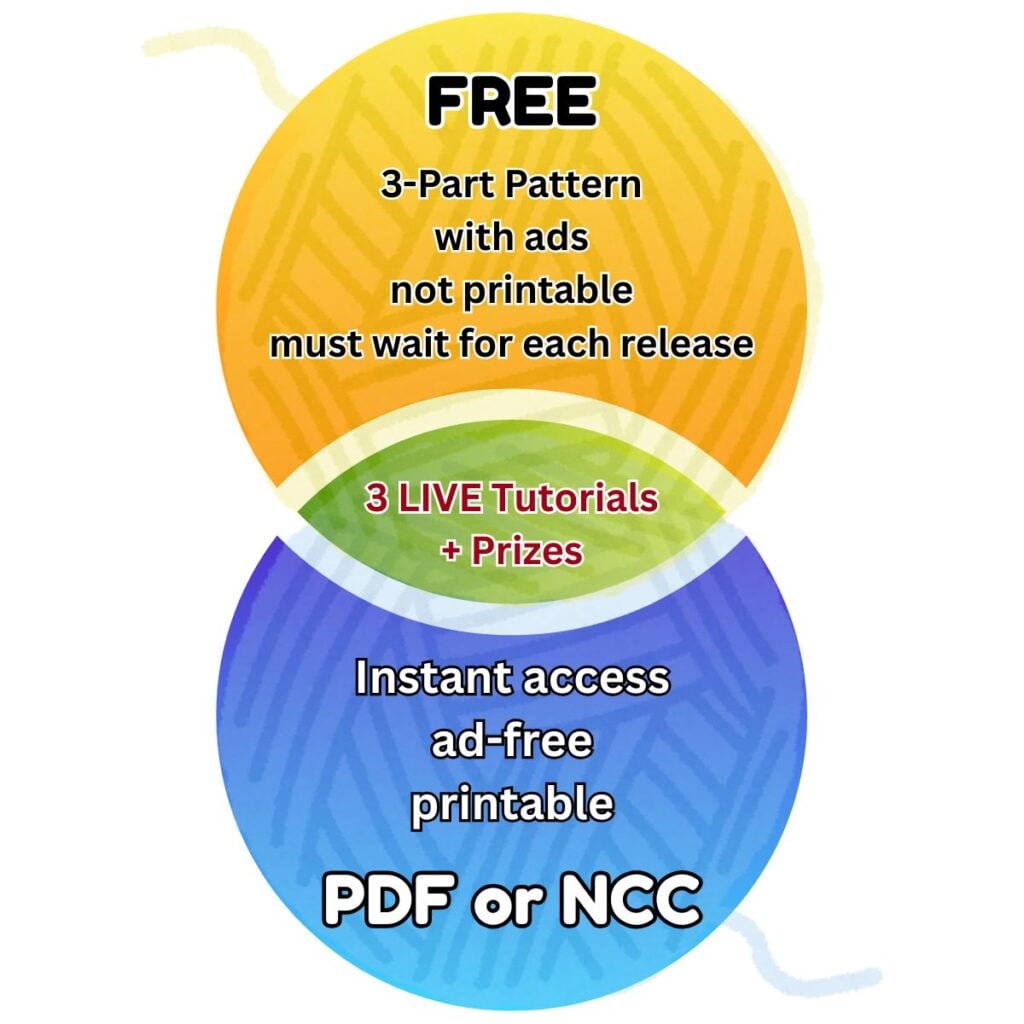
To celebrate, I’m hosting a FREE LIVE Crochet Along (CAL) starting May 11th—with 3 parts, 3 LIVE tutorials, and PRIZES! 🎉 Join below to crochet along with me, get all the details, and be entered to win one of 12 giveaways announced at our Crochet Party on May 16th!
Get the PDF Pattern now to crochet ad-free
You can also purchase the PDF via Ravelry and Etsy, but it will cost more than if you purchase it on my website (just $12).
If you are a FULL MEMBER of Nicki’s Crochet Club (formally The Crochet Club), you will NOT need to purchase the PDF! You, NCC Members, automatically get the FULL AD-FREE WRITTEN Pattern HERE (not the 3 LIVE Tutorials videos yet), starting April 28th!
You’ll also get access to the LIVE Tutorials as they are being published!
LIVE CAL Q&A
Come join us at 12pm, PT on 4/30/26 for a LIVE Q&A about this LIVE CAL
🧶 How the FREE LIVE CAL Works
This is a 3-part LIVE CAL to teach you how to crochet the 8-in-1 Interchangeable Seasonal Highland Cow Welcome Sign, with each part released every other day starting May 11th. Each part includes:
- A FREE written pattern (viewable on the blog, with ads)
- A step-by-step LIVE video tutorial (with replay) at 12pm, PT on each scheduled day
✨ Bonus for signing up:
You’ll get early access to each written part the evening before it goes live — plus the full material list and all event details sent straight to your inbox!
🎁 12 WINNERS – Multiple Ways to Win! 🎉
You don’t have to do everything to win — just jump in and have fun! Here’s how:
- 3 Winners → Just for signing up 🙌
- 3 Winners → Watch all 3 videos + answer the question in each
- 3 Winners → Finish all 3 parts by May 16th at 10am PT
- 3 Winners → Join the LIVE Crochet Party 🎉 (May 16th at 12pm PT)
Be sure to always use the hashtag #WelcomeCowCAL when you share your posts or talk about this LIVE CAL, etc!
💡 The LIVE Party is where we’ll celebrate, announce all winners… and I’ll reveal a fun little surprise 😉 We’ll keep the PRIZES a mystery until the LIVE Party, too! But they will be amazing and worth it!
👉 Sign up above and get ready for pattern, LIVE tutorials, and prizes!
What will you need for the LIVE Crochet Along?
Click the links below to see which materials I used exactly! 1 Skein or less per color
- Herrschners Worsted Supreme Yarn:
- limeade
- really red
- tangerine
- sweetheart
- fawn
- honey
- peark
- heather
- grape jam
- faylily
- lagoon
- onyx
- WeCrochet Brava Worsted Yarn (100% acrylic, 218yd/100g)
- grass
- sky
- canary
- Lion Brand Skein Tones Worsted Yarn (100% acrylic, 185yd/100g)
- adobe
- cocoa
- Mary Maxim Starlette Worsted Yarn (acrylic, 180yd/100g)
- cottonwood
- 4mm hook
- scissors
- tapestry needle
- Polyfill
- Plastic Eyes (10mm)
- 10 inch wooden circle
- Pipecleaners (about 4-5)
- Optional: Knitting Icord Machine (or crochet it)
- optional: beige velcro to attach & detach (or use magnets or snaps)
- Hot glue
- optional: “human” makeup blush for bunny ears
- optional: pom pom for santa hat
Can I use a different yarn?
Yes, you can switch to a different yarn brand, even a different fiber if you prefer.
I recommend any worsted yarn for this project. Pick from your yarn stash if you want, BUT I highly recommend the yarns mentioned above.
But it’s an ideal project as a yarn stash buster. Use leftover yarn if you have any. I would recommend sticking with either of my above recommendations.
What colors should I pick?
I recommend any of the mentioned solid colors.
Either stick with the colors I picked or pick your favorite colors for your favorite pieces.
Can I use a different hook size?
Yes, you can pick a different size. Just remember, the pattern will be a bit smaller or larger unless you focus on the gauge provided.
More Details about the Pattern
Gauge
4 sc sts x 5 sc rows = 1 square inch
Finished Size
10 inches in diameter
Stitches and Abbreviations (US Terms)
Learn all the basic crochet stitches HERE
- st/sts = stitch/stitches
- ch = chain
- sk = skip
- sl st = slip stitch (or invisible sl st – see video)
- inc = increase
- sc = single crochet
- hdc = half double crochet
- dc = double crochet
- tr = treble crochet
- ATC = Alternative Turning Chain
- BLO = back loop only
- FLO = front loop only
- inv sc dec (rounds) or regular sc dec (rows)
When does the Crochet Along start?
The Crochet Along will be broken up into 3 Parts and start on May 11th, 2026.
You will simply need to decide whether to join the CAL for free or get VIP Access (Nicki’s Crochet Club Members get VIP Access in the Vault automatically).
Are you excited yet? Let’s grab or order your materials, and then we will get started on May 11th, 2026 with Part 1.
LIVE Crochet Along Pattern Parts
Remember, you can get the PDF of this pattern if you don’t like ads or want to work ahead:
Be sure to share your progress pictures in our Facebook group using the hashtag #WelcomeCowCAL so we can celebrate you.
Each LIVE Tutorials for Parts 1-3 starts at 12pm, PT (3pm, ET).
Part 1: circle, icord, welcome letters, cow
LIVE Tutorial starts 12pm, PT on May 11th, 2026. The LIVE Tutorial Replay will be available after HERE on Youtube.
Written Pattern
Pattern Notes:
First, you’ll crochet the circle, welcome letters, and highland cow (plus knitted icord), then you’ll crochet the seasonal accessories.
For continuous rounds, use a stitch marker unless otherwise mentioned.
If R has no “turn” mentioned, it’s a ROUND (if no sl st mentioned, it’s a continuous round), if it is mentioned, it’s a “ROW”.
The circle must be glued to the wooden circle. ANYTHING else I used hot glue for, it can also be sewn on.
Instructions:
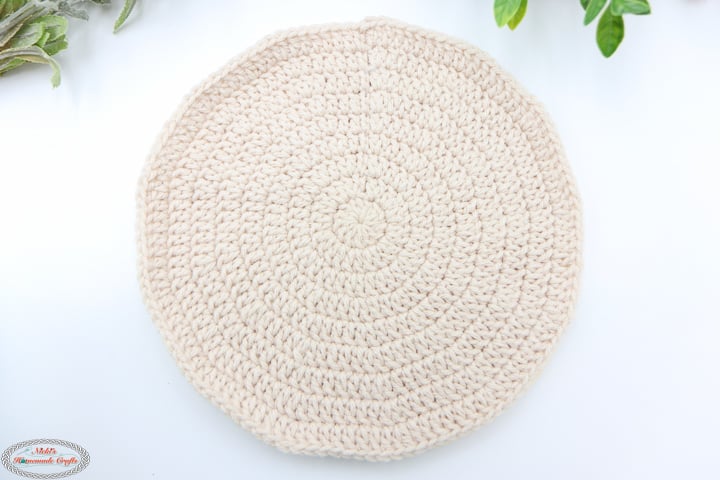
Circle
Cottonwood
First DC per round is made as an ATC or ch 3
R1: MR, 13 dc, close the circle, sl st
R2: 2 dc per st, sl st
R3: (1 dc, 2 dc) x 13, sl st
R4: (1 dc in 2 sts, 2 dc) x 13, sl st
R5: (1 dc in 3 sts, 2 dc) x 13, sl st
R6: (1 dc in 4 sts, 2 dc) x 13, sl st
R7: (1 dc in 5 sts, 2 dc) x 13, sl st
R8: (1 dc in 6 sts, 2 dc) x 13, sl st
R9: (1 dc in 7 sts, 2 dc) x 13, sl st
Fasten off and check that it fits the wooden circle (add or remove rounds to make it fit).
fasten off, weave in ends.
Hot glue the circle to the wooden circle.
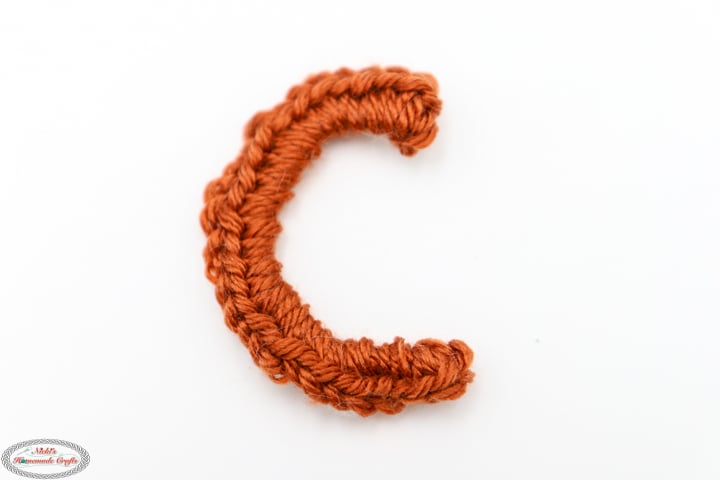
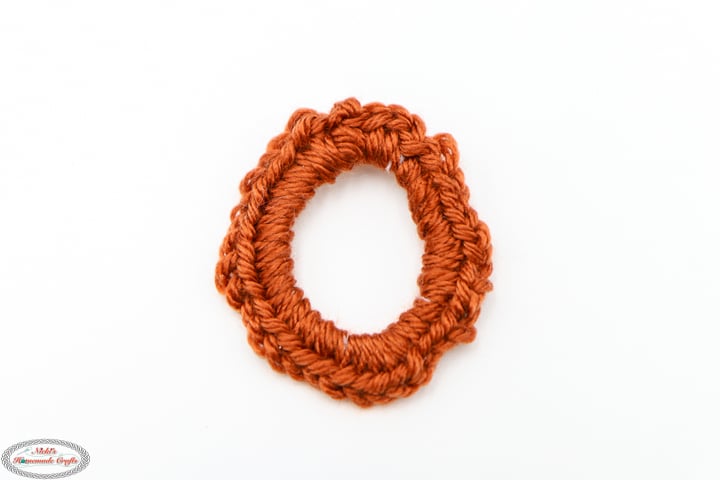
Welcome Letters
Adobe
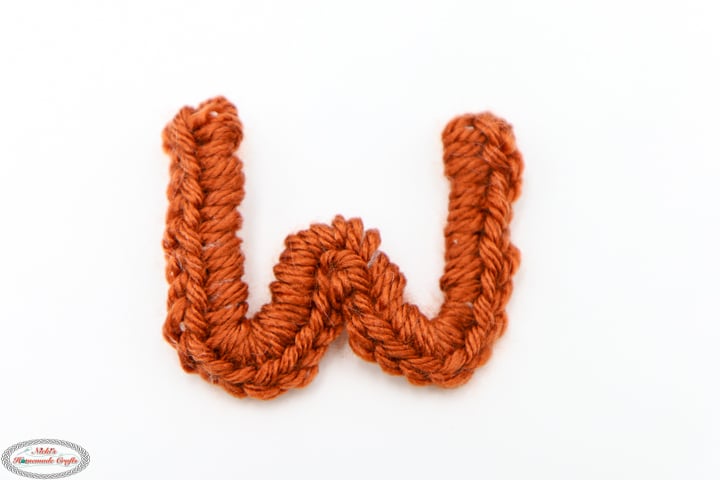
Each letter is about 2 inches in HEIGHT!
So you’ll crochet TIGHTLY as many sc sts around a pipecleaner (so you won’t see the pipecleaner anymore when the letters are done) as you can fit WHILE bending it to make letters and checking the height of your letter.
Make sure you have excess length of the pipecleaner hanging off on each side to prevent the stitches from falling off. You’ll use a pair of pliers to cut/trim the pipecleaners to make them shorter, and then bend the excess to the back of the letter. I hot-glued my letters to the circle, but they can also be sewn on. Glue is easier and faster, though.
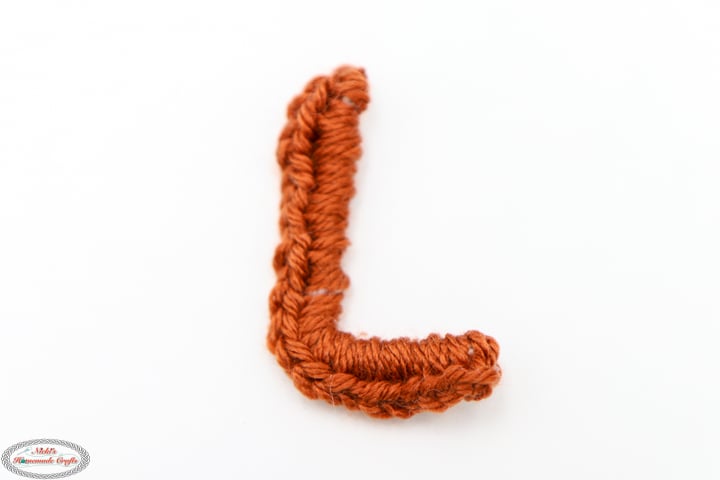
The letters should be uppercase letters like this:
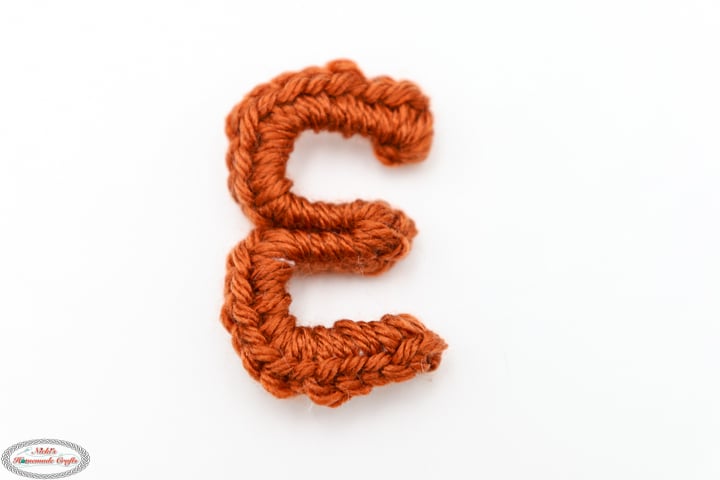
W E L C O M E
Be aware that the letter E is made in ONE piece. See the pictures for a close-up.

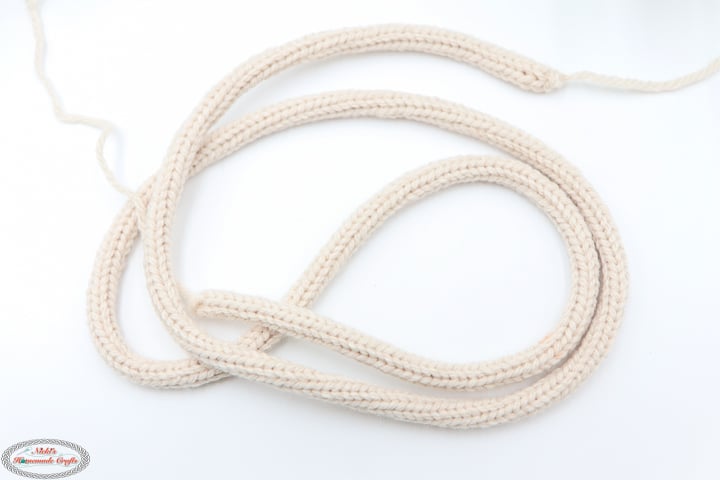
I-cord
cottonwood
I used the Tulip I-cord Machine to “knit” the icord fairly quickly. Optionally, you can also crochet it, or use macrame cord.
I made the icord 43 inches long and tied the ends together.
Then I hot-glued the icord to the circle, keeping it “open” at the top as the hanger.
Find a tutorial for the Tulips Icord Machine here: https://youtu.be/jja2ivRb2rM
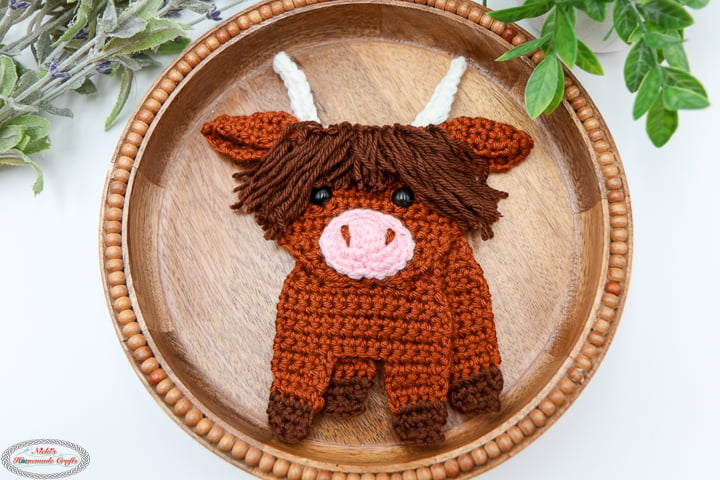
Highland Cow
Body with Legs (make twice)
start with adobe
Ch 11, start from the 2nd ch from the hook
R1: 1 sc per st, turn
R2-5: 2 sc, 1 sc per st, turn
R6-9: 1 sc per st, turn
Now, crochet 1 leg at a time
R10-13: 1 sc in 5 sts, turn
Cut adobe, start with cocoa yarn
R14: 1 sc per st, turn
R15-16: 1 sc dec, 1 sc per st, turn
Fasten off
Go back to R14, after the 5 sts crocheted, skip 4 sts, reattach the adobe yarn, and repeat R14-16 for the second leg.
Head
adobe
Ch 11, start from the 2nd ch from the hook
R1: 1 sc per st, turn
R2-7: 2 sc, 1 sc per st, turn
R8-10: 1 sc per st, turn
R11-16: 1 sc dec, 1 sc per st, turn
Fasten off
Snout
sweetheart
Ch 4, start from 2nd ch from the hook
R1: 3 sc, 1 sc, 3 sc, turn 180 degrees and crochet on the other side of the chain, 1 sc, sl st (crocheting in rounds now)
R2: ([2 sc] in 3 sts, 1 sc) twice, sl st
R3: ((1 sc, [2 sc]) 3 times, 1 sc) twice, sl st, fasten off
Sew 2 adobe colored lines for nostrils, then sew the snout to the bottom of the head with a little bit of polyfill.
Add the plastic eyes right above, left and right.
2 Ears
adobe
R1: MR, ch 1, 4 sc, close the ring, turn
R2: 2 sc per st, turn
R3-8: 1 sc per st, turn
R9-10: sc dec, 1 sc per st until 2 sts left, sc dec, turn
Sew to the top side of the head (next to R1).
2 Horns
Pearl
Ch 10, start from the 2nd ch from the hook
R1: 1 sl st in 2 sts, 1 sc in 3 sts, 2 sc, 1 sc in 3 sts, fasten off
Sew next to the ears (more towards the top but still side of the head).
Hair
Using the cocoa color, cut 7 inch strands first and then “latch hook style” using a crochet hook, add 1-2 strands per st to the first 3 rows of the top of the head.
Latch hook style technique: Fold a yarn piece in half, place it in the open hook, pass it under a stitch, wrap the ends into the hook, and pull back to close the latch and secure the knot.
You can also do the technique WITHOUT cutting the 7 inch strands first and cut them AS you add them to the head. It may save some time.
Finally, trim the ends a bit and give the highland cow some bangs.
Then sew or glue the highland cow to the circle but leaving a bit of space at the top to at velcro (or a magnet, snap etc) for the accessories.
Add rough side of the velcro to the circle like the image.

Be sure to watch the entire video for PART 1 and answer the question at the end to qualify for the GIVEAWAY! AND don’t forget to post your picture for Part 1 in the Facebook Group “Crocheting with Nicki” with the hashtag #WelcomeCowCAL.
Part 2: Pieces for Mother’s Day, Easter, St. Patrick’s, Winter
LIVE Tutorial starts 12pm, PT on May 13th, 2026. The LIVE Tutorial Replay will be available after HERE on Youtube.
Written Pattern:
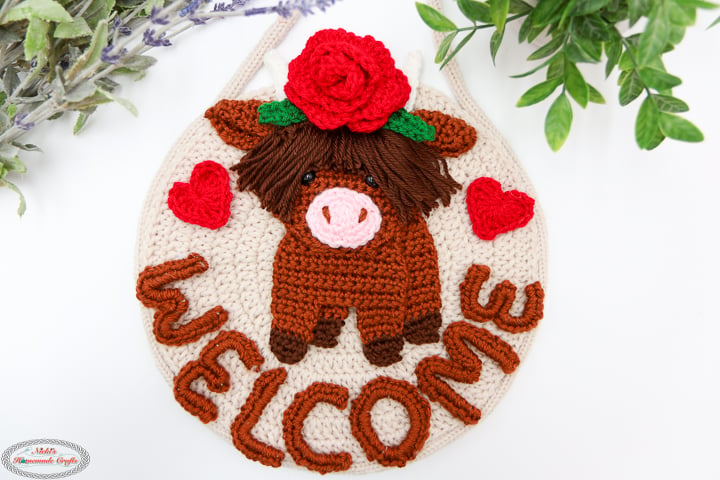
Mother’s Day/ Valentine’s Day
2 Hearts
really red
R1: MR, ch 3, 3 tr, 3 dc, ch 1, 1 tr, ch 1, 1 tr, 3 dc, 3 tr, ch 3, sl st to the ring, close the ring, fasten off.
Rose
really red
First dc are made as ATC (or ch 3) & count as 1 dc
ch 30, start from the 2nd ch from the hook
R1: *[1 dc, ch 2, 1 dc], sk 1, repeat from * until the end, turn
R2: *[5 dc] into ch-2, 1 sc between the dc’s that are ABOVE the skipped st, repeat from * until the end, fasten off, roll up the piece into a rose, sew through ALL layers multiple times to hold the rose in place.
Rose Leaves
grass
ch 19, start from the 2nd ch from the hook
R1: 1 sc in 2 sts, 1 hdc in 2 sts, 1 dc in 2 sts, 1 tr in 3 sts, ch 3, sl st to the same st as the tr, ch 3, 1 tr in 3 sts, 1 dc in 2 sts, 1 hdc in 2 sts, 1 sc in 2 sts, sl st
Sew to the bottom of the rose.
Add the soft side of the velcro to the back side of the rose AND the hearts so they can be added to the rough side of the velcro on the wall hanging.

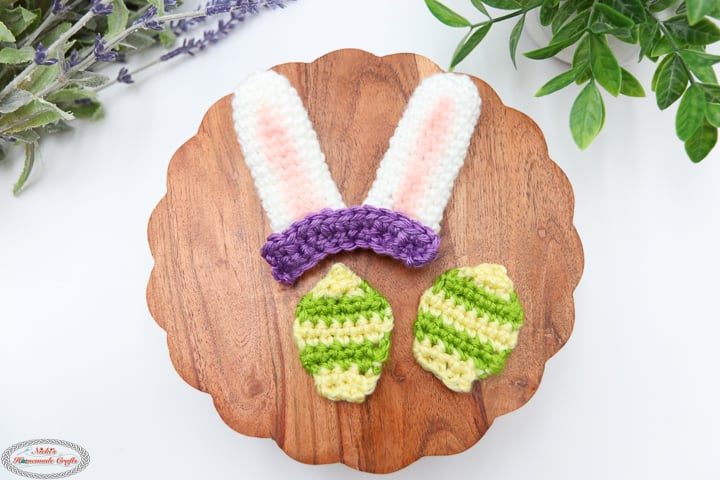
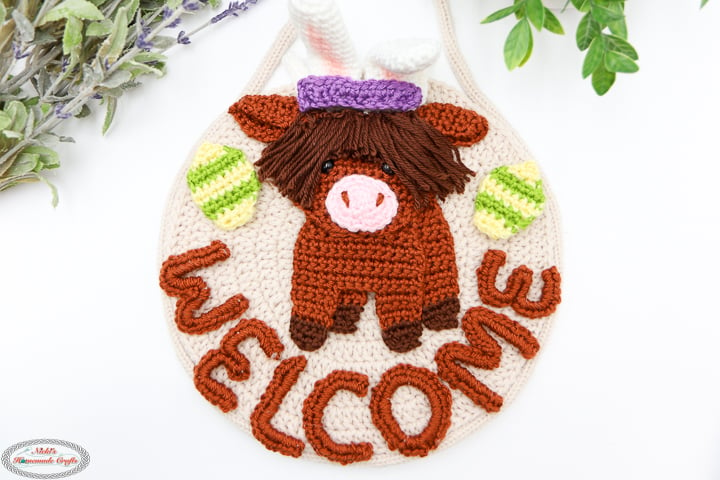
Easter
2 Ears
pearl
R1: MR, ch 1, 6 sc
R2: 2 sc per st
R3-16: 1 sc per st
Fasten off, weave in ends, and add some makeup blush.
Headband
heather
ch 11, start from the 2nd ch from the hook
R1: (1 sc, 2 sc) 5 times, turn
R2: 1 sc per st
Fasten off, sew the ears to the headband.
2 eggs
start with daylily, switch colors every 2 rows to limeade
Ch 4, start from the 2nd ch from the hook
R1: 1 sc per st, turn
R2-5: 2 sc, 1 sc per st, turn
R6-7: 1 sc per st, turn
R8-9: sc dec, 1 sc per st until 2 sts left, sc dec, turn
R10: sc dec 2 times, fasten off
Add the soft side of the velcro to the back side of the ears and headband AND the eggs, so they can be added to the rough side of the velcro on the wall hanging.
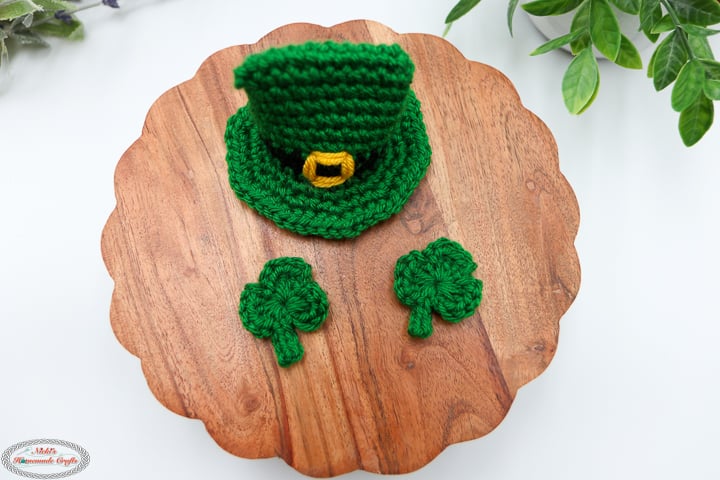
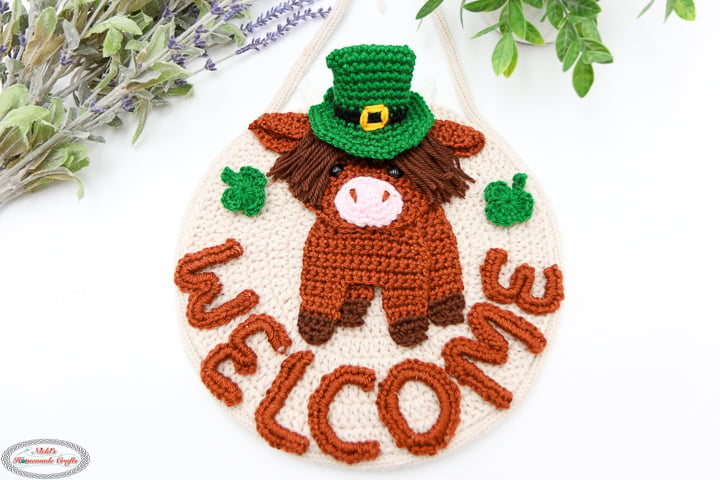
St. Patrick’s Day
2 Clovers
grass
R1: (ch 2, 3 dc, ch 2, sl st to the ring) 3 times, ch 4, start from the 2nd ch from the hook, 1 sl st in 3 sts, sl st to the ring, close the ring, fasten off.
Hat
grass
Ch 11, start from the 2nd ch from the hook
R1: 1 sc per st, turn 180 degrees and crochet on the other side of the chain, 1 sc per st, sl st (crochet in rounds now)
R2-7: 1 sc per st, sl st
Drop the grass and pick up the onyx color
R8-9: 1 sc per st, sl st
Cut onyx and pick up the grass again
R10: 1 sc per st, sl st
R11: (1 sc, 2 sc) 10 times, sl st
R12: (1 sc in 2 sts, 2 sc) 10 times, sl st
R13: (1 sc in 3 sts, 2 sc) 10 times, sl st
Using canary and sew a belt buckle square to the front around the onyx color.
Add the soft side of the velcro to the inner back side of the hat AND the clovers so they can be added to the rough side of the velcro on the wall hanging.
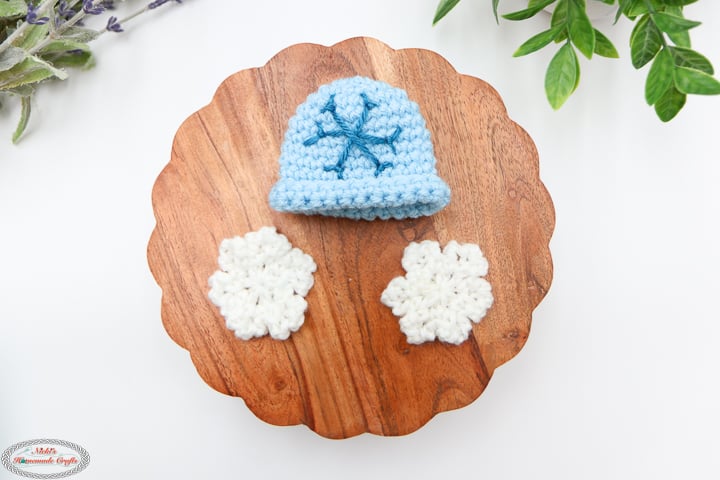
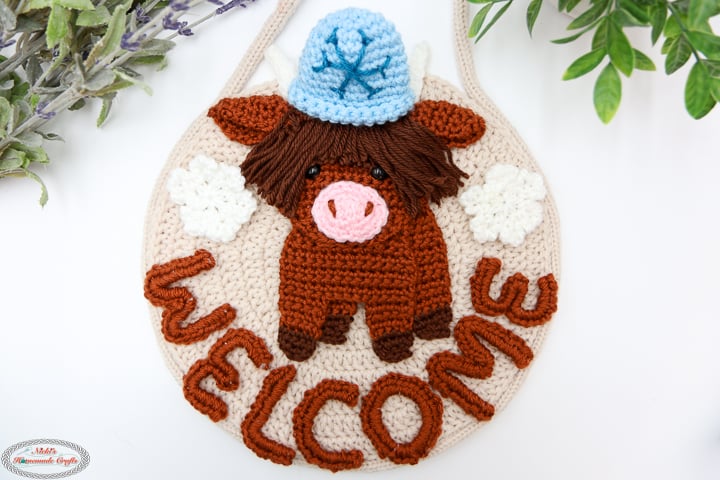
Winter
Beanie
sky
R1: MR, ch 1, 6 sc
R2: 2 sc per st
R3: (1 sc, 2 sc) 6 times
R4: (1 sc in 2 sts, 2 sc) 6 times
R5-13: 1 sc per st
Fasten off, weave in ends, fold over the end of the beanie for a “fold over beanie”.
Using the lagoon color, embroider on the snowflake using this image as a reference.
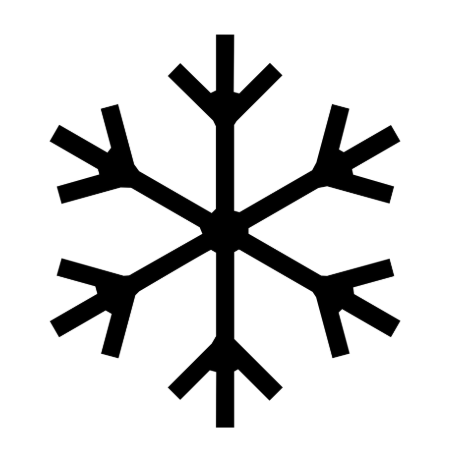
2 Snowflakes
white
R1: MR, ch 1, ( 1 sc, ch 2) 6 times, sl st
R2: into ch-2 spaces only (1 sc, (ch 2, sl st to the first ch made) 3 times, 1 sc) 6 times, sl st
Add the soft side of the velcro to the back side of the snowflakes AND the inner back side of the beanie so they can be added to the rough side of the velcro on the wall hanging.
Be sure to watch the entire video for PART 2 and answer the question at the end to qualify for the GIVEAWAY! AND don’t forget to post your picture for Part 2 in the Facebook Group “Crocheting with Nicki” with the hashtag #WelcomeCowCAL.
Part 3: Pieces for Christmas, Halloween, Fall, Graduation
LIVE Tutorial starts 12pm, PT on May 15th, 2026. The LIVE Tutorial Replay will be available after HERE on Youtube.
Written Pattern:
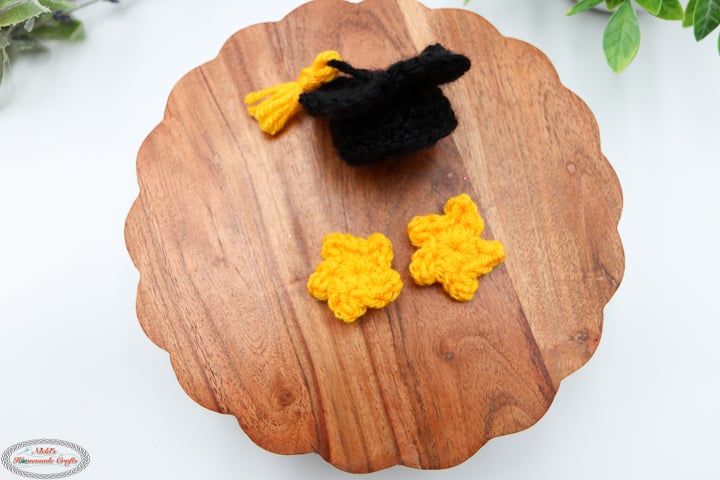
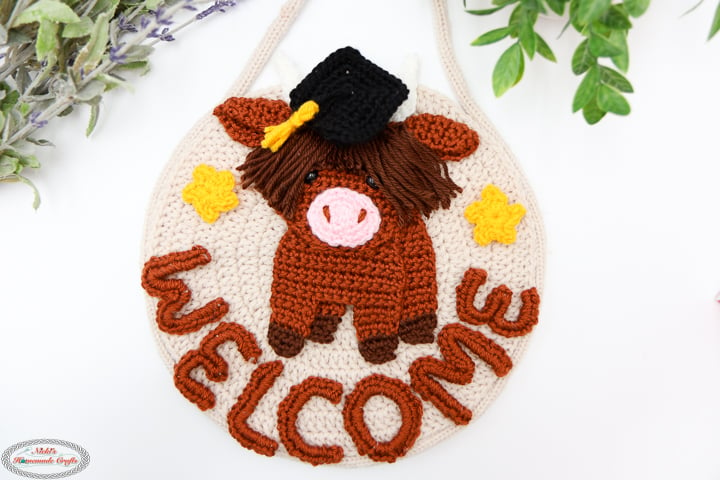
Graduation Accessories
2 Stars
canary
R1: MR, (1 sc, 1 dc, ch 2, sl st to the 1st ch, 1 sc) 5 times, fasten off and weave in ends
Top of the hat
onyx
R1: MR, ch 1, 8 sc, sl st
R2: ( 1 sc, 3 sc) 4 times, sl st
R3-5: *1 sc per st until you reach the 2nd sc of the 3 sc, into that st add 3 sc, continue from * all around, fasten off, weave in ends
Bottom of the hat
onyx
ch 18, start from the 2nd ch from the hook
R1-4: 1 sc per st
Fasten off and sew to the top of the head.
Tassel
canary
Cut 4 pieces of 2-inch strands, fold in half, wrap yarn around the fold, and fasten off. Then, add an onyx piece and then add to the top of the hat
Add the soft side of the velcro to the back and inner side of the hat AND the stars so they can be added to the rough side of the velcro on the wall hanging.
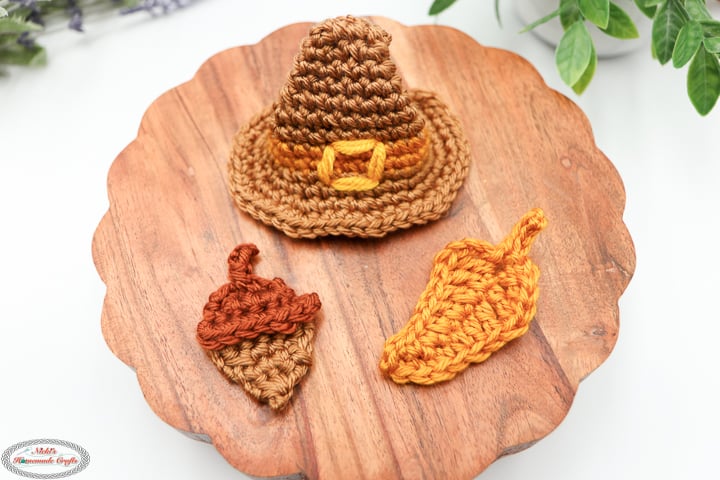
Fall/Harvest/Thanksgiving/Pilgrim Accessories
Leaf
honey
ch 9, start from the 2nd ch from the hook
R1: 1 sc in 2 sts, 1 hdc in 2 sts, 1 dc in 2 sts, 1 tr in 2 sts, ch 3, sl st to the same st as the tr, ch 4, start from the 2nd ch, 1 sl st in 3 chs, sl st to the same st as tr, ch 3, 1 tr in 2 sts, 1 dc in 2 sts, 1 hdc in 2 sts, 1 sc in 2 sts, fasten off, and weave in ends
Acorn
start with adobe
ch 5, start from the 2nd ch from the hook
R1: 2 sc, 1 sc, 1 sc, 2 sc, turn
R2: in front loop only, 2 sc, 1 sc in 4 sts, 2 sc, cut yarn
Use fawn
R2: in the back loop only (the leftover loop) 1 sc in 6 sts, turn
R3-4: 1 sc per st, turn
R5-6: 1 sc dec, 1 sc per st, turn
R7: 4 sc tog, fasten off
Reattach adobe color to the top of the acorn, 1 ATC (height of dc), fasten off, weave in ends
Hat
fawn
Ch 5, start from the 2nd ch from the hook
R1: 1 sc per st, turn 180 degrees and crochet on the other side of the chain, 1 sc per st, sl st (crochet in rounds now), sl st
R2: (1 sc in 3 sts, 2 sc) 2 times, sl st
R3: (1 sc in 4 sts, 2 sc) 2 times, sl st
R4: (1 sc in 5 sts, 2 sc) 2 times, sl st
R5: (1 sc in 6 sts, 2 sc) 2 times, sl st
R6: (1 sc in 7 sts, 2 sc) 2 times, sl st
R7: (1 sc in 8 sts, 2 sc) 2 times, sl st
Drop the fawn, pick up the honey color
R8: (1 sc in 9 sts, 2 sc) 2 times, sl st
R9: (1 sc in 10 sts, 2 sc) 2 times, sl st
Cut the honey, pick up the fawn color
R10: (1 sc in 11 sts, 2 sc) 2 times, sl st
R12: (1 sc in 12 sts, 2 sc) 2 times, sl st
R13: (1 sc in 2 sts, 2 sc) 9 times, sl st
R14: (1 sc in 3 sts, 2 sc) 9 times, sl st
Fasten off
Using canary and sew a belt buckle square to the front around the honey color.
Add the soft side of the velcro to the back and inner side of the hat AND the acorn and leaf so they can be added to the rough side of the velcro on the wall hanging.
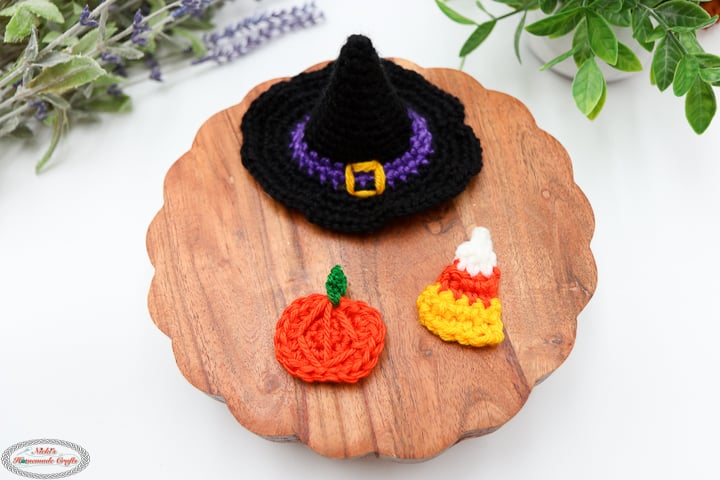
Halloween Accessories
Hat
Start with onyx
R1: MR, ch 1, 4 sc, sl st
R2: (1 sc, 2 sc) 2 times, sl st
R3: (1 sc in 2 sts, 2 sc) 2 times, sl st
R4: (1 sc in 3 sts, 2 sc) 2 times, sl st
R5: (1 sc in 4 sts, 2 sc) 2 times, sl st
R6: (1 sc in 5 sts, 2 sc) 2 times, sl st
R7: (1 sc in 6 sts, 2 sc) 2 times, sl st
R8: (1 sc in 7 sts, 2 sc) 2 times, sl st
R9: (1 sc in 8 sts, 2 sc) 2 times, sl st
R10: (1 sc in 9 sts, 2 sc) 2 times, sl st
R11: (1 sc in 10 sts, 2 sc) 2 times, sl st
Drop the onyx, start with grape jam
R12: (1 sc in 11 sts, 2 sc) 2 times, sl st
R13: (1 sc in 12 sts, 2 sc) 2 times, sl st
Cut the grape jam, pick up the onyx
R14: (1 sc in 13 sts, 2 sc) 2 times, sl st
R15: (1 sc, 2 sc) 15 times, sl st
R16: (1 sc in 2 sts, 2 sc) 15 times, sl st
R17: (1 sc in 3 sts, 2 sc) 15 times, sl st
Using canary and sew a belt buckle square to the front around the grape jam color.
Pumpkin
tangerine
R1: MR, ch 1, 6 sc, sl st
R2: 2 sc per st, sl st
R3: (1 sc, 2 sc, (1 hdc, 2 hdc) 2 times) 2 times
Sew on 3 lines top to bottom.
Using the grass color reattach at the top and crochet 1 ATC (height of dc), fasten off and weave in ends.
Candy Corn
start with canary, switch to tangerine in R3, and switch to pearl in R5
Ch 6, start from the 2nd ch from the hook
R1: 1 sc per st, turn
R2: 1 sc dec, 1 sc per st, turn
R3: 1 sc per st
R4: 1 sc dec, 1 sc per st, turn
R5: 1 sc per st, turn
R6: sc dec twice,
R7: sc dec, fasten off, and weave in ends
Add the soft side of the velcro to the back and inner side of the hat AND the pumpkin and candy cane so they can be added to the rough side of the velcro on the wall hanging.
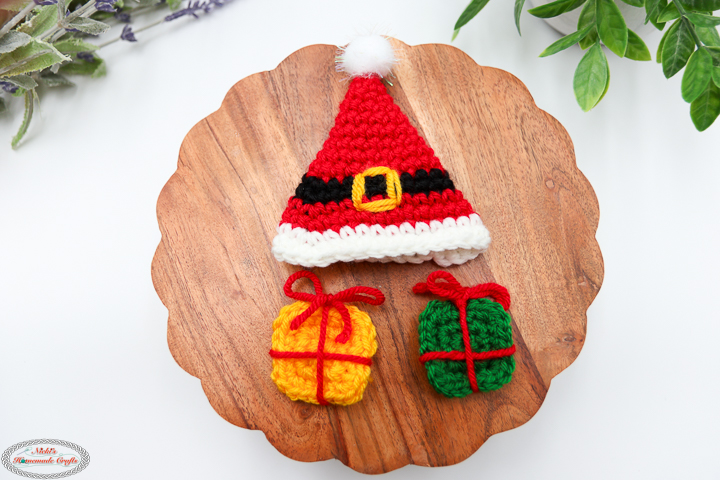
Christmas Accessories
Hat
Start with really red
R1: MR, ch 1, 4 sc, sl st
R2: (1 sc, 2 sc) 2 times, sl st
R3: (1 sc in 2 sts, 2 sc) 2 times, sl st
R4: (1 sc in 3 sts, 2 sc) 2 times, sl st
R5: (1 sc in 4 sts, 2 sc) 2 times, sl st
R6: (1 sc in 5 sts, 2 sc) 2 times, sl st
R7: (1 sc in 6 sts, 2 sc) 2 times, sl st
R8: (1 sc in 7 sts, 2 sc) 2 times, sl st
R9: (1 sc in 8 sts, 2 sc) 2 times, sl st
Drop the really red, start with onyx
R10: (1 sc in 9 sts, 2 sc) 2 times, sl st
R11: (1 sc in 10 sts, 2 sc) 2 times, sl st
Cut the onyx, pick up the really red
R12: (1 sc in 11 sts, 2 sc) 2 times, sl st
R13: (1 sc in 12 sts, 2 sc) 2 times, sl st
Cut the really red, start with pearl
R14: (1 sc in 13 sts, 2 sc) 2 times, sl st
R15: (1 sc in 14 sts, 2 sc) 2 times, sl st
Using canary and sew a belt buckle square to the front around the onyx color. Optionally hot glue on a pom pom, or leave it off.
2 Gifts
1 gift is canary with really red ribbon, the other gift is grass with really red ribbon.
R1: MR, ch 1, 8 sc, sl st
R2: (1 sc, 3 sc) x 4, sl st
R3: *1 sc per st until you reach the 2nd sc of the 3 sc, into that st add 3 sc, continue from * all around, fasten off, weave in ends
Wrap really red yarn around the squares like you would for a gift, and add a bow tie on the top.
Add the soft side of the velcro to the back and inner side of the hat AND the gifts so they can be added to the rough side of the velcro on the wall hanging.

Be sure to watch the entire video for PARTs 1-3 and answer the question at the end to qualify for the GIVEAWAY! AND don’t forget to post your picture for Part 3 in the Facebook Group “Crocheting with Nicki” with the hashtag #WelcomeCowCAL.
Party with PRIZES
LIVE PARTY starts 12pm, PT on May 16th, 2026. The LIVE Tutorial Replay (but Prizes can only be won LIVE) will be available after HERE on Youtube.
We’ll have another CAL coming soon after this one ends! Be sure to stick around and be on my newsletter to not miss out!