How to Crochet a Multipurpose Crochet Bag – Free Pattern
This post includes affiliate links.
This free crochet pattern will teach you how to crochet a Multipurpose Crochet Bag with removable pockets using the Suzette Stitch and the Waistcoat stitch and also comes with a video tutorial.
I am so excited about this pattern I created. It is called the Multipurpose Crochet Bag. When I recently started multiple different projects that had lots of different colors, I realized that I needed to find a way to take them all with me when running errands so I could work on them while waiting at the doctor’s office, for example.
And sometimes I really don’t know which mood I will be in, so I need all my WIPs with me. Am I the only one who does that? lol

Anyways, I realized that my other yarn storage bags were either full, broken, or did not have the functionality I wanted in a yarn storage bag, so I thought, well, I will make my own, the way I like it, with lots of pockets for hooks, scissors, pattern printouts etc.
And this is how I created this Multipurpose Crochet Bag. I love it and am so happy I could jump in the air.
Just to get an overview about what you will need and what you need to crochet, as well as what you can do with it, I created this fun short video to introduce you to the Multipurpose Crochet Bag. Enjoy!
Subscribe to my Youtube Channel here:
[youtube-subscriber channelID=”UCSI4OeQQnxVQEAwMGeTCn1Q” layout=”full” subscribers=”default”]
But, before I show you the materials and the actual free crochet pattern, please also be sure to add this pattern to your Ravelry Favorites by clicking the button below as that allows my pattern being shown to more people who might want to see it and also want to make it.

If you add this pattern to you Ravelry Favorites and share it on social media as a link, I will be able to share a lot more free crochet patterns for you all.
In addition, I created a downloadable pdf for you all, that has all the pictures separated from the pattern. So you can choose whether you want to print them or not. That can save you a lot of ink in the long run.
You can get the crochet pattern for the Multipurpose Bag on Ravelry, Etsy, LoveCrafts, or my new membership The Crochet Club. The Crochet Club has so much more to offer than just PDF patterns! You get tutorials, references and the complete VIP treatment as well.
If you pay just twice the amount as this pattern costs and you have a month’s worth of The Crochet Club Membership with a lot more patterns! It’s well worth it.
If you do not want to join The Crochet Club, you can also purchase the ad-free, printer-friendly PDF pattern at the links below. But IF you join the All-Access Membership you will automatically get this pattern.
In addition, I created a downloadable PDF that has all of the pictures separated from the pattern, so you an choose whether you want to print them or not. This can save you a lot of ink in the long run. You can buy the ad-free, printer-friendly PDF on Ravelry, Etsy, LoveCrafts, and my VIP crochet membership, The Crochet Club.


Let me first tell you what you will need to make the bag, before I will tell and show you how to make the bag.
How to Crochet a Multipurpose Bag Easily
You will need:
- Caron One Pound yarn in the colors Hollyhook, Scarlet, Deep Violet, Claret
- 5.0 mm hook
scissors
tapestry needle - plastic canvas (optional, for stability, but I did not use it)
- stitch marker
Gauge:
2 Suzette stitches x 2 rows =1 square inch
Stitches used:
hdc – half double crochet- sc – single crochet
sl st – slip stitch- suzette stitch (1sc, 1dc in the same stitch,
sk next st) - waistcoat stitch (
wst )
Size:
The bag is approximately 10 inches in height, 10 inches in width (with yarn inside, but not stretched out) and 15-16 inches in length.
Instructions:
Actual Bag Part of the Multipurpose Crochet Bag
Working on the bottom of the bag first, then you will work your way upwards.
Start with the yarn Deep Purple, use a stitch marker
Round 1: Ch 31, 2 sc in the 2nd chain from the hook, 1 sc in the next 28 chs, 3 sc in the last ch, (now you will work on the other side of the chain, working yourself backwards, so it is a round) 1 sc in the next 28 chs, 1 sc in the first ch (where you place the 2 sc in the beginning), do not sl st, use a marker and continue to the next round
Round 2: place 2 sc each in the next 2 sts, place 1 sc in the next 28 sts, place 2 sc each in the next 3 sts, place 1 sc in the next 28 sts, place 2 sc in the next st, do not sl st, use a marker and continue to the next round
Round 3: 2 sc, 1 sc, 2 sc, 1 sc, place 1 sc in the next 28 sts, [2 sc, 1 sc] 3 times, place 1 sc in the next 28 sts, 2 sc, 1 sc, do not sl st, use a marker and continue to the next round
Round 4: [2 sc, 1 sc, 1 sc] 2 times, place 1 sc in the next 28 sts, [2 sc, 1 sc, 1 sc] 3 times, place 1 sc in the next 28 sts, 2 sc, 1 sc, 1 sc, do not sl st, use a marker and continue to the next round
Round 5: [2 sc, 1 sc in the next 3 sts] 2 times, place 1 sc in the next 28 sts, [2 sc, 1 sc in the next 3 sts] 3 times, place 1 sc in the next 28 sts, 2 sc, 1 sc in the next 3 sts, do not sl st, use a marker and continue to the next round
Round 6: [2 sc, 1 sc in the next 4 sts] 2 times, place 1 sc in the next 28 sts, [2 sc, 1 sc in the next 4 sts] 3 times, place 1 sc in the next 28 sts, 2 sc, 1 sc in the next 4 sts, do not sl st, use a marker and continue to the next round
Round 7: [2 sc, 1 sc in the next 5 sts] 2 times, place 1 sc in the next 28 sts, [2 sc, 1 sc in the next 5 sts] 3 times, place 1 sc in the next 28 sts, 2 sc, 1 sc in the next 5 sts, do not sl st, use a marker and continue to the next round
Round 8: [2 sc, 1 sc in the next 6 sts] 2 times, place 1 sc in the next 28 sts, [2 sc, 1 sc in the next 6 sts] 3 times, place 1 sc in the next 28 sts, 2 sc, 1 sc in the next 6 sts, do not sl st, use a marker and continue to the next round
Round 9: [2 sc, 1 sc in the next 7 sts] 2 times, place 1 sc in the next 28 sts, [2 sc, 1 sc in the next 7 sts] 3 times, place 1 sc in the next 28 sts, 2 sc, 1 sc in the next 7 sts, do not sl st, use a marker and continue to the next round
Round 10: [2 sc, 1 sc in the next 8 sts] 2 times, place 1 sc in the next 28 sts, [2 sc, 1 sc in the next 8 sts] 3 times, place 1 sc in the next 28 sts, 2 sc, 1 sc in the next 8 sts, do not sl st, use a marker and continue to the next round

You will now start working upwards, so in this next round ONLY, work only in the back loops for each stitch you make. Be sure to use a stitch marker as we never sl st until the bag is finished!
Round 11: place *1 sc and 1 dc in BLO only in the same st, sk the next st, continue from * all around
Now work normally again by crocheting into both loops per stitch.
Round 12-16: place *1 sc and 1 dc in the same st, sk the next st, continue from * all around
Change colors to Hollyhook. Here is how I do it, so there is a smooth transition rather than a hard color change:

Round 17-22: place *1 sc and 1 dc in the same st, sk the next st, continue from * all around
Change color to Claret
Round 23-28: place *1 sc and 1 dc in the same st, sk the next st, continue from * all around
Change color to Scarlet
Round 29-34: place *1 sc and 1 dc in the same st, sk the next st, continue from * all around


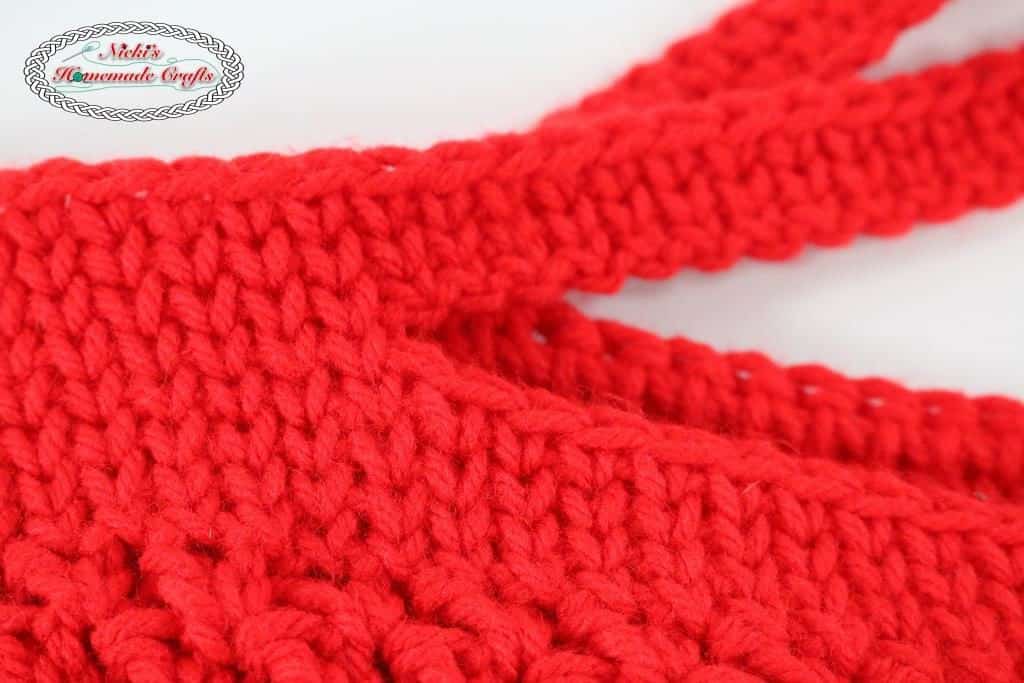
Now you will do the waistcoat stitch (wst) in each stitch (no skipping stitches) that will help stabilize the top of the bag including the handles. If you do not know how to do this stitch, please see the video on the bottom of this pattern. You could just do a normal single crochet, but it will be less stable and looks different.
Round 35: place 1 sc in each stitch all around (foundation row for the wst)
Round 36-37: place 1 wst in each stitch all around
We will now add the handles. Be sure to check that you add the handles in the middle of each side. Sometimes stitches are skipped by accident, so if my number does not match up with yours, just adjust it.
Round 38: 1 wst in the next 33 sts, ch 30, sk the next 21 sts, 1 wst in the next 36 sts, ch 30, sk the next 21 sts, 1 wst in the next 3 sts
Round 39: 1 wst in the next 33 sts, 1 sc in each ch of the chain of 30, 1 wst in the next 36 sts, 1 sc in each ch of the chain of 30, 1 wst in the next 3 sts
Round 40-41: place 1 wst in each stitch all around, sl st to finish the bag. Weave in the ends.
Large inside main divider of the Multipurpose Crochet Bag
Start with the color Deep Purple.
Row 1: Make a foundation hdc chain of 50 and turn. The foundation hdc chain is where you make the chain and the first row of hdc at the same time. If you do not know how to do this, I actually show it in the video where you learn how to create the small divider pockets. So be sure to check that out. Or see the pictures below (ignore the red color).

Row 2-4: Ch 1 and place 1 hdc in each stitch, turn
Change color to Hollyhook.
Row 5-9: Ch 1 and place 1 hdc in each stitch, turn
Change color to Claret.
Row 10-14: Ch 1 and place 1 hdc in each stitch, turn
Change color to Scarlet.
Row 15-19: Ch 1 and place 1 hdc in each stitch, turn
Sl st to finish this main divider. Weave in the ends.

Small inside pocket dividers of the Multipurpose Crochet Bag:
Make 6 pockets in total.
Start with Scarlet.
Row 1: Make a foundation hdc chain of 15 and turn
Row 2-5: Ch 1 and place 1 hdc in each stitch, turn
Change color to Claret.
Row 6-10: Ch 1 and place 1 hdc in each stitch, turn
Change color to Hollyhook.
Row 11-15: Ch 1 and place 1 hdc in each stitch, turn
Change color to Deep Purple.
Row 16-20: Ch 1 and place 1 hdc in each stitch, turn

NOW we work the way around and work our way back upwards, so that we do NOT have to sew the pockets in the end by including the first and last stitches from the already made stitches. If that does not make sense, including the instructions below, I highly recommend watching the video below.

Row 21: Ch 1, 1 hdc in the first stitch and the first stitch 2 rows below (it will bend and create a pocket now), 1 hdc in the next 13 sts, 1 hdc in the last stitch and the last stitch 2 rows below. Turn
Row 22-24: Ch 1, 1 hdc in the first stitch and the first stitch 1 row up from the one just attached, 1 hdc in the next 13 sts, 1 hdc in the last stitch and the last stitch 1 row up from the one just attached. Turn
Change colors to Hollyhook.
Row 22-24: Ch 1, 1 hdc in the first stitch and the first stitch 1 row up from the one just attached, 1 hdc in the next 13 sts, 1 hdc in the last stitch and the last stitch 1 row up from the one just attached. Turn
Change colors to Claret.
Row 25-29: Ch 1, 1 hdc in the first stitch and the first stitch 1 row up from the one just attached, 1 hdc in the next 13 sts, 1 hdc in the last stitch and the last stitch 1 row up from the one just attached. Turn
Change colors to Scarlet.
Row 25-29: Ch 1, 1 hdc in the first stitch and the first stitch 1 row up from the one just attached, 1 hdc in the next 13 sts, 1 hdc in the last stitch and the last stitch 1 row up from the one just attached. Turn
Sl st at the end and weave in the ends.
Subscribe to my Youtube Channel here:
[youtube-subscriber channelID=”UCSI4OeQQnxVQEAwMGeTCn1Q” layout=”full” subscribers=”default”]
Adding yarn strings to the corners of each main and pocket dividers for the Multipurpose Crochet Bag
Cut for the corresponding color a 1 yard piece of yarn and attach it by knotting or a different technique to the corner of each divider.


Assembly of the dividers to the Multipurpose Crochet Bag
Now you can add the dividers into the bag. Start with the main divider and then add the pocket dividers in the locations as you wish. See the pictures below for inspiration.


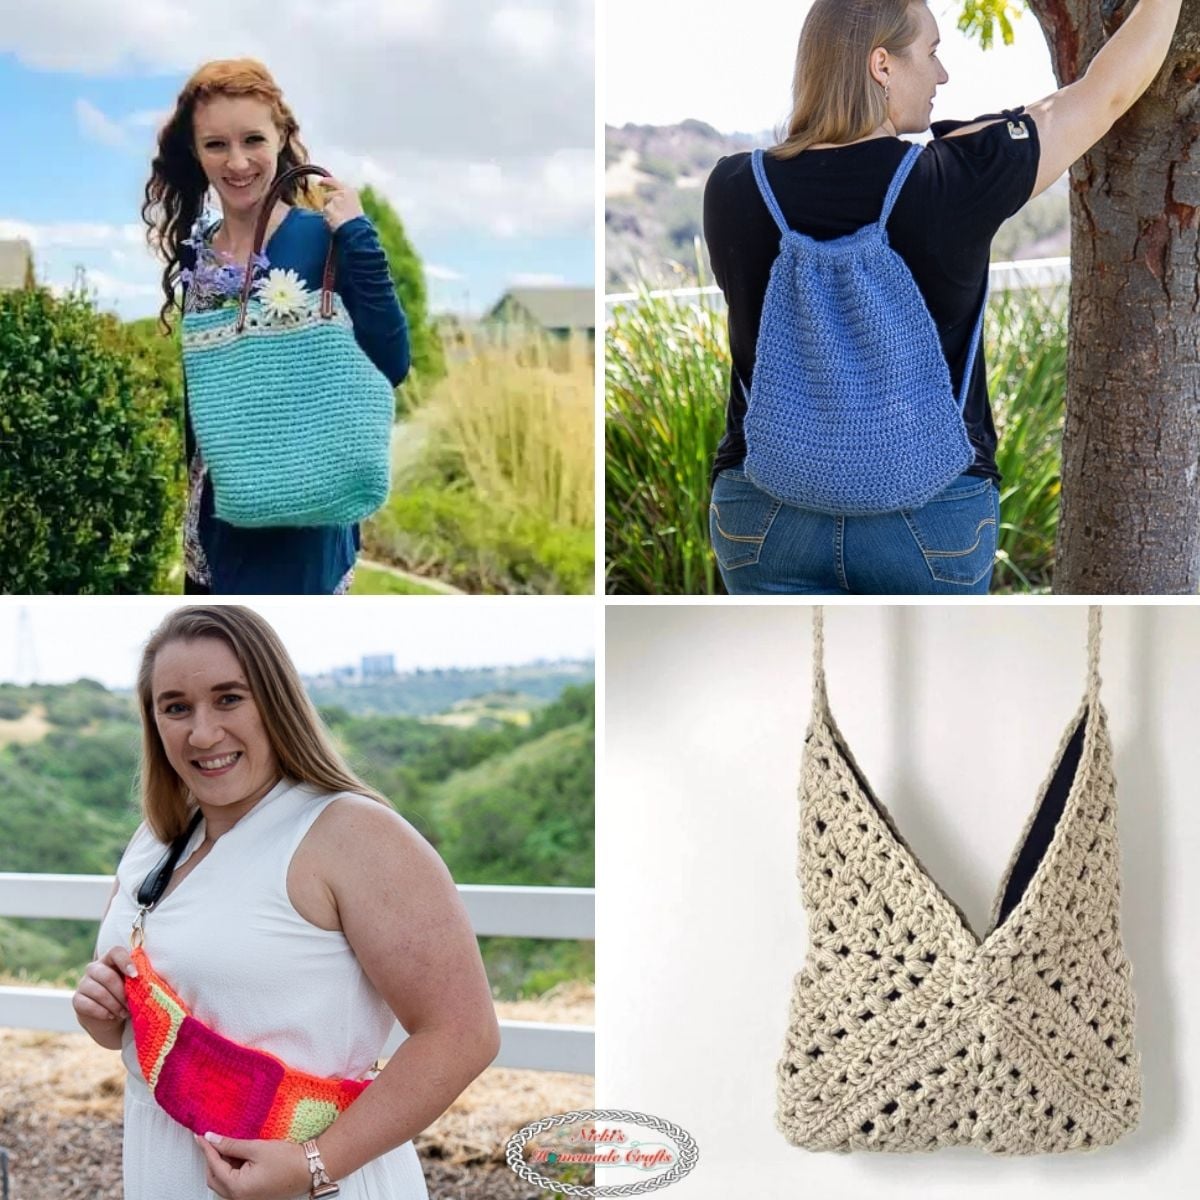
Need more Free Bag Crochet Pattern inspiration? Check out these ones:


I hope you love this
Also, I share many more free crochet patterns and tutorials quite often in my Newsletter. Just for signing up I will send you a free ebook. If you are interested, please sign up below. I’m pretty sure you will enjoy my newsletter and support group on Facebook.
See what Angela, from my crochet group, said: “…Just today alone, I was speaking to a friend and mentioned this group to her because she’s having a hard time emotionally. I told her she needed to join so she can learn some cool crochet techniques and keep herself busy. You’re my first “go-to” group. Not only do you have some amazing ideas… But it’s you as a person that I can relate to. You’re kind, generous, and probably take things to heart more than you should (I do that too lol)… But you’re awesome! …”


This would be great for any project. I’m doing a rainbow blanket so I need space for several skeins. This tote is perfect!
LOVE this!! Just bought a few different Sweet Roll cakes so I think I’ll use one for this 😉
Hi! I just subscribed!, and im having difficulty understanding the corner curve part. . starting the bag and im on row 5 (beginning) . The pattern says “two times” on the beginning curves on rounds 5-10. If i do that will the count be off?… I dont understand math … but i count and it seems like its going to be off … Please help. Thank you and God bless.
Hi Annette,
thank you for contacting me and I am sorry it took me a day to respond, but I am currently working on a new pattern being published today. Anyways, there are three increases per curve as you can see on the picture below those mentioned rounds. You first make 2 increases on one curve (generally speaking), then do the 28 middle stitches and then you increase three times on the other curve. After that, you do the 28 stitches in the middle again, before you do the last increase (which is the third) on the first curve. Does that make sense? The math is correct. If it does not, feel free to contact me again and I will try to be more detailed. You can also email me if that works better for you. Thanks you:-)
Ohhhhhh ok I feel so. Dumbfounded. Makes sense now thank you:) happy crocheting
Hello! This is an amazing pattern! Would any other kinds of yarn work? Do you use the entire pound of each color? I have lots of different yarns in my stash and was wondering if I could use some of it up instead.
Thank you for sharing! (I forgot to say this in my original post)
Hi Jennifer,
Thanks for your comment and question. I did not use the full skein on any of the colors. The skeins are worsted weighted yarn in acrylic. I do not think it would be a good idea to use cotton (in case you are thinking about that), unless you do not integrate the pockets/dividers, because cotton would make the purse very heavy. But any other yarn would be great. I would Loe to see the bag made with leftover yarn. If you do make it that way, please share it on my Facebook page . Thanks again for contacting me and let me know if you have more questions 🙂
Beautiful. Thanks. I’m making one for myself.
I started this today, but when i get to round 5, im stuck there does not seem to be enough stitches, im not understanding the pattern…. please help!! (2sc, 1sc in the next 3 stitches) 2 times—- does that mean would that mean a total of 9 sc then 23 sc then (2sc, 1sc in the next 3 stitches ) not sure how many…PLEASE HELP…………..I would love it you could put the stitch count at the end of each round, it would help it i counted them at the end to make sure i have the correct amount of stitches.
Thank you very much.
Don’t over think it. You will do 2/3 of the first half circle, do the long line, then do the half circle on the other side, the long line and then finish up the first half circle (last 1/3). So the first half circle is 10 stitches (2 sc, 1 sc in the next 3 sts and then again 2 sc, 1 sc in the next 3 sts = 10 sts), then crochet 28 stitches, [2 sc, 1 sc in the next 3 sts] 3 times = 15 sts, crochet 28 sts and then finish the first half circle by crocheting another 2 sc, 1 sc in the next 3 sts = 5 sts.
Does that makes sense now? Maybe if you draw it out for the oval it will make more sense. Let me know if you need more help.
How would you use the plastic canvas for stability?
Adding it to the bottom of the bag