Rosebud Crochet Stitch Pattern – Photo and Video Tutorial
This post includes affiliate links.
When it comes to roses, I am a complete romantic. I love roses, rosebuds and all flowers in general. So this rosebud crochet stitch pattern was a must on my list of tutorials I wanted to show off to the world. The stitch pattern is very easy although it might look a bit daunting at first, but trust me, once you get started and made one rosebud, you will have no problems making lots of them.
As the rosebuds are just an addition to the actual “background” flat pattern you can easily just learn how to crochet the rosebuds and then add them to whatever project you like. However, in this tutorial, I will show you every detail of the minimum amount of repeat stitches. Then you can adjust them yourself for your own pattern design.
To make it easier to understand, I included a very detailed video tutorial below as well. I go into further details on how you can adjust the stitch pattern very easily. So, if you need more information or the photo tutorial is not clear enough for you, be sure to check out the video tutorial at the end of this tutorial.
In fact, I used this pattern to create a Mother’s Day/Birthday present for my Mom. Check out the Rosebuds Picture Frame pattern here.

Rosebud Crochet Stitch Pattern Video Tutorial
Subscribe to my Youtube Channel here:
[youtube-subscriber channelID=UCSI4OeQQnxVQEAwMGeTCn1Q layout=full subscribers=default]
Rosebud Crochet Stitch Pattern
Before diving into the tutorial, please read the following important notes about how to adjust the pattern.
Rosebud Stitch Pattern Math
This tutorial focuses on having 15 stitches between the rosebuds. This number is the number of multiples of the beginning chain. If you want to change that number, you can.
That will increase or decrease the distance between the rosebuds. Furthermore, the additional number of chains you add to the beginning chain equals the added up stitches (in this example 10) before the first rosebud (for this example 5) and after the last rosebud (for this example 4) minus one stitch as it counts as the turning chain.
In addition, the next set of rosebuds is shifted inwards to be in between the rosebuds from the previous set. You will be 12 stitches inwards from the beginning of the row when you make your first rosebuds.
That number 12 comes from the initial 5 stitches (of the 10 previously mentioned) plus about half of the distance between the rosebuds (15:2 = 7.5, so I chose 7). Therefore this number must be changed if you change any of the beginning chain numbers.
After the first rosebud in that specific shifted row, you will still crochet the normal stitches that is the distance between the rosebuds (in this example 15 stitches).
This would mean you will finish that row with about equal amount of stitches as you started (in this example it is 12 stitches, meaning 8 from the other half of the 15 stitches plus 4 stitches).
This should hopefully clear up some confusion that would have arisen. Again be sure to check out the video tutorial as well.
Written Instructions for Rosebud Pattern
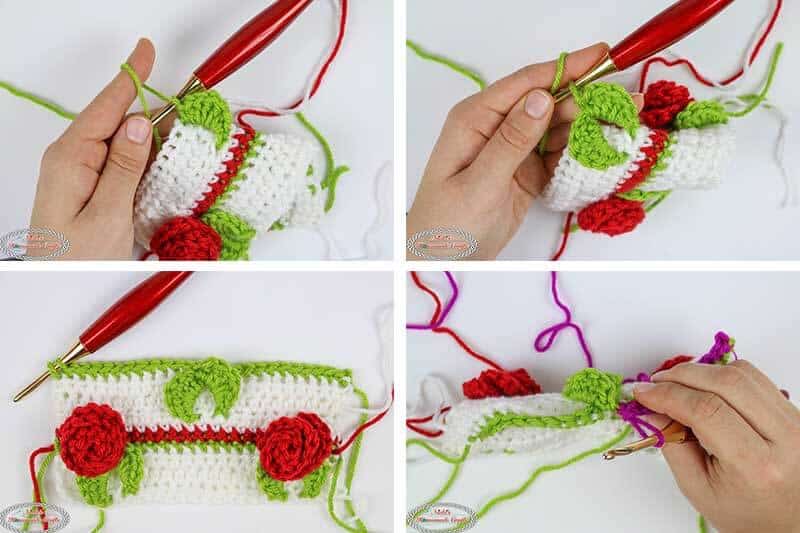
1. Chain a multiple of 15 (or a number that you want the roses to be apart from) plus 10 (the number of stitches added up on each end plus 1). For this example, I have 25 chains. Then, starting from the 2nd ch from the hook, 1 hdc in each st. For the next two rows, ch 1, 1 hdc in each st. Change the color to kiwi. 1 sc in each of the next 5 sts. Ch 3 and place a front post single crochet (fpsc) 3 rows down (see where my hook points at). Now, crocheting around the ch 3, place this sequence [1 sc, 1 hdc, 3 dc, 1 hdc, 1 sc].

2. Ch 3 and place another fpsc 2 stitches to the left of the first one. And repeat the sequence on this ch 3: [1 sc, 1 hdc, 3 dc, 1 hdc, 1 sc]. Now without skipping any stitches in the normal row, place 1 sc in each of the next 15 sts, then ch 3.

3. Now repeat the same process as the first leaf set. When finished, 1 sc in each of the remaining 4 sts.

Change color to really red. Ch 1, 1 sc in the first 4 sts. Ch 14, starting from the 4th ch from the hook, place 3 dc in each ch until you reach the last sc again. Now, roll up the swirly string to make it into a rosebud.

4. Turn the rosebud over and push the hook through all layers and crochet a single crochet (do this twice to secure it). Be sure the rosebud is turned towards the leaves. Now, place 1 sc in the next 15 sts, and then ch 14. And repeat the process of making a rosebud.

5. After securing the rosebud, place 1 sc in the remaining 5 sts. Change color to white. Ch 1, 1 sc in each st. Then for the next 3 rows, ch 1, and place 1 hdc in each st. Then change colors to kiwi again. We are now shifting the rosebuds between the previous rosebuds but several rows above. So, ch 1 and place 1 sc in each of the next 12 sts. Ch 3.

6. Now repeat the process as before by making 2 leaves. Then place 1 sc in each st until the end of the row. Change the color to bright violet. Ch 1 and place 1 sc in each of the next 12 sts.
7. Now, repeat the same process as you did before by making a rosebud.

8. Finish the row by placing 1 sc in each st. *To continue the sequence, repeat the 4 rows (1sc row and 3 hdc) in white and then repeat the kiwi and really red rows. Next, repeat the 4 white rows following with the kiwi and bright violet rows. Repeat from * until finished.

In order to learn how to adjust the above sequence for wider pieces such as blankets or pillowcases or anything else, please watch the video below as I go into detail how you would go about doing that. Again, be sure to check out my pattern for this stitch called the Rosebuds Picture Frame.
Please share this tutorial with the world, by clicking the corresponding social media buttons above or below. Thanks.