How to Make Great Videos and Photos for Crochet, Knitting and Sewing – DIY Craft Tutorial
This post includes affiliate links.
In this tutorial, I will show you how I make my videos and take my photos, what I use in order to make and edit them. This tutorial should provide you with everything you need in order to become successful in Photo and Video making for any business. I will focus on DIY crafts such as crocheting and knitting as well as sewing, but it can work for so many other niches as well.
First of all, I will admit to you that I do NOT have a crafting studio ROOM which means I will show and tell you how I improvise and still be able to do what I want and need to do, even though I do not have an exact designated room for it. I have my Photo and Video Studio in the corner of my master bedroom.
When I first started out with my crafting business, I only sold already made items on Etsy. I was not doing so well, because the competition was so big. As I am a very creative person, I like to make my own designs as well, so I decided to only focus on creating crochet patterns and tutorials.
Once I made that shift, I started growing fast. I realized that the competition is not as big as the one for already made crochet items. Also, I wanted to go on auto-pilot rather than feeling like I am a crocheting machine. I have huge amounts of respect for those that can crochet so fast and make a lot of money (or a good extra amount for Christmas) with hand-made crochet creations and sell them on Etsy, craft fairs or otherwise.

So I focused on creating crochet patterns and tutorials, making them available on my website, as well as Etsy and Ravelry pdf downloads. Now, in order to get the attention of the makers and buyers for your niche, you have to be able to present yourself well. I focus on having great customer service where I connect with my followers through Facebook live videos, email, messages or comments on other social media platforms.
But another very important aspect I put a lot of attention to are photos and videos. Once I started having a great photo and video studio, I realized that my videos were going viral and patterns were shared often on social media, because they were presented well.
So, when I first started, I crocheted in the family room, the master bedroom or when I was waiting somewhere while running errands. I have all my yarn stored in my closet (it is a walk-in) or in small boxes in the master or family room for the projects I am working on. Furthermore, I have one table where I have my “photo and video studio” and I do all my editing and writing on my computer in the living room.
I do, now, have an amazing Yarn storage wall that I love so much. I created myself and you can, too.
Thought about creating your own website. I have a complete guide for it HERE!!!
So you can see that you do not need much space in order to do what I do, create crochet patterns and tutorials. So do not feel bad if you don’t have a designated room for your hobby. Even though I would like to have a designated room, I can’t have it right now and I am alright with it as I have a very supportive husband as well as kids who understand what I do and never have issues with it.
Ever thought about becoming a a Crochet or Knitting Designer? Check out my Step – by – Step Guide HERE!
Now, let’s talk about what I actually use in order to great pictures and videos whether it is for Youtube, Facebook, Etsy, Ravelry or any other crafting or social media page.

EQUIPMENT NEEDS FOR A GREAT PHOTO AND VIDEO STUDIO
Below you can see my setup for my photo and video studio. I have an Asus Monitor on the left side for which you will need a mini HDMI to connect the camera to the monitor. The camera hanging above (the setup more detailed explained below) and movable microphone on the right. The microphone requires a Phantom Power Supply to work with your camera. The amazing white PVC backdrop is my favorite backdrop of all time. I did DIY to hang it onto my previous backdrop and love it.

The studio is actually much brighter than the picture shows because I need to use my cell phone to take this picture. I also have 2 soft boxes, one on the left and one on the right side.
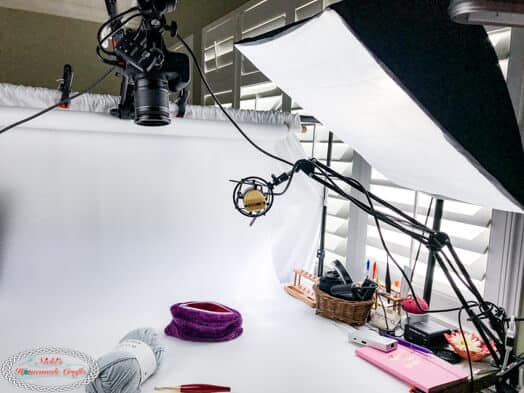
So the most important items shown in this picture above is my camera. I had point and shoot cameras before, which were alright, but I had so many more possibilities when I got a DSLR camera. This camera, in particular, is the Canon Rebel T6i. I love it. I have it connected to a wireless shutter which you can see below. I seriously, can’t live without it. I take this shutter with my camera everywhere. It allows me to take pictures easily without anyone around.

I bought the kit for this camera that included a lot of extra things. You can get it HERE. You might be thinking the price is high. Trust me it is not! Because you get the camera, 2 lenses and so many other things with it. If you would look at the price of just the lenses you would pay the same price or even more than this entire kit! It is a fantastic deal. I am beyond happy with it.

Furthermore, I bought these small lights that were also part of a kit. You can find the kit HERE. I do have to say that I do not use the lightbox anymore that came with it, as I created the studio you see in this picture after getting the lightbox kit. I do not use this setup much lately. But it works ideal for small items such as jewelry, etc.

Next, I realized I needed even more light and a backdrop, so I got this kit HERE. I do not use the umbrellas as you can tell because I wanted more light rather than dim and spread light.

Furthermore, I had already a very inexpensive IKEA table in order to place my studio on it. I got this table top HERE, plus table feet.
Once you have your studio setup, you can create images such as the one below. I also have a Youtube Channel where you can see my videos in action.

In addition, I recently also purchased another backdrop set that looks like real wood on pictures. I love it as it makes your items pop out and provide some elegance to your pictures as you can see in these pictures below. You can get the wood backdrop set HERE. In case you are interested in the FREE CROCHET PATTERNS for the items below, just click the photo.


Now, in order to make videos, I had to purchase one extra piece of equipment. I bought the items shown below in the picture. This picture is old, BUT I still use the same setup to hang my camera.


The piece is actually 2 different orders. One is the 2 section arm which you can get HERE. And the other part is the clamp to attach it to the backdrop pole that is shown in the pictures above. The clamp can be bought HERE.


Now you would attach your camera to it and great awesome pictures and videos.
EDITING YOUR PHOTOS AND VIDEOS
In order to actually edit my photos, I use a Macbook Pro, but you can use any computer you want as the photo editing software I use, can be used with any computer. I use Adobe Lightroom and Photoshop to create stunning photos. After editing my photos and adding my watermark, I save my photos and then compress them to a smaller size as most websites require you to have small pictures, because it would slow down the website (even if you have your own). That is not a good customer experience when you have to wait for things to load, right? I also use Adobe Spark to create awesome Memes and Title Pictures.
In order to edit your videos, I use Adobe Premier Pro. It seems expensive, but wow, it made such a difference. I used to use free software, but I was always limited on what I was able to do. Now, the sky is my limit on how to create the best videos ever.
Here I would like to recommend a couple of other neat things I bought that help me to show off certain items. Click on the images to purchase!


I hope you liked this detailed tutorial on what I use and see how my studio is set up. Please share it with the world on social media by clicking the links below or above. Thank you so much.


Hi, Nicole–What a great blog post. And your videos are wonderful! It’s encouraging to see how you are able to do so much with the space that you have. Can I ask a question about your camera set-up? Which focus setting do you choose on your Canon Rebel T6i to maintain clarity of your moving hands? You do a great job!
I try to make sure my hand does not move up or down much and at the same time have the camera turned off for autofocus. But sometimes I forget and still make videos with the focus turned on. As long as I do not move too much up and down the focus stays the same as it needs to be. Creating crochet videos really helps others and makes me happy. So I am glad you like them. Thanks
Nicki, Thank you SOO much for sharing this info. It is exactly the kind of post I have been looking for and within my niche too!! I started a crochet and crafting blog in March and am having a blast! But I’ve been looking for ways to improve my presentation. Luckily I have a very sunny house and crochet table, but my camera is sub par. Unfortunately, your recommended camera is not really in my budget YET. But I’ve already started saving :-). Thank you for the great tutorial, I cannot wait to see what else you do! ~Caitlin <3