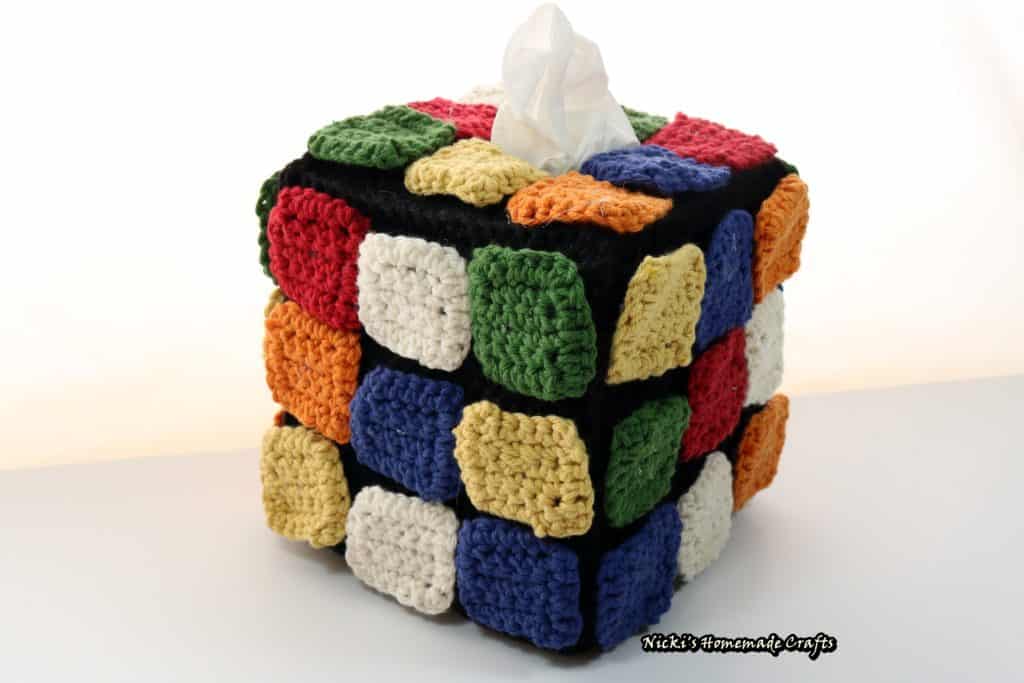
Rubik’s Cube Tissue Box Crochet Cover Pattern With Rearranging Colored Square Tiles
This post includes affiliate links.
Free crochet pattern for a Rubik’s cube tissue box cover that is easy to make. It is a fun Rubik’s cube inspired crochet pattern with rearranging coloured squares.
I am so excited about my new pattern creation: a Rubik’s Cube Tissue Box!
This Rubik’s Cube pattern is unique because you can rearrange the colored square tiles any way you like! As most other patterns make you pick the color combination before making the cube, having a permanent color combination. But not this pattern.
This pattern is designed that you make the colored square tiles separately from the black background. Once the squares are made they are attached using Velcro and hot glue.

Rubik’s Cube Tissue Box Cover Crochet Pattern
This pattern fits a tissue box with the size: 4 3/8 x 4 3/8 x 5 inches
I got the idea for this crocheted tissue box cover from The Big Bang Theory, as Sheldon has a ceramic Rubik’s Cube on the end table next to “his spot”.
Now, before I show you the materials and the actual free crochet pattern, please be sure to add this pattern to your Ravelry Favorites by clicking the button below as that allows my pattern being shown to more people who might want to see it and also want to make it.

You can get the crochet pattern for the Rubik’s Cube on Ravelry, Etsy, LoveCrafts, or my new membership The Crochet Club. The Crochet Club has so much more to offer than just PDF patterns! You get tutorials, references and the complete VIP treatment as well.
If you pay just twice the amount as this pattern costs and you have a month’s worth of The Crochet Club Membership with a lot more patterns! It’s well worth it.


In addition, I created a downloadable PDF of this Rubik’s cube tissue box cover. It has all of the pictures separated from the pattern, so you an choose whether you want to print them or not. This can save you a lot of ink in the long run. You can buy the ad-free, printer-friendly PDF on Ravelry, Etsy, LoveCrafts, and my VIP crochet membership, The Crochet Club.

What you will need:
- 3.5mm hook
- (light) Worsted weighted yarn in these colors (I used Knitpicks Dishie yarn):
- Black
- Red
- Yellow
- White
- Blue
- Green
- Orange
- Tapestry needle
- Scissors
- Tissue box (4 3/8 x 4 3/8 x 5 inches)
Gauge:
4 sc in 1 inch
Rubik’s Cube Tissue Box Cover Instructions:
Sides (make 4)
Using Black, Ch 20
Row 1:
1 sc in 2nd Ch from the hook, 1 sc in each ch till the end of the row (19 st)
Row 2:
Ch1, 1 sc in each st till the end of the row (19 st)
Row 3-24:
Repeat row 2, 22 times (24 rows in total with 19 st in each row), tie off, and weave in the ends
Rubik’s cube Tissue Box Top
Using Black, Ch 20
Row 1:
1 sc in 2nd Ch from the hook, 1 sc in each ch till the end of the row (19 st)
Row 2:
Ch1, 1 sc in each st till the end of the row (19 st)
Row 3-7:
Repeat row 2, 5 times (7 rows in total with 19 st in each row)
Row 8:
Ch 1, 1 sc in the next 7 st, leaving the rest of the stitches untouched as of right now
Row 9-12:
Ch 1, 1 sc in the next 7 st
By the end of row 12, tie and weave in the end, and move to the other side that we left untouched earlier
Row 8:
skip 5 stitches in the middle (next to the side you just did) and attach the yarn and Ch 1, 1 sc in the next 7 st
Row 9-12:
Ch 1, 1 sc in the next 7 st
Row13:
Ch1, 1 sc in the next 7 st, Ch5, (now going to the first side again), 1 sc in the next 7 st
Row 14-20:
Ch1, 1 sc in each st till the end of the row (19 st)
Fasten off, and then weave in the ends

Connecting all the Rubik’s cube Tissue Box Cover sides and top
Start by crocheting the top to all 4 sides by single crocheting them together on the right side (let the side with the foundation chain be on the bottom (where the opening for the tissue box will be) using 20 sc.
Once you created a cross by having the top attached to all the sides of the Rubik’s cube, it is time to crochet the sides together, again right side facing outwards (you want to see where the sides are connected). See the picture below to see what it will look like. It should be 24 sc to connect the sides together.
Once all sides are connected, go one more round on the bottom of the tissue box opening with single crochet to get rid of the view of the foundation chain and making it look better.
Cubes
Make 9 Cubes per color (54 cubes in total)
Ch 6
Row 1:
5 sc in each stitch (5 st)
Row 2-5:
Ch 1, 5 sc in each st (5 st)
Ch 1, work 5 sc on the adjacent side (we are going around the square to make the side look better), Ch 1 (in the corner), 5 sc on the next side, Ch 1 (in the corner), 5 sc on the last side, sl st to the first stitch of the last row, tie off and weave in the ends


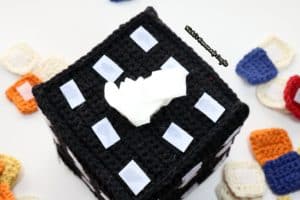
Attach Velcro using hot glue to all the cubes on the right side (leaving the opposite side of the Velcro still attached), place the cubes on the black side or top the way you want them and hot glue the other part of the Velcro to the black side/top as seen on the picture below:

VIDEO TUTORIAL (not a complete one):
Check out my video below to see what it actually looks like (please note I said in the video I used “superglue”, but that is not correct, I used hot glue!!)
Subscribe to my Youtube Channel here:
[youtube-subscriber channelID=UCSI4OeQQnxVQEAwMGeTCn1Q layout=full subscribers=default]
I hope you love this Rubik’s cube tissue box crochet pattern as much as I do. If you love it, please use the social media share buttons above or below and share it with the world and your friends.
That way you will find it easily again when you need it and you also provide the world and your friends with the ability to gain extra crochet knowledge as well.
And to top it off, you help me as it allows me to create more content that you love already and want to see more of – free crochet patterns and tutorials. So, thank you for sharing.


