Stylish Crochet Armchair Caddy – Easy Free Pattern
This post includes affiliate links.
The Crochet Armchair Caddy is a free pattern and ideal for a quick project. Use it to store your crochet hooks, books, yarn, and more. Perfect for your couch and bedside, too!
My family watches TV almost every day. That is our time to get together, cozy up, and enjoy a good movie or TV show. But we also lose at least 1 remote each day.
Considering that we need 3 in order to turn the TV, cable, and speakers on, it can be frustrating when you lose one. So, I designed the Crochet Armchair Caddy to make life easier and keep all the remotes in one place.
I love how versatile this crochet pattern is. You can use it for your chair, sofa, your bedside, stroller or even a wheelchair. All you have to do is make a couple of tweaks to the finished size, add some straps and you are good to go.
To further customize it, you could actually adjust the size of the pockets or even the number. Then you can store your remotes, magazines, books, and even crochet hooks and yarn. The possibilities are endless.
In fact, you can make the crochet armchair remote control holder as big or small as you like. You can add more or fewer storage pockets on both sides or just one side. This is the perfect pattern that you can easily adjust to your needs.

This crochet armchair caddy and organizer is also a great solution for wheelchair storage as well as strollers. Add some straps to the side of the caddy to provide more stability and it will make your best multi-purpose storage caddy ever.
I love how versatile and functional this pattern is. Perfect project for beginners as it uses easy crochet stitches. I have also provided a video tutorial to help you learn this great stitch.
So let me now give you the list of supplies you need in order to make this cute Armchair Caddy pattern.

This great crochet pattern is also available as an ad-free, printer-friendly pdf pattern. You can purchase it at the links below for only a small fee.


How to make the Crochet Armchair Caddy
You will need:
- Premier Yarns Anti-Pilling yarn (180yds/165m) in the color Red Heather (3 skeins)
- 5.0mm hook
- scissors
- tapestry needle
Gauge:
4 dc x 2 rows = 1 square inch
Size:
28×14 inches (but can be made bigger or smaller)
Stitches used:
Learn all the basic crochet stitches HERE
- linked dc = linked double crochet (video tutorial)
- ch = chain
- sl st = slip stitch
- mattress stitch
- running stitch
Written Instructions for Crochet Armchair Caddy:
Firstly, you can make this pattern as big or as little as you like. I would first figure out how wide you want your caddy to be and then how long. Secondly, you need to know how many pockets you would like to have and adjust this pattern accordingly.
Ch 52
R1: starting from the 3rd ch from the hook, 1 linked dc in each st, turn (50 sts)
R2 – 105 (can be made shorter or longer): 1 linked dc in each st, turn
After you finish your long rectangle, fold over the ends to create pockets on your crochet armchair caddy (you can also just have one side have pockets). Firstly, sew the sides together using the mattress stitch. Secondly, sew a running stitch to create actual pockets. I have made this Armchair caddy with one running stitch in the middle.
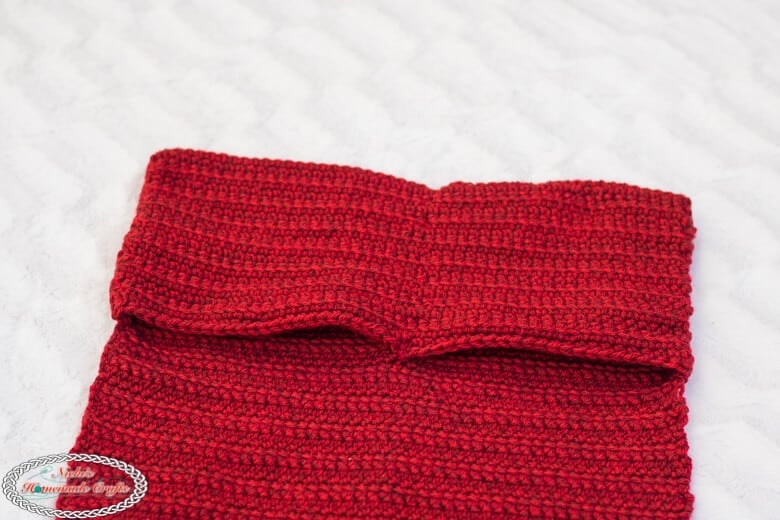
The other side has 2 running stitch lines to create 3 pockets. But you could add more pockets by sewing more “lines” to divide up the large pockets on either side.
In fact, you could even add another smaller rectangular crochet piece to each side to have even more pockets. That piece would be sewn onto the front or into a large pocket.

Once you finish, you just need to fasten off and weave in your ends.
The crochet armchair caddy is now ready and can be used for your chair or sofa. You can even use it for your bed if just make one side have pockets and the other side is tucked underneath the mattress. Sometimes people using this caddy for their stroller and wheelchairs.

If you need help with Linked Crochet Stitch, check out the tutorial below.
Crochet Armchair Caddy Stitch Video Tutorial
This crochet armchair caddy pattern uses the linked crochet stitch. If you are not familiar with this stitch, check out the video tutorial below.
Linked crochet stitches are great for homewares as they create dense and thick crochet fabric. The finished item will have no gaps or holes if you use the linked crochet stitch.
I have included an in-depth crochet stitch tutorial so you can master this great stitch in no time.
Subscribe to my Youtube Channel here:
[youtube-subscriber channelID=”UCSI4OeQQnxVQEAwMGeTCn1Q” layout=”full” subscribers=”default”]
I hope you love this Crochet Armchair caddy pattern as much as I do. If you love this pattern and technique, please use the social media share buttons above or below and share this pattern link with the world and your friends.
That way you will find it easily again when you need it and you also provide the world and your friends the ability to gain extra crochet knowledge as well.
And to top it off, you help me as it allows me to create more content that you love already and want to see more of – free crochet patterns and tutorials. So, thank you for sharing.
If you love my crochet patterns and the way I teach, I would suggest subscribing to my newsletter below as I share new patterns, tutorials and special announcements often.
THE CROCHET CLUB – CROCHET PATTERN, TIPS & TUTORIAL VAULT
You can have the most amazing pattern and yarn in the world, but if you don’t have the knowledge on how to crochet in a way that makes you proud, then all your work is for nothing.
Maybe you have a dream of having perfect straight seams or have less yarn to weave in?
Let me introduce you to THE CROCHET CLUB – AN ALL-ACCESS MEMBERSHIP! It is exactly what it says on the tin. If you sign up for the membership I will teach you different techniques and tips on how to improve your crochet projects!
You will get access to all my patterns in PDF formats and full support from me to guide you through the tricky bits. I will also teach you what YOU want to learn! Join me in THE CROCHET CLUB – AN ALL-ACCESS MEMBERSHIP!


Love this pattern. Am making it for my sister for a Christmas gift!!