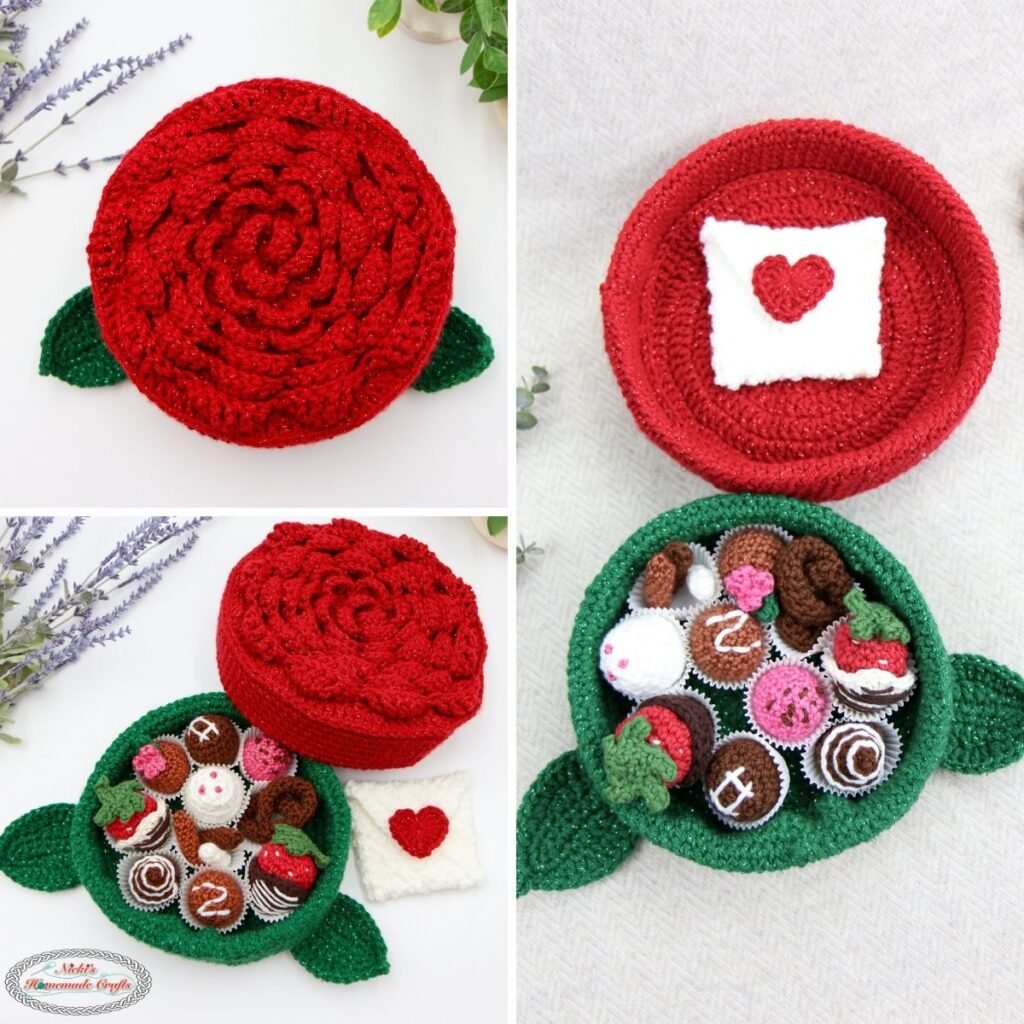
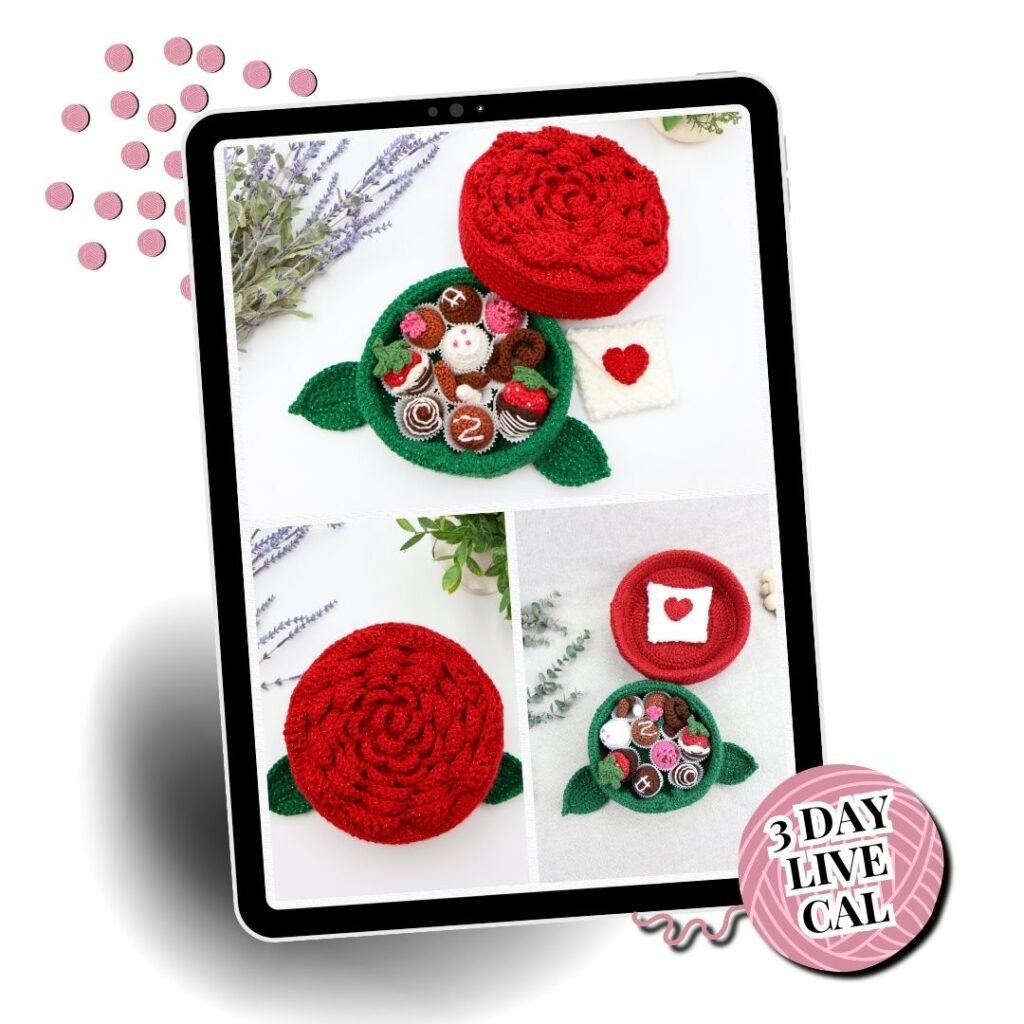
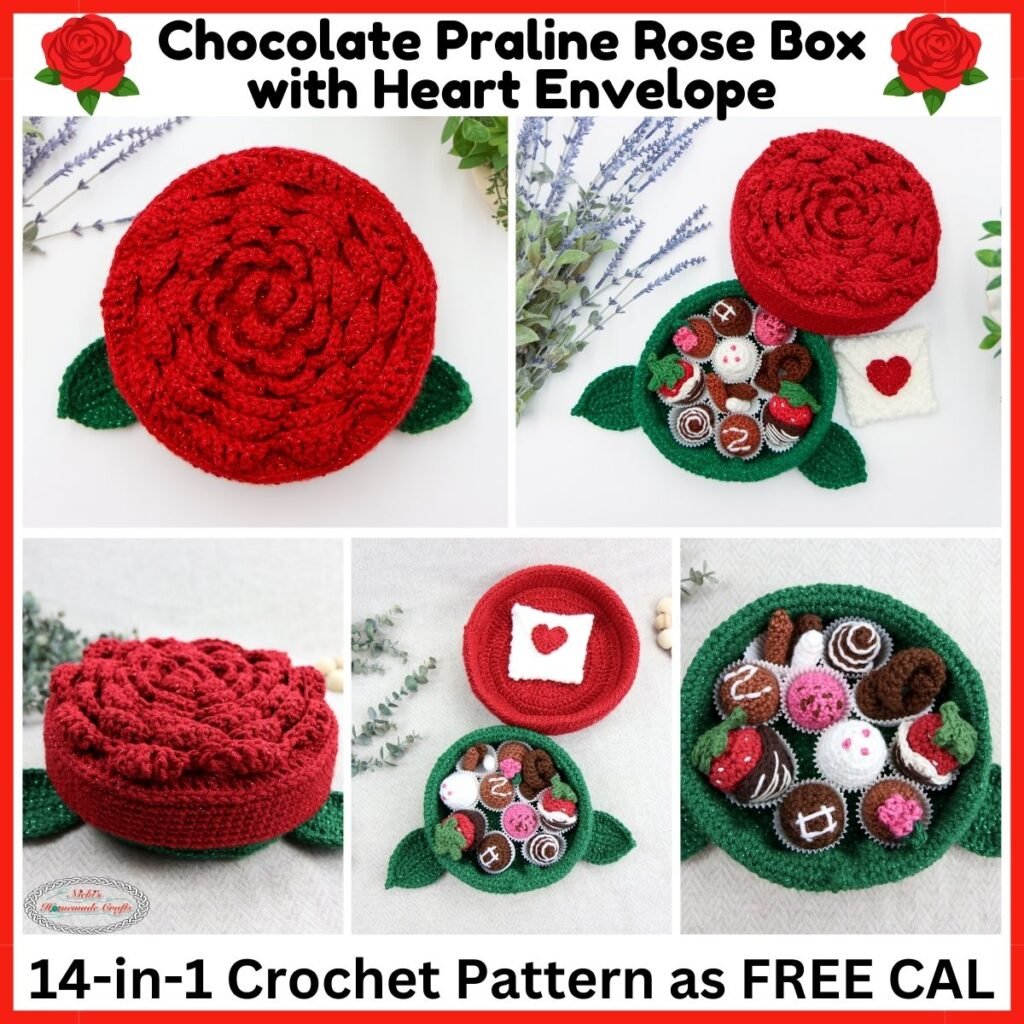
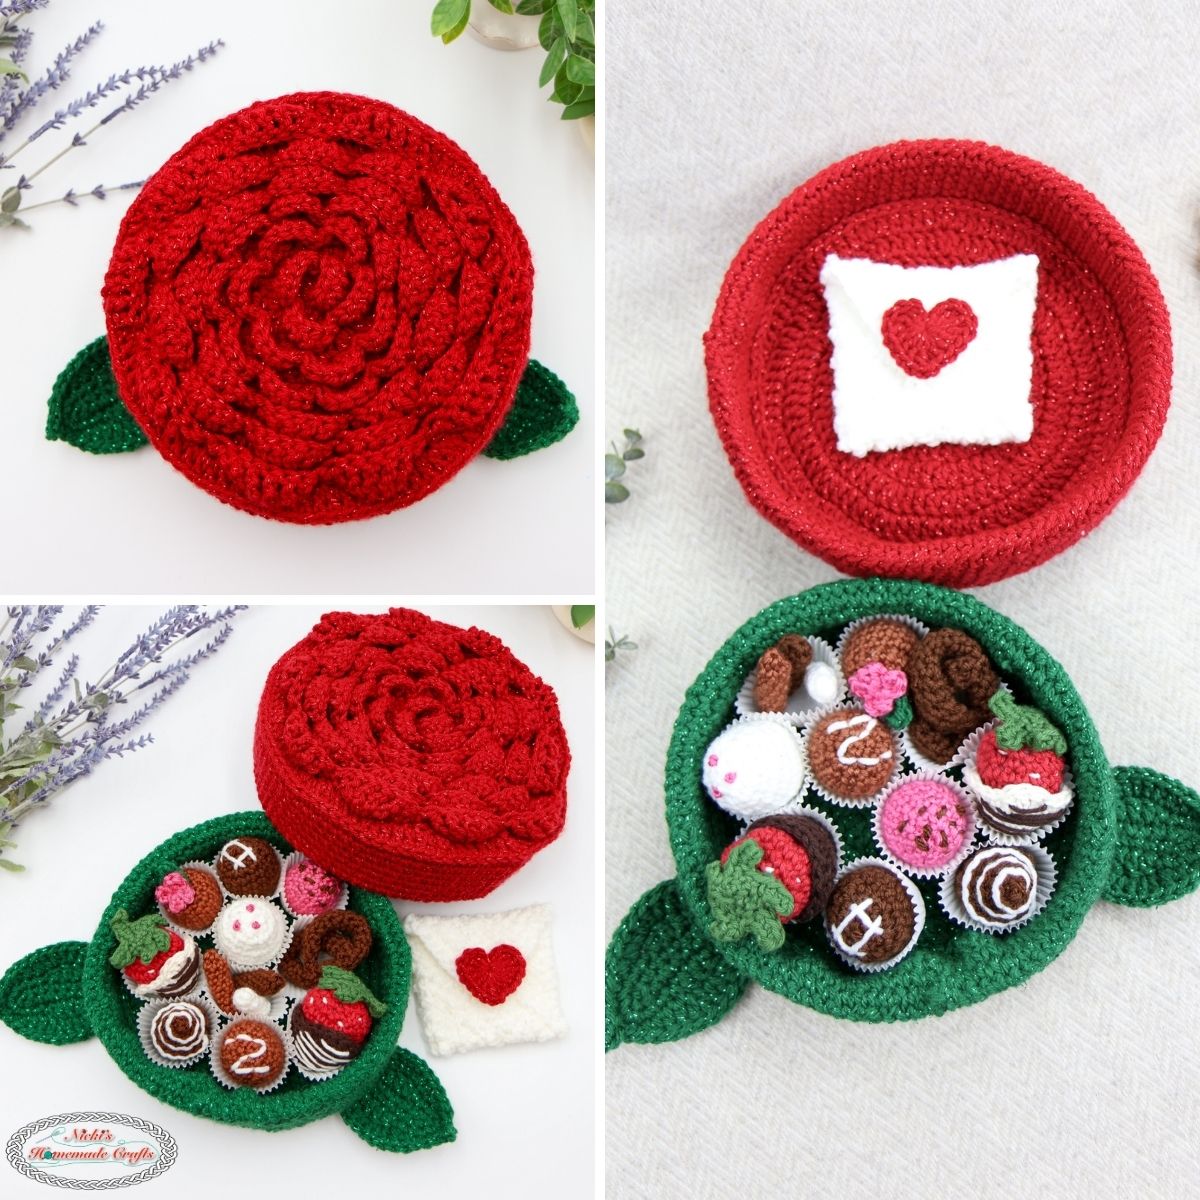
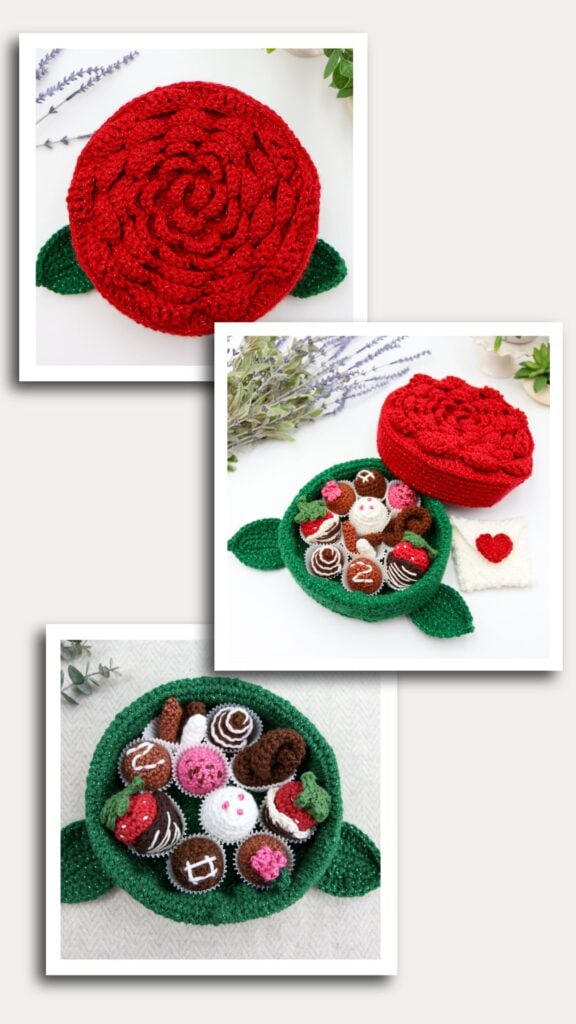
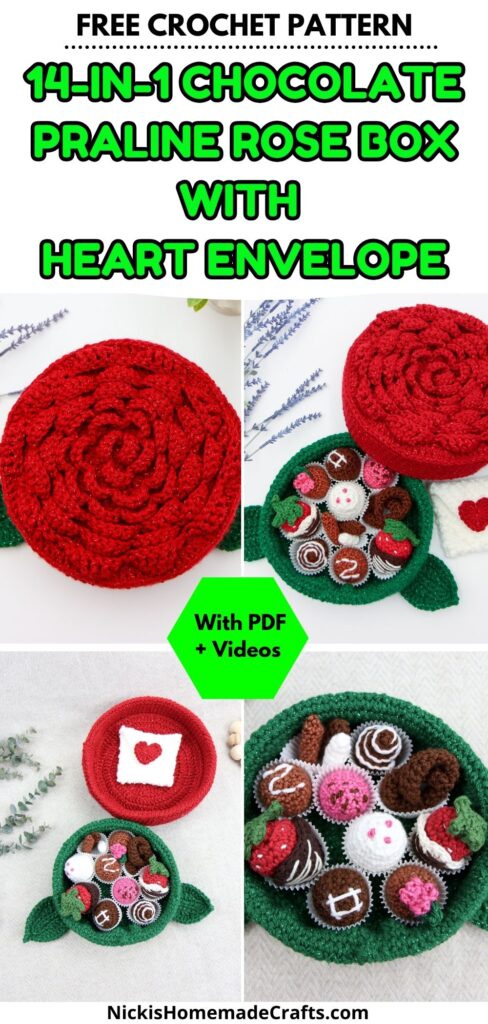
Free Crochet Chocolate Praline Rose Box with Heart Envelope – 14-in-1 Pattern – 3-Day LIVE Crochet Along
This post includes affiliate links.
Crochet Alongs are super fun. But Quick LIVE Crochet Alongs are more interesting, and exciting and allow you to take your time finishing one large project without overwhelm and YOU get LIVE Tutorials and LIVE Support with a Community at the same time.
This free crochet pattern for a 14-in-1 Chocolate Praline Rose Box with Heart Envelope Crochet Pattern is broken up into 3 quick parts with a GIVEAWAY at the end.
Have you ever wanted to be part of a REALLY Fun CAL (crochet along) that includes LIVE Videos, Support, and a Community? Well, with this CAL you get all that. We’ll be making an extremely fun and beautiful 14-in-1 Chocolate Praline Rose Box with Heart Envelope for Valentine’s Day as decor or to gift it to someone every special and dear to my heart.
This 14-in-1 Chocolate Praline Rose Box with Heart Envelope Crochet Pattern uses only worsted yarn from different yarn companies, depending on the praline, box or envelope itself. All the details on the colors per crochet pieces are broken down in the material section below.
And not only will you be able to make a Chocolate Praline Rose Box with Heart Envelope in this LIVE CAL, but you can also arrange the pieces differently or add more or fewer pralines to your rose gift box if you prefer.
FREE CAL Sign Up – Early Access the Evening Before & Be Entered into the Giveaway
You can join the CAL for FREE and you’ll get access to the pattern in parts – 1 part per day – with ads Right HERE:
Join the 3-Day LIVE
14-in-1
Chocolate Praline Rose Box with Heart Envelope
Free Crochet Along
Learn LIVE with Support
and Community – All At Once!
Be part of this Unique and Special CAL, and experience like no other!
Get a head start with the PDF Now:
You just need to decide if you want to get instant access to the PDF right now and work at your own pace (VIP access) or join the FREE CAL (with ads) and get access to each part of the pattern one day at a time.
Sign up for the Crochet Along Pattern
There are 3 ways to join this exciting, quick 3-day LIVE crochet along to make this 14-in-1 Chocolate Praline Rose Box with Heart Envelope Crochet Pattern.
- You can join for FREE and get access to the pattern 1 day at a time (with ads) – one part of the pattern is already available (3 will be published later)
- OR you can get the ad-free PDF now and get access to the entire pattern instantly.
- OR if you are part of The Crochet Club Membership then you get also access to the entire pattern at once ad-free.
Regardless of which option you pick, the LIVE Tutorials for each part will be at 12pm, PT on January 12th (part 1), January 14th (part 2), and January 16th (part 3) on Youtube. Links to those LIVE Tutorials will be sent via email the evening before!
FREE CAL Sign Up – Early Access the Evening Before & Be Entered into the Giveaway
You can join the CAL for FREE and you’ll get access to the pattern in parts – 1 part per day – with ads Right HERE:
Sign up form takes a second to load! Wait for it and sign up ❤️
VIP Access to the Ad-Free PDF
Or you can get VIP Access to the entire pattern right away in a PDF – all ad-free.
See the breakdown below to make an informed decision on what will work best for you.
How to Join 3-Day LIVE Crochet Along for the
14-in-1 Chocolate Praline Rose Box with Heart Envelope Pattern
FREE CAL
VIP Access
If you are a FULL MEMBER of THE CROCHET CLUB, you will NOT need to purchase the VIP ACCESS PDF! You, TCC Members, automatically get the FULL AD-FREE WRITTEN Pattern HERE (not the 3 LIVE Tutorials videos yet), starting January 2nd!
You’ll also get access to the LIVE Tutorials as they are being published!
You can also purchase the PDF via Ravelry and Etsy but it will cost more than if you purchase it on my website (just $10).
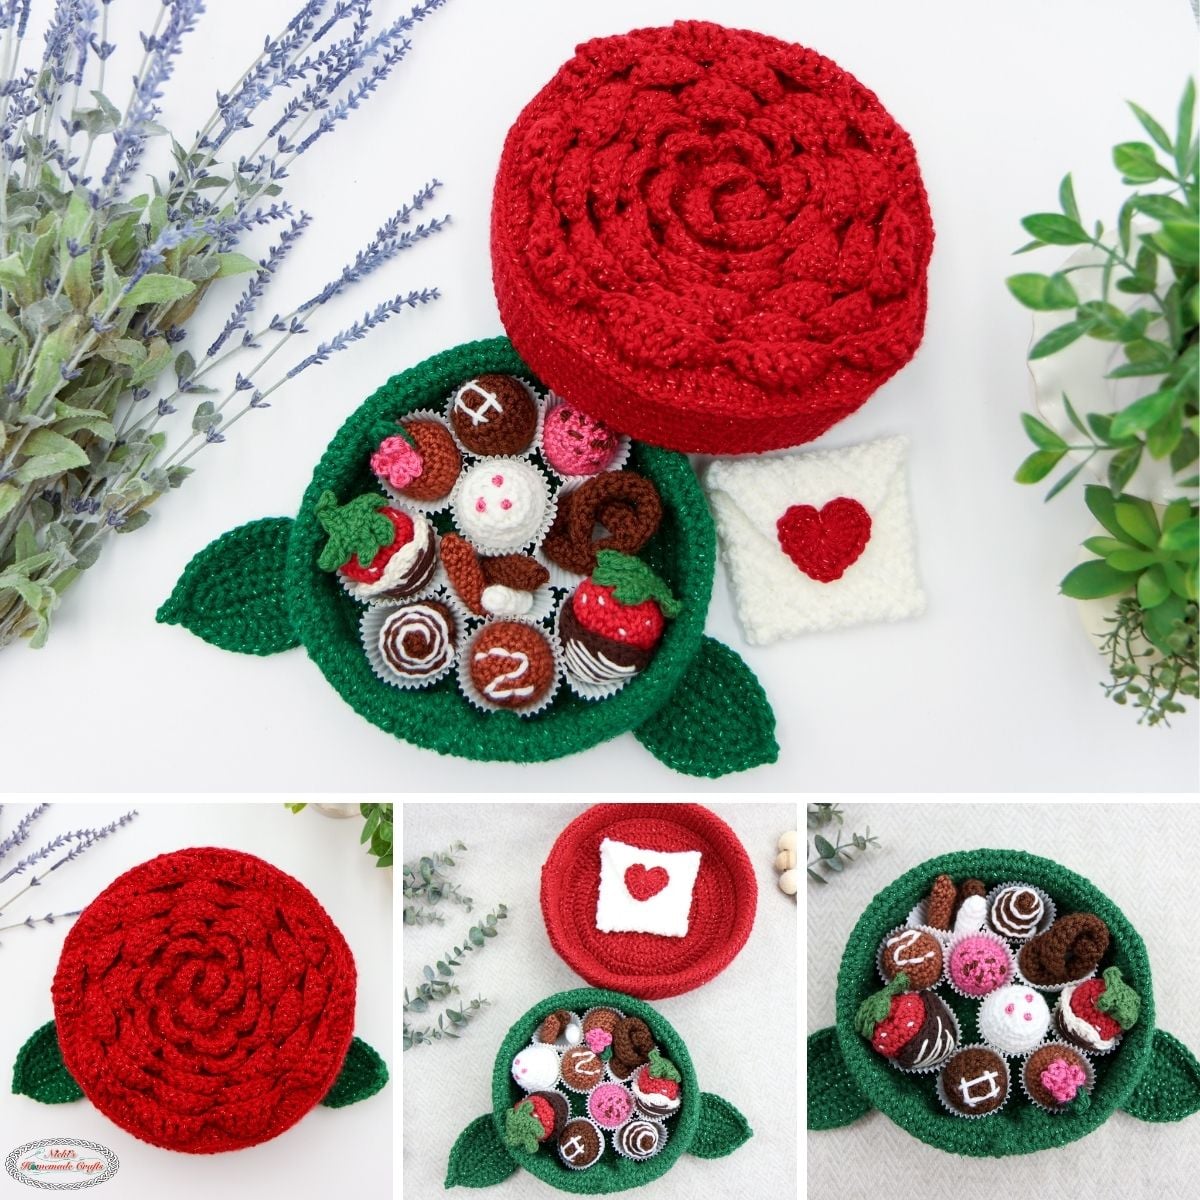
This Chocolate Praline Rose Box with Heart Envelope includes the following patterns
- Leaf Gift Box Bottom
- Rose Gift Box Lid
- Envelope
- Heart
- 10 Pralines
Learn how to Crochet this 14-in-1 Chocolate Praline Rose Box with Heart Envelope Pattern via a LIVE Crochet Along with Support and Community
This CAL will be quick, finished within 3 days as we’re using worsted yarn, and it will be as a written pattern, as well as LIVE Video Tutorials with extra support and a fun community!
If you’ve ever tried Crochet Alongs and Gingerbread Patterns before and…
OR you can join the CAL for FREE and you’ll get access to the pattern in parts – 1 part per day – with ads Right HERE:
Sign up form takes a second to load! Wait for it and sign up ❤️

How will this CAL work? Any Support?
Easy. You simply will follow each part once released – you have 1 day to complete each section of the pattern. The schedule is broken down below.
I’ll be crocheting each piece of the Chocolate Praline Rose Box with Heart Envelope on camera according to the schedule below.
Make sure to sign up for early release emails above and of course, join my Facebook group for release info and to show off your creations.
While you work on the parts of the pattern, I encourage you to share your progress pictures in my Facebook group using the hashtag #LIVECALJAN26
And if you need any support or help during the Crochet Along, please tag me in my Facebook group so I can find and answer your question(s). PLUS you also get support during the LIVE Tutorials.
You have until 1/17/26 to finish the pattern, post the image of the final product plus using the hashtag #LIVECALJAN26 in my Facebook group (directly post into my group) to qualify for the Giveaway! The giveaway is optional. If you need more time, you take your time.
How do you have a chance to win in the Giveaway?
It’s very easy. But remember you don’t need to be part of it and can simply take your time for the pattern.
But here is how you qualify to be entered in the Giveaway:
- Join my newsletter (the sign up box above)
- Follow me on at least 2 of these social media platforms: Youtube, Facebook, Instagram, and TikTok
- Post the image of your final product in my Facebook group
- Use the hashtag #LIVECALJAN26
- Post into my Facebook group with the image and hashtag no later than 1/17/26 10am, PT
- JOIN the PARTY! We pick 3 additional winners to win something!
- Optional: Share this link with your crochet bestie on social media and tag me!
I will pick THREE winners to each win a $30 valued crochet surprise. The Giveaway Winner announcement will take place on my Facebook page and my Youtube Channel on 1/17/26 at 12pm, PT (3pm, ET).
So we will have 12 WINNERS:
- 3 for signing up for the LIVE CAL for free
- 3 for commenting on the Video Tutorials (1 winner per video)
- 3 for finishing the LIVE CAL (as mentioned above)
- and 3 for showing up for the Party!

What will you need for the 14-in-1 Chocolate Praline Rose Box with Heart Envelope Crochet Pattern LIVE Crochet Along?
Click the links below to see which materials I used exactly!
- Herrschners Worsted Supreme Yarn:
- penny
- geranium
- Mary Maxim Starlette Sparkle (worsted, 98% acrylic, 2% polyester, 196yd/100g)
- Emerald (1.5 skeins)
- Ruby (1.5 skeins)
- WeCrochet Dishie Yarn (worsted, 100% cotton, 190yd/100g)
- red (strawberries)
- jalapeno (strawberries)
- white (strawberries)
- coffee (strawberries)
- WeCrochet Brava Worsted Yarn (100% acrylic, 218yd/100g)
- espresso
- white
- 4mm hook
- scissors
- tapestry needle
- Polyfill
- Plastic Canvas (2-3 sheets) OR thick cartboard (from old packaging)
- Mini Muffin Liners
- optional: velcro to attach & detach the envelope
Can I use a different yarn?
Yes, you can switch to a different yarn brand, even a different fiber if you prefer.
I recommend any worsted yarn for this project. Pick from your yarn stash if you want, BUT I highly recommend the yarns mentioned above.
But it’s an ideal project as a yarn stash buster. Use leftover yarn if you have any. I would recommend sticking with either of my above recommendations.
What colors should I pick?
I recommend any of the mentioned solid colors.
Either stick with the colors I picked or pick your favorite colors for your favorite pieces.
Can I use a different hook size?
Yes, you can pick a different size. Just remember the pattern will be a bit smaller or larger unless you focus on the gauge provided.
More Details about the Pattern
Gauge
8 sc sts x 7 sc rows = 2 square inches
Finished Size
8.5 x 2.5 inches
Stitches and Abbreviations (US Terms)
Learn all the basic crochet stitches HERE
- st/sts = stitch/stitches
- ch = chain
- sk = skip
- sl st = slip stitch (or invisible sl st – see video)
- inc = increase
- sc = single crochet
- tr = treble crochet
- dc = double crochet
- tr = treble crochet
- dtr = double treble crochet
- ldc = linked double crochet
- ATC = Alternative Turning Chain
- BLO = back loop only
- FLO = front loop only
- inv sc dec (rounds) or regular sc dec (rows)
- 3rd loop behind the V = the loop behind the back loop
When does the Crochet Along start?
The Crochet Along will be broken up into 3 Parts and starts January 12th, 2026.
You will simply need to decide whether to join the CAL for free or get VIP Access (The Crochet Club Members get VIP Access in the Vault automatically).
We are pretty sure you will all like this Quick 3-Day LIVE Crochet Along to make a 14-in-1 Chocolate Praline Rose Box with Heart Envelope Crochet Pattern as much as we do. Be sure to share this post with your crochet friends so they all can join in.
Are you excited yet? Let’s grab or order your materials, and then we will get started on January 12th, 2026 with Part 1.
LIVE Crochet Along Pattern Parts
Remember, you can get the PDF of this pattern if you don’t like ads or want to work ahead:
Be sure to share your progress pictures in our Facebook group using the hashtag #LIVECALJAN26 so we can celebrate you.
Each LIVE Tutorials for Parts 1-3 starts at 12pm, PT (3pm, ET).
Part 1: Rose Gift Box Lid and Heart Envelope
LIVE Tutorial starts 12pm, PT on January 12th, 2026. The LIVE Tutorial Replay will be available after HERE on Youtube.
Written Pattern Rose Box Lid
Rose Lid (outside)
Starlette in Ruby
R1: MR, 1 ATC (shown in video), 12 dc, close the circle, use a stitch marker for continuous rounds
R2-7: ALL in blo
R2: 2 dc per st
R3: (1 dc, 2 dc) x 13
R4: (1 dc in 2 sts, 2 dc) x 13
R5: (1 dc in 3 sts, 2 dc) x 13
R6: (1 dc in 4 sts, 2 dc) x 13
R7: (1 dc in 5 sts, 2 dc) x 13, then after finishing with 1 hdc, 1 sc, 1 sl st
R8: ALL in 3rd loop behind the V, 1 sc per st
R9-15: 1 sc per st
Rose
Attach yarn to the flo in R2, then crochet in spiral rounds R2-7
R2-4: (1 sc, sk 1, [6 dc], sk 1) repeat all around
R5-6: (1 sc, sk 2, [6 tr], sk 2) repeat all around
R7: (1 sc, sk 3, [8 dtr], sk 3) repeat all around
Fasten off
Rose Lid (inside)
Starlette in Ruby
R1: MR, 1 ATC (shown in video), 12 dc, close the circle, use a stitch marker for continuous rounds
R2: 2 dc per st
R3: (1 dc, 2 dc) x 13
R4: (1 dc in 2 sts, 2 dc) x 13
R5: (1 dc in 3 sts, 2 dc) x 13
R6: (1 dc in 4 sts, 2 dc) x 13
R7: (1 dc in 5 sts, 2 dc) x 13, then after finishing with 1 hdc, 1 sc, 1 sl st
R8: ALL in 3rd loop behind the V, 1 sc per st
R9-14: 1 sc per st

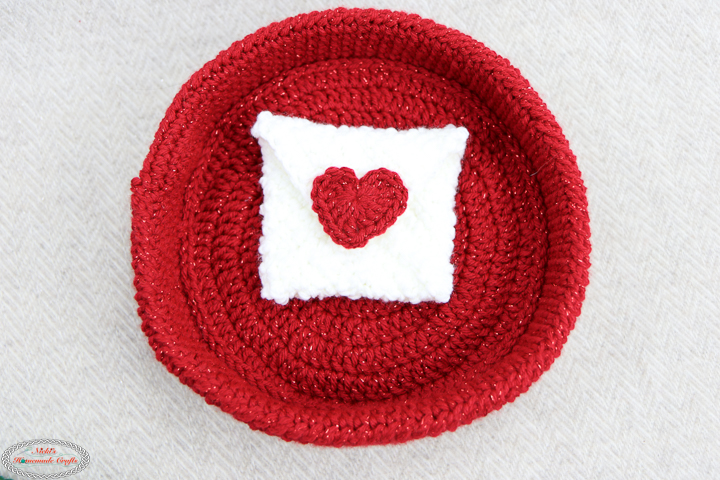
Written Pattern Heart Envelope
Envelope
White Worsted Acrylic Yarn
Ch 21, start from the 2nd ch from the hook
R1: 1 ldc per ch, turn
R2-11: ch 2, 1 ldc per st, turn
Fold 3 of the corners inward and sew the edges together.
Heart
Startlette in Ruby
R1: MR, ch 3, 3 tr, 3 dc, ch 1, 1 tr, ch 1, 3 dc, 3 tr, ch 3, sl st to the MR and pull to close the ring, sew/glue to the heart to the last corner of the envelope (the flap).
I glued Velcro to the inside corner of the envelope and also to the sewn area of the envelope, so you can open and close the envelope anytime.
Optionally, add a velcro behind the envelope so you can add it to the inside of the red lid to hide the envelope.
Remember to post your pictures of Part 1 to our Facebook group using the hashtag #LIVECALJAN26 so we can celebrate you, and you qualify for the giveaway.
Part 2: Leaf Gift Box Bottom and Gift Box Assembly
LIVE Tutorial starts 12pm, PT on January 14th, 2026. The LIVE Tutorial Replay will be available after HERE on Youtube.
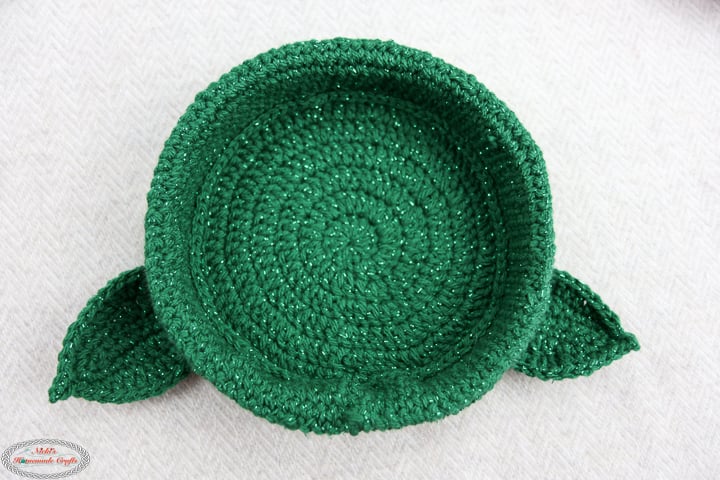
Written Pattern Rose Box Bottom
Green Box with Leaves (outside)
Starlette in Emerald
R1: MR, 1 ATC (shown in video), 12 dc, close the circle, use a stitch marker for continuous rounds
R2: 2 dc per st
R3: (1 dc, 2 dc) x 13
R4: (1 dc in 2 sts, 2 dc) x 13
R5: (1 dc in 3 sts, 2 dc) x 13
R6: (1 dc in 4 sts, 2 dc) x 13
R7: (1 sc in 5 sts, 2 sc) x 13
R8: ALL in 3rd loop behind the V, 1 sc per st
R9-15: 1 sc per st
Green Box with Leaves (outside)
Starlette in Emerald
R1: MR, 1 ATC (shown in video), 12 dc, close the circle, use a stitch marker for continuous rounds
R2: 2 dc per st
R3: (1 dc, 2 dc) x 13
R4: (1 dc in 2 sts, 2 dc) x 13
R5: (1 dc in 3 sts, 2 dc) x 13
R6: (1 dc in 4 sts, 2 dc) x 13
R7: (1 sc in 5 sts, 2 sc) x 13
R8: ALL in 3rd loop behind the V, 1 sc per st
R9-14: 1 sc per st
Assembly of the box bottom and lid
Cut 2 circles from the plastic canvas that fit inside the outside box and the outside lid (remember the outside lid is BIGGER!) Then cut 2 stripes of plastic canvas PER bottom box and top lid (for the walls). Make sure to stripes are a BIT smaller than the height of the walls of each lid. Make the stripes overlap when put inside the outside box and outside lid. Do not sew the stripes together; that way, they can move, and you can easily put the lid on top of the bottom box.
Now, for each the bottom box and the lid, add the inside layer in and sew around the last round using the whip stitch, to connect the 2 layers together. Finally sew the center (where the Magic Ring is) together through the 2 layers and the plastic canvas in between so the entire layers hold together.
Make sure the lid fits on top of the box before you move on.
This step will be shown in the LIVE Videos in more detail.
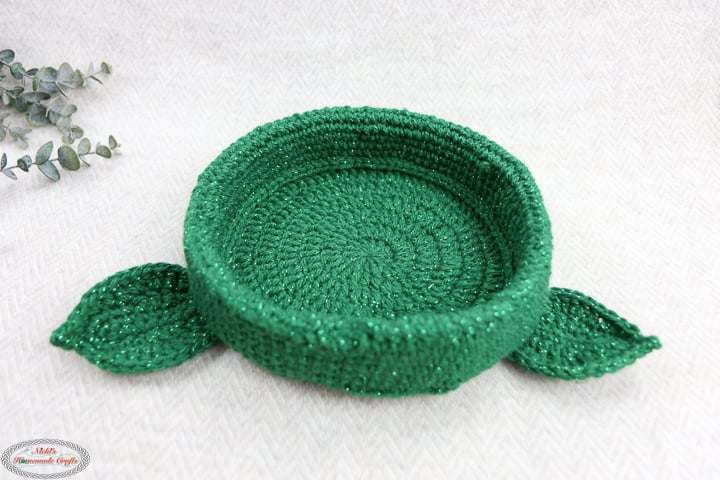
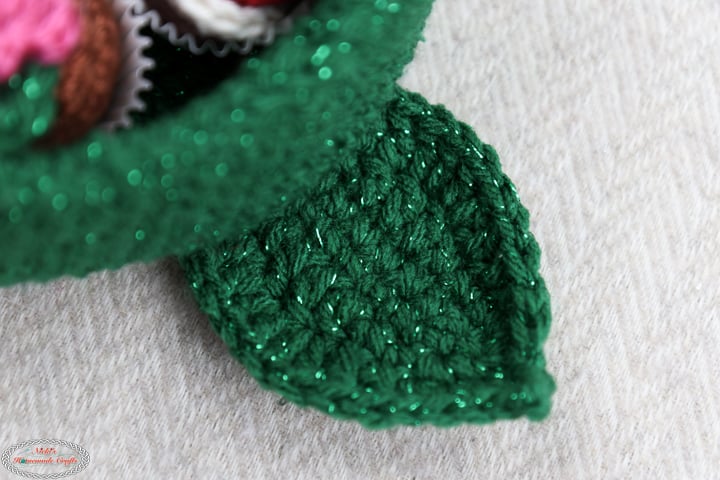
Leaves (2 or more)
Starlette in Emerald
To make this pattern easier to read, please follow the following: 1 sc x 8 = 1 sc in 8 sts / 2 dc = 2 dc in the same st
Ch 10, start from the 2nd ch from the hook
R1: 1 sc x 8, 3 sc, 1 sc x 7, 2 sc in the first st you already crocheted 1 sc in
R2: 2 sc, 1 sc x 2, 1 dc x 3, 1 sc x 2, (2 sc) x 3, 1 sc x 2, 1 dc x 3, 1 sc x 2, (2 sc) x 2
R3: 1 sc, 2 sc, 1 hdc, 1 dc x 2, (2 dc) x 2, 1 dc x 2, 1 hdc, 1 sc x 2, ch 3, sl st to the first ch, 1 sc x 2, 1 hdc, 1 dc x 2, (2 dc) x 2, 1 dc x 2, 1 hdc, (1 sc, 2 sc) x 2
Fasten off and sew the leaves to the bottom of the green box.
Remember to post your pictures of Parts 1-2 to our Facebook group using the hashtag #LIVECALJAN26 so we can celebrate you, and you qualify for the giveaway.
Part 3: 10 Pralines
LIVE Tutorial starts 12pm, PT on January 16th, 2026. The LIVE Tutorial Replay will be available after HERE on Youtube.
Written Pattern 10 Pralines
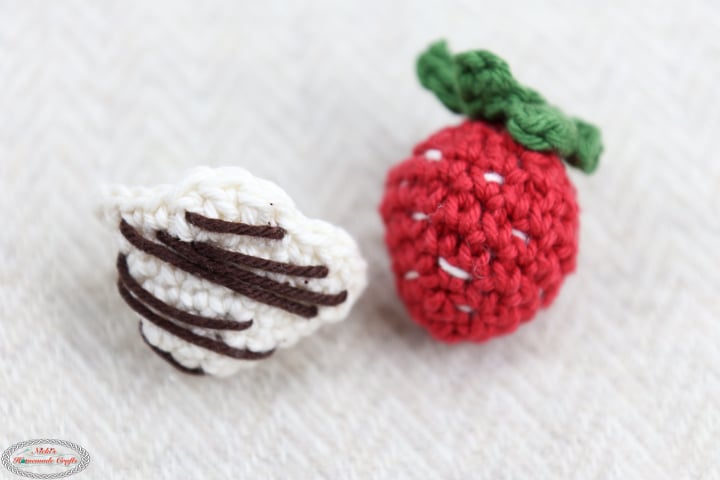
Strawberries (1 small and 1 medium size)
Video Tutorial for the Strawberries is here
Dishie Yarn
R1: With Red, MR and add ch 1, and 6 sc, close the ring
R2: *1 sc, then 2 sc in the next st, repeat from * until the end
R3: *1 sc in the next 2 sts, then 2 sc in the next st, repeat from * until the end
R4: *1 sc in the next 3 sts, then 2 sc in the next st, repeat from * until the end
R5: *1 sc in the next 4 sts, then 2 sc in the next st, repeat from * until the end
(stop here for the small strawberry and continue with R7)
R6: *1 sc in the next 5 sts, then 2 sc in the next st, repeat from * until the end
(stop here for the medium strawberry and continue with R7)
R7: 1 sc in each st
Regardless of the size of the strawberry, follow the following pattern:
R8: *1 sc in the next 2 sts, 1 sc dec, repeat from * until the end of the round
R9: *1 sc, 1 sc dec, repeat from * until the end of the round
R10: 1 sc dec all around (add polyfill), fasten off red yarn
R11: With green, per stitch (you should have 5-6 sts in the last round) *place 1 sc, ch 4, starting from the 2nd ch from the hook 1 sc per ch, then go to the next st, repeat from * all around
R12: 1 sc per leaf all around, then weave your yarn through all of these sc sts, pull and close the hole, weave in your ends
Using white yarn, weave your yarn in and out throughout the strawberry (see video for more details) to make the little seeds
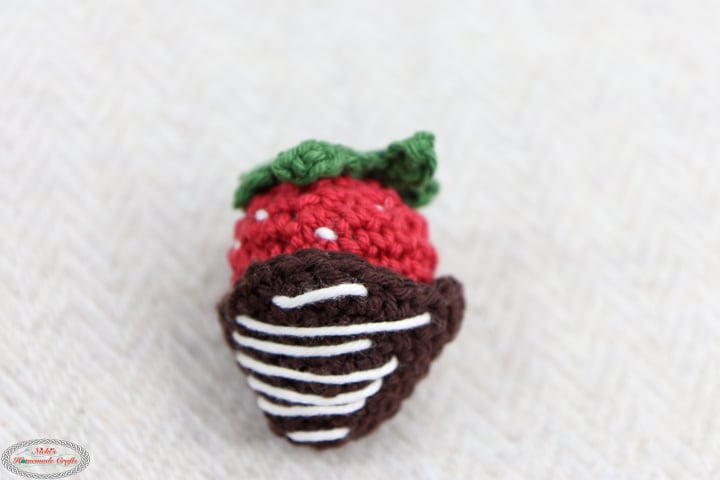
Chocolate Shells to Cover the Strawberries
R1: With Brown, MR and add ch 1, and 7 sc, close the ring
R2: *1 sc, then 2 sc in the next st, repeat from * until the end, 1 sc
R3: *1 sc in the next 2 sts, then 2 sc in the next st, repeat from * until the end, 1 sc
R4: *1 sc in the next 3 sts, then 2 sc in the next st, repeat from * until the end, 1 sc
R5: *1 sc in the next 4 sts, then 2 sc in the next st, repeat from * until the end, 1 sc (stop here for the small strawberry and continue with R7)
R6: *1 sc in the next 5 sts, then 2 sc in the next st, repeat from * until the end, 1 sc (stop here for the medium strawberry and continue with R7)
R7: randomly crochet in each st 1 st any of the following (1 sc, 1 hdc or 1 dc)
You want the waves to be uneven so it looks more realistic
With white weave yarn on one side of the chocolate in and out to make “lines”
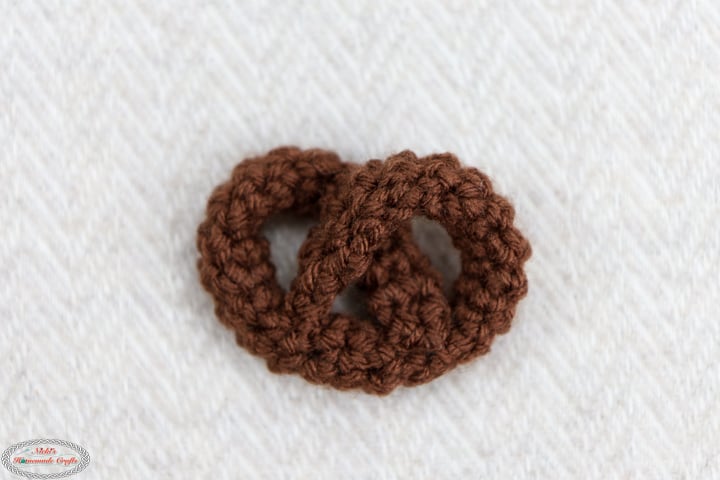
Pretzel
WeCrochet Brava Espresso
R1: MR, 5 sc
R2-31: 1 sc per st
Fasten off, then fold the tubes into a pretzel and sew the end to the pretzel itself
Z Praline
Herrschners Supreme Penny
R1: MR, 6 sc
R2: 2 sc in each st
R3: (1 sc, 2 sc) x 6
R4: in blo, 1 sc per st
R5-7: 1 sc per st
R8: (1 sc, 1 inv sc dec) x 6
R9: 1 sc per st
add polyfill
R10: inv sc dec all around, close the hole
Using white yarn, embroider a Z on the top using back stitches
Pink Praline
Herrschners Supreme geranium
R1: MR, 6 sc
R2: 2 sc in each st
R3: (1 sc, 2 sc) x 6
R4: in blo, 1 sc per st
R5-7: 1 sc per st
R8: (1 sc, 1 inv sc dec) x 6
R9: 1 sc per st
add polyfill
R10: inv sc dec all around, close the hole
Using espresso yarn, embroider lines (sprinkles) on the top

White Praline
WeCrochet Brava White
R1: MR, 6 sc
R2: 2 sc in each st
R3: (1 sc, 2 sc) x 6
R4: in blo, 1 sc per st
R5-7: 1 sc per st
R8: (1 sc, 1 inv sc dec) x 6
R9: 1 sc per st
add polyfill
R10: inv sc dec all around, close the hole
Using geranium yarn, embroider 3 french knots on the top
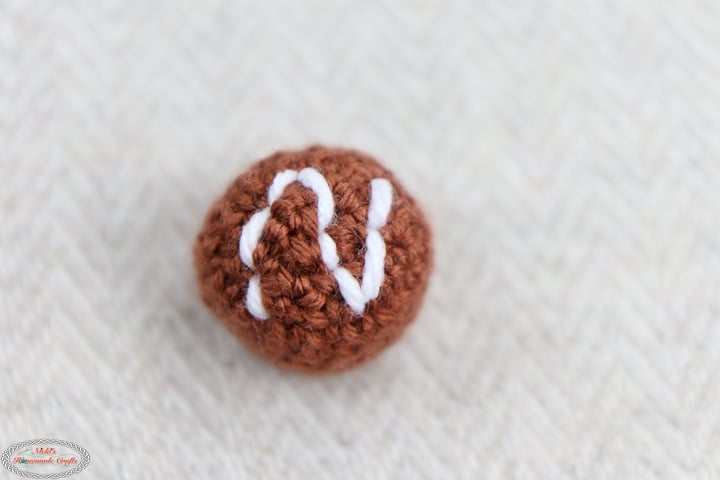
Hashtag Praline
WeCrochet Brava Espresso
R1: MR, 6 sc
R2: 2 sc in each st
R3: (1 sc, 2 sc) x 6
R4: in blo, 1 sc per st
R5-7: 1 sc per st
R8: (1 sc, 1 inv sc dec) x 6
R9: 1 sc per st
add polyfill
R10: inv sc dec all around, close the hole
Using white yarn, embroider a hashtag on the top

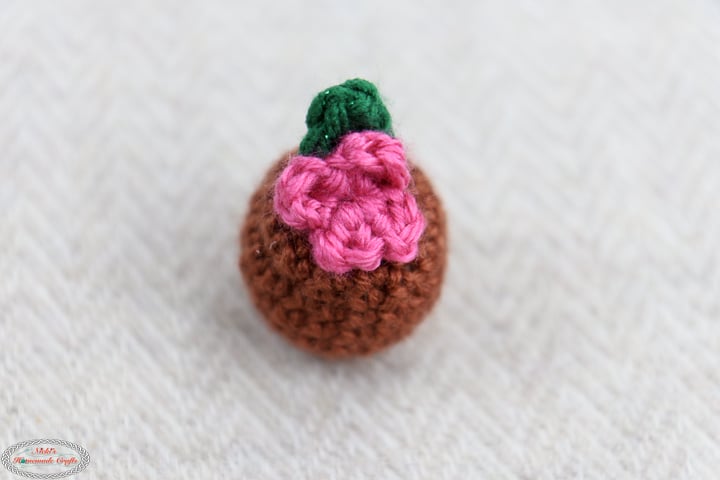
Flower Praline
Herrschners Supreme penny
R1: MR, 6 sc
R2: 2 sc in each st
R3: (1 sc, 2 sc) x 6
R4: in blo, 1 sc per st
R5-7: 1 sc per st
R8: (1 sc, 1 inv sc dec) x 6
R9: 1 sc per st
add polyfill
R10: inv sc dec all around, close the hole
Flower
Geranium: MR, (ch 1, 2 dc, ch 1, sl st) x 4, close the magic ring
Emerald: ch 4, start from 2nd ch, 1 sc, 1 hdc, 1 dc
Fasten off, sew leaf below the petals, then sew to the praline
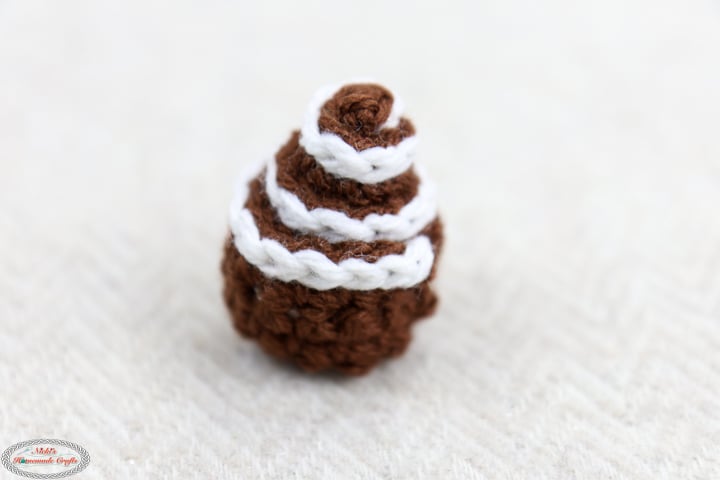
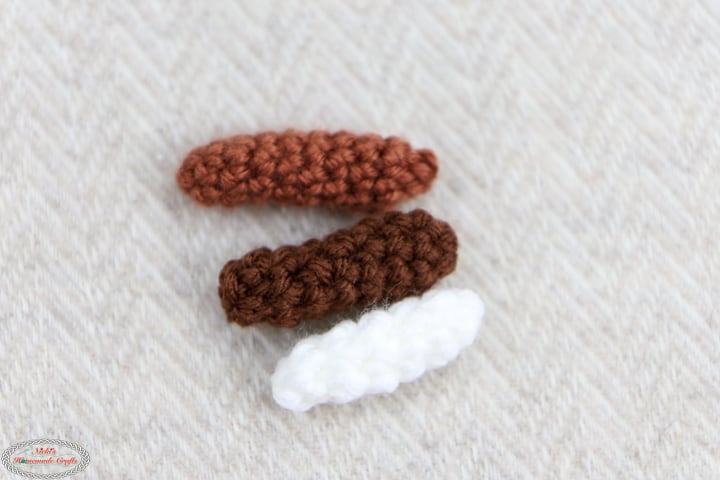
Spiral Praline
WeCrochet Brava Espresso
R1: ch 31, start from the 2nd ch, 1 sc per st, turn
R2-4: 1 sc per st
R5: in WHITE, 1 sl st per st, fasten off
Spiral (in different heights/layers) the rectangle, then sew it together to stay that way.
Stick Praline
WeCrochet Brava Espresso and White, Herrschners Supreme penny
R1: MR, 5 sc
R2-6: 1 sc in each st
Fasten off, weave in ends
Assembly
Put all the pralines inside the mini muffin liners and add them to the green box. Add a love letter, gift card etc, into the envelope and then put the lid on.
Now, it’s ready to gift it to someone special.
Remember to post your final images by 1/17/26, 10am, PT to our Facebook group using the hashtag #LIVECALJAN26 so we can celebrate you and you qualify for the giveaway. The Winners will be announced at the big Party on 1/17/26 at 12pm, PT HERE.
HUGE Crochet Party with Lots of Prizes
The LIVE PARTY with 12 PRIZE Winner Announcement starts on 1/17/26 at 12pm, PT HERE on Youtube.
The next LIVE CAL, after the current one finishes, will likely be in March/April 2026, as I am going to have them now every other month. Get ready for it 🙂 Just be on my Newsletter list and you will not miss it.