How to Crochet Bow in Striped Colors – Free Pattern
This post includes affiliate links.
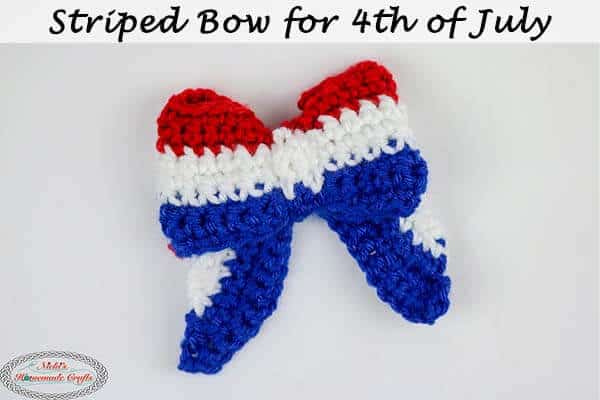
This is a free crochet bow pattern for creating a Bow in Striped Colors. This pattern can also be made in solid colors. Photos and a video tutorial are included.
Bows are so versatile and so much fun. They can be used on presents, as household decorations, on clothing, in hair, on hats…the possibilities are truly endless!
And there’s nothing I love more than seeing little girls wearing bows the size of their heads.
To learn how to make your own bow for whatever purpose you desire, please continue to read below.
Crocheting a Bow is very easy and fun. My first crocheted bow pattern was actually for the Advent Wreath I created for Christmas.
But I felt like I wanted to adjust the pattern to make it in stripes. I think this 4th of July themed bow turned out wonderful.

Crochet Bow Pattern Details
It is ideal as a bow tie, bow headbands or even a bow hair tie.
I can see so many other possibilities on how this bow can be used, but that would make this pattern too long.
Many girls will love this striped crochet bow pattern for themselves and for their dolls (just use thinner yarn and a much smaller hook to reduce the size).

If you prefer making crochet bow in a solid color, either check out my general crochet pattern for it below as a video tutorial or see my Advent Wreath crochet pattern where you can see additional photos as well.
I will for sure use this bow for my 4th of July celebration as a bow hair tie as you can see it below.
If you like more stripes or 4th of July pattern be sure to check out the Striped Crochet Bag Pattern or the Roundup of 4thof July Patterns.

Crochet Bow PDF Pattern
Now, before I show you the materials and the actual free crochet pattern, please also be sure to add this pattern to your Ravelry favorites by clicking the button below as that allows my pattern being shown to more people who might want to see it and also want to make it.

If you add this crochet bow pattern to you Ravelry Favorites and share it on social media as a link, I will be able to share a lot more free crochet patterns for you all.
In addition, I created a downloadable pdf for you, that has all the pictures separated from the pattern.
So you can choose whether you want to print them or not. That can save you a lot of ink in the long run.
You can get the crochet pattern for the Striped Bow on Ravelry, Etsy, LoveCrafts, or my new membership The Crochet Club.
The Crochet Club has so much more to offer than just PDF patterns! You get tutorials, references and the complete VIP treatment as well.
If you pay just twice the amount as this pattern costs and you have a month’s worth of The Crochet Club Membership with a lot more patterns! It’s well worth it.
If you do not want to join The Crochet Club, you can also purchase the ad-free printer-friendly PDF pattern at the links below.
But IF you join the All-Access Membership you will automatically get this pattern.


So let me now get started and tell you what you will need in order to crochet this amazing pattern.
How to crochet the Bow in Striped Colors
Materials:
- Premier Yarns Everyday Anti-Pilling Worsted yarn in really red
- I love this yarn in colors royal and white
- 5.0mm hook
- scissors
- tapestry needle
Stitches used (US terms):
Click HERE to learn these basic stitches
- ch = chain
- sc = single crochet
- sl st = slip stitch
- dec = decrease
- chainless foundation single crochet
Gauge:
3 rows x 3 sts = 1 square inch
Final Size:
4 (wide) x 4.5 (in height) inches
Crochet Bow Written Instructions:
I have added a video tutorial below for your convenience to get the main idea on how to make it bow.
BUT the video shows the bow in a solid color and the small piece of the bow is made slightly different. Please keep that in mind.
But the video should help you in case you have trouble assembling it (same for solid or striped).
Start with the yarn royal
Chain 51, then starting from the 2nd ch from the hook
Row 1: 1 sc dec, 1 sc in each st until 2 sts left, 1 sc dec, ch 1, turn (48 sts)
Row 2 – 3: repeat row 1
Change colors to white
Row 4 – 6: repeat row 1 (after row 6, you have 38 sts)
Fasten off white and start with really red
Row 7: skip 7 stitches, attach the yarn, 1 sc in each st until 7 sts left, ch 1, turn
Row 8: 1 sc in each st, ch 1, turn
Row 9: 1 sc in each st, ch 1 turn, sl st and fasten off.
Small piece to wrap around the bow:
You will now use the chainless foundation single crochet chain technique. Be sure you are familiar with it.
Start with royal blue and make 3 stitches using the chainless foundation single crochet, then switch colors to white and also crochet 3 stitches the same way.
Now switch colors again to really red and also crochet 3 chainless foundation single crochets.
Row 2: 1 sc in the next 3 sts in really red, 1 sc in the next 3 sts in white, 1 sc in the next 3 sts in royal, fasten off, cut the end to be about 18 inches long for sewing.
Fold the large piece to make it look like a bow (left and right long wing inwards so the ends hang down), add the small piece on top of the large piece and pinch the middle and sew together the end of the small piece in the back.
Fasten off and weave in the ends.
You can see what the back looks like here where I also added a hair tie so it can be used to add it to a ponytail.

Video Tutorial to Learn how to Crochet a Bow in a Solid Color and see how to assemble and sew it
Subscribe to my Youtube Channel here:
[youtube-subscriber channelID=UCSI4OeQQnxVQEAwMGeTCn1Q layout=full subscribers=default]
TO SUMMARISE…
Firstly, if you love this crochet bow pattern, please use the social media share buttons above or below. Share this pattern link with the world and your friends.
That way you will find it easily again when you need it. You will also provide the world and your friends with the ability to gain extra crochet knowledge as well.
Secondly, to top it off, you help me as it allows me to create more content that you love already and want to see more of – free crochet patterns and tutorials. So, thank you for sharing.
Lastly, if you love my crochet patterns and the way I teach, I would suggest subscribing to my newsletter. I share new patterns, tutorials, and special announcements often.
Be sure to share this pattern as a link with the world on social media using the buttons above or below this pattern. I hope you enjoy it. Thanks for sharing.