Free Crochet Christmas Tree Tissue Box Cover Pattern
This post includes affiliate links.
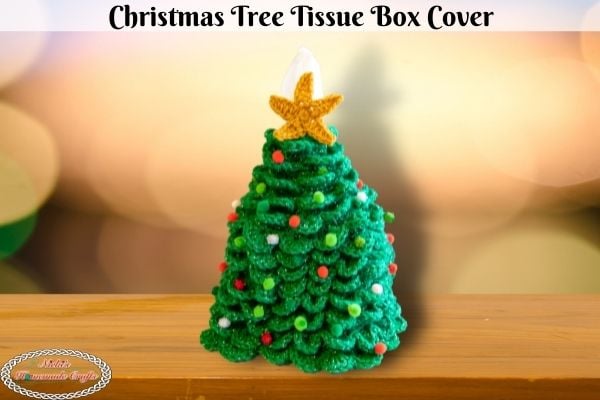
This free pattern is for a Christmas Tree Tissue Box Cover for the Holiday Season. This pattern is made using single and double crochet stitches as well as sparkle yarn to make it shimmer like lights.
Ok, I’m officially obsessed! I love crocheting tissue box covers. They are so much prettier than traditional store-bought tissue boxes. Plus they also make great yarn storage containers as well as “trash cans” for used tissues and yarn scraps.
If you have never tried making a tissue box cover, I sure hope this will be the first one you try. It’s fun and fairly easy to crochet, even for a beginner.
Using only basic crochet stitches and 4 rounds that repeat themselves, you can easily make this tree bigger or smaller. In fact, you can even use the Christmas Tree for another decor, not sure for tissue boxes. Maybe even as a hat?
Ready to make this one?

Crocheting Tissue Box Covers
Well, this Christmas Tree Tissue Box Cover is not my first pattern for tissue boxes. I have made 20 other crochet patterns for them before. So far 1 for rectangle boxes and in total 20 for square boxes.
My new ebooks include all 20 square tissue box cover crochet patterns and even explain the idea of how to start your own design. And of course, the ebook also comes with lots of videos.
Get the PDF of the Christmas Tree Tissue Box Cover Pattern

This pattern is also available as an ad-free, printer-friendly pdf pattern that can be purchased at the links below for only a small fee.


If you like this Tissue Box Cover crochet pattern, you might like these also:


- Gift Tissue Box Cover
- Santa Belt Tissue Box Cover
- Snowman Head Tissue Box Cover
- Gingerbread House Tissue Box Cover
So, let me now give you the supplies you need in order to crochet this cute pattern.
How to crochet a Christmas Tree Tissue Box Cover
Materials you will need
- Hobby Lobby – I love this yarn Sparkle
- JeallyBean (2 skeins)
- Premier Everyday Yarn
- Mustard (just a tiny bit)
- Tiny christmas colored poms
- Glue (like hot glue)
- 4.00 mm hook
- scissors
- tapestry needle
Gauge
4 sts x 5 rows = 1 square inch
Size
Fits a tissue box cover: 4.25 x 4.25 x 5 inches
Stitches used in the pattern
Learn all the basic crochet stitches HERE
- sc = single crochet
- sl st = slip stitch
- blo =back loop only
- flo = front loop only
- dc = double crochet
- ch = chain
Christmas Tree Tissue Box Cover Pattern Video Tutorial
Subscribe to my Youtube Channel here:
[youtube-subscriber channelID=”UCSI4OeQQnxVQEAwMGeTCn1Q” layout=”full” subscribers=”default”]
Free Written Pattern for the Christmas Tree Tissue Box Cover
First, you’ll be crocheting the Christmas Tree from the top down. Then you will crochet the star. Finally you’ll be gluing on the star and poms to the tree.
You’ll be crocheting in continuous rounds, so be sure to use a stitch marker.
Crochet Christmas Tree
Ch 15, make a loop with a slip stitch connect the first and last st
R1-2: 1 sc in each st
R3a: *1 sc in flo, sk 1 st, 7dc in the next st, sk 1 st, repeat from * until the end even if the pattern is only partly finished
R3b: you’re working into the leftover back loop from the previous round, 1 sc in each st
R4: *1 sc, 1 sc inc, repeat from * until the end even if the pattern is only partly finished
R5: 1 sc in each st
R6: Repeat R3a and R3b
R7: *1 sc in the next 2 sts, 1 sc inc, repeat from * until the end even if the pattern is only partly finished
R8: Repeat R5
R9: Repeat R3a and R3b
R10: *1 sc in the next 3 sts, 1 sc inc, repeat from * until the end even if the pattern is only partly finished
R11: Repeat R5
R12: Repeat R3a and R3b
R13: *1 sc in the next 4 sts, 1 sc inc, repeat from * until the end even if the pattern is only partly finished
R14: Repeat R5
R15: Repeat R3a and R3b
R16: *1 sc in the next 5 sts, 1 sc inc, repeat from * until the end even if the pattern is only partly finished
R17: Repeat R5
R18: Repeat R3a and R3b
R19: *1 sc in the next 5 sts, 1 sc inc, repeat from * until the end even if the pattern is only partly finished
R20: Repeat R5
R21: Repeat R3a and R3b
R22: *1 sc in the next 6 sts, 1 sc inc, repeat from * until the end even if the pattern is only partly finished
R23: Repeat R5
R24: Repeat R3a and R3b
R25: *1 sc in the next 7 sts, 1 sc inc, repeat from * until the end even if the pattern is only partly finished
R26: Repeat R5
R27: Repeat R3a and R3b
R28: *1 sc in the next 8 sts, 1 sc inc, repeat from * until the end even if the pattern is only partly finished
R29: Repeat R5
R30: Repeat R3a and R3b
R31: *1 sc in the next 9 sts, 1 sc inc, repeat from * until the end even if the pattern is only partly finished
R32: Repeat R5
R33: Repeat R3a and R3b
R34: *1 sc in the next 10 sts, 1 sc inc, repeat from * until the end even if the pattern is only partly finished
R35: Repeat R5
R36: Repeat R3a and R3b
R37: *1 sc in the next 11sts, 1 sc inc, repeat from * until the end even if the pattern is only partly finished
Fasten off and weave in your ends
Now insert the tissue box inside the tree to make it easier to add the poms and star.

Crochet Star
R1: make a magic ring (or ch 2), and add 10 sc, sl st
R2: *ch 6, from the 2nd ch from the hook, 1 sc, 1 hdc, 1 hdc, 1 dc, 1 tr, now sk 1 st, from where the ch starts, sl st, in the next st repeat from * 4 more times
Fasten off and weave in your ends.
Now glue the star to the top of the tree.
Adding the Ornaments to the Christmas Tree
Finally glue the poms to the tree all around however you like.
Although I used sparkling yarn, you can also add a light string (real or fake) around as well.
Finally add your tissue box from the bottom into Christmas Tree.

Be sure to join my Crochet Facebook Group and show off your crochet creation. I would love to admire them and cheer you on as you’re working on creating it and after you finished it.
I’m also always here to support you through this and any other pattern and tutorial. Simply ask in my group and me and other amazing and kind crocheters will help you along.

If you love this pattern, please use the social media share buttons above or below and share this pattern link with the world and your friends.
That way you will find it easily again when you need it and you also provide the world and your friends with the ability to gain extra crochet knowledge as well. And to top it off, you help me as it allows me to create more content that you love already and want to see more of – free crochet patterns and tutorials. So, thank you for sharing.
If you love my crochet patterns and the way I teach, I would suggest subscribing to my newsletter below as I share new patterns, tutorials, and special announcements often.