How to Make a Crochet Rope – Easy Photo and Video Tutorial
This post includes affiliate links.
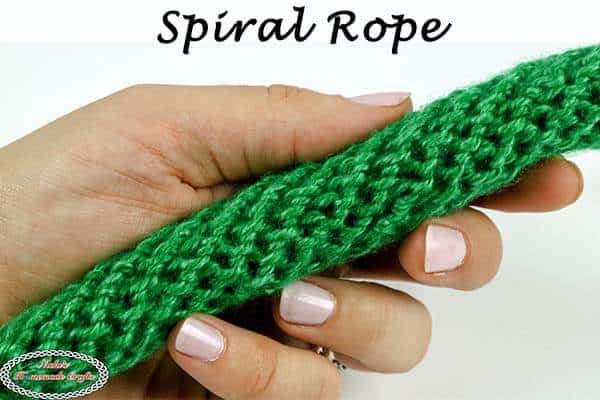
This is a simple, free tutorial on how to make a crochet rope. The crochet spiral rope has many uses in different craft projects. Use it as a bag or basket handles or as rope in specific craft projects.
When doing a search for spiral rope, one finds several results. They are showing lovely seed bead jewelry that employs a technique to create a spiral twist in the finished product. But did you know that the spiral rope is for more than just bead jewelry? That’s right. You can also make a lovely crochet spiral rope to add to your crochet projects.
If you would like to learn how to crochet a rope, please continue to read below for the easy-to-follow tutorial.
Crochet Rope Tutorial Basics
This Tutorial will teach you how to crochet a spiral cord easily. You can also call it a spiral crochet tube if you wish, but they are all the same thing. When I first learned about this spiral rope, I was very confused. The wrong side of the work was on the outside and the right side of the work was located on the inside. Furthermore, you do not place the single crochet stitches where they normally are. But after trying it out a few times, I figured out where all the stitches are. It became a lot easier.

Now, before I start teaching you how to crochet this spiral rope pattern, I must explain to you where to put the stitch. Typically we put any kind of stitch underneath the V which refer to as the front and back loop. But there are other places where to add a stitch. The second most known way would be to add the stitch to either the front or the back loop. And the final way would be the 3rd loop behind the V.
Now the crochet spiral rope is crocheted differently. You will add the stitches to neither of the just listed stitches, but rather the horizontal bar that is created when you crochet any basic stitches. To be more clear, the horizontal bar is the yarn strand that is created, and kind of hidden and never looked at, when two stitches are connected.
Where to place the stitches to create the crochet spiral?
So when you crochet a single crochet, you need to be able to get your yarn from stitch to stitch, when that is the yarn strand used to connect two stitches. I have it shown on the picture (showing the backside of a single crochet) below which I found on Annie’s website. I added some text, color and an arrow to better show off the horizontal bar I am talking about.

If that picture is not very clear, be sure to check out the very detailed video tutorial below. I explain and show in detail where the horizontal bar is and where to place the stitches in order to crochet a spiral rope.
If you prefer to have the right side outwards, be sure to check out my video tutorial to learn how to crochet an I-cord. You can use the Spiral Rope for Bag Handles. the I-cord would take longer to create than the Spiral Rope, though. I may not have used the Spiral Rope for the Flower Shoulder Bag, but you can easily substitute the handles with this one. The Crochet Backpack Pattern also uses a crochet spiral rope. It’s a fun, easy, and very popular pattern.
But let’s get started with the actual photo and video tutorial for the Crochet Spiral Rope.
How to crochet Spiral Rope – Video Tutorial
Subscribe to my Youtube Channel here:
[youtube-subscriber channelID=UCSI4OeQQnxVQEAwMGeTCn1Q layout=full subscribers=default]
How to Make This Easy Crochet Rope – Photo Tutorial
1. First, make a magic ring and add as many single crochets as you wish. The more you add the bigger and thicker the spiral crochet rope will be. In this example, I added 8 single crochets. Next, pull the ring closed and crochet 1 round (continuous with no slip stitches) of back loop single crochets (one stitch per stitch). Now you will start using the horizontal bar. I pulled the horizontal bar out a little bit in the picture below so you can see where it is.

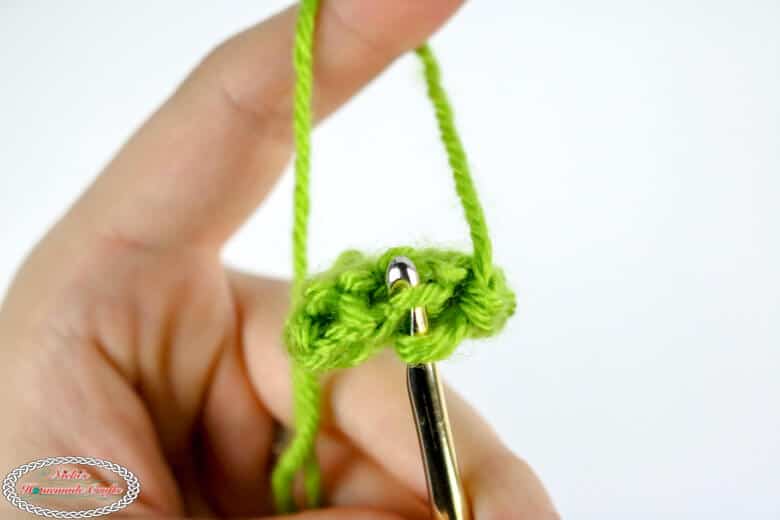
2. Here I am showing you the horizontal bar from a different perspective. It is the upside down U you see closest to my finger, in the center of this sample.

3. To be even more clear, I inserted my crochet hook into the horizontal bar shown below. You will now create a single crochet right onto this horizontal bar to create a spiral effect.
4. This picture shows a dramatically elongated version of the horizontal bar. I decided to hold the yarn a bit longer before creating my next single crochet to show off what the horizontal bar actually is for. You can see very clearly here that it is the yarn strand connecting 2 stitches together. Most crocheters either never think about this stitch or are not even aware of it and that it can be used.

5. In the picture below, can you see the horizontal bar? Once you tried it out a few times, it really is easy to spot it.


6. So, now that you know where the horizontal bar is, just keep crocheting one single crochet onto each horizontal bar in a round as long as you need your crocheted spiral rope to be.
7. Once you get a bit further down, you might want to tilt the project to the side and keep crocheting that way as that might be more comfortable for your hands and wrists. So, just keep crocheting single crochets onto the horizontal bar to create a spiral rope.

If you found this picture tutorial too confusing, I highly recommend for you to check out the video tutorial above. Be aware I do provide a quick instructional lesson about the horizontal bar first as that might otherwise be to confusing if I would not have done that.
My friend Cheryl at Crochet 365 and Knit too also created a video and photo tutorial for the Spiral Rope. So if you don’t understand my version, you should try hers HERE. Also, I need to give my friend Cheryl from Crochet 365 Knit Too a big thank you for this tutorial idea. You are awesome!
Be sure to share this pattern as a link with the world on social media using the buttons above or below this pattern. I hope you enjoy it. Thanks for sharing.


no video for the spiral rope
Yes, there is a video for the spiral rope. Towards the bottom of the tutorial it says “video tutorial” and right underneath is the video.
The drawings that you show in the video are A+. They show the “bar” from the side you need to see, whereas the drawing here is a view where you don’t get to clearly see the important stitch. I was puzzled as to why that is. The photographs are somewhat vague without adding arrows to pinpoint the “bar” for the viewer. But, the work as a whole is FABULOUS and is the best video I can find to understand how to make this cord. Thank You for your hard work here and with your video. ?
Your tutorial is a life saver. Had almost given up on the spiral but sae your video and you made sense of it. Thank you…
Loved your tutorial! I almost gave up!