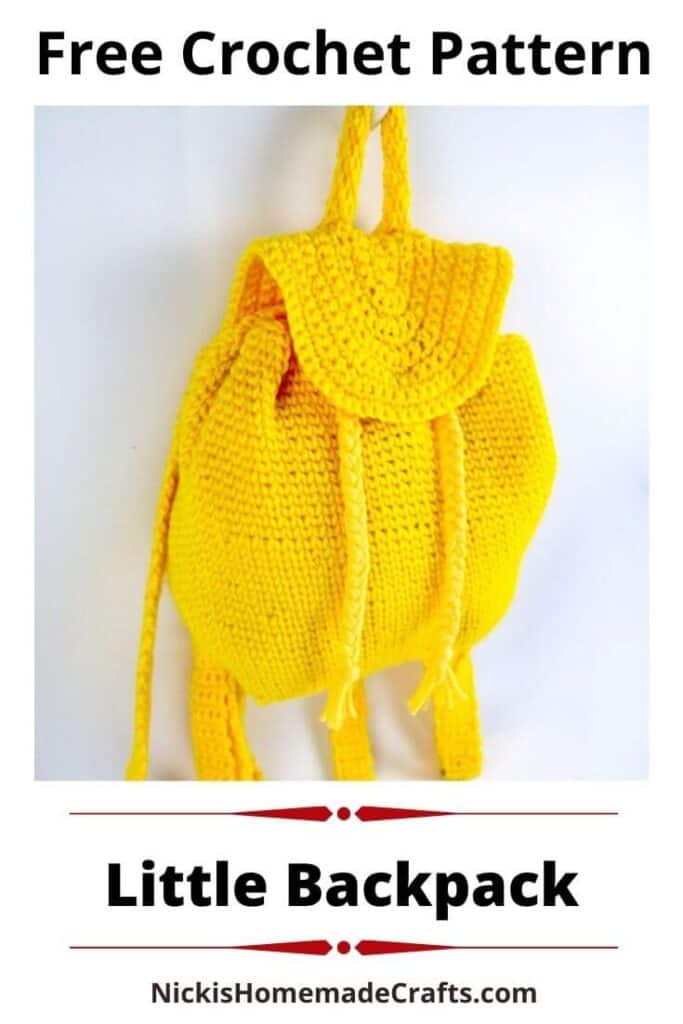
Mini Crochet Backpack – Easy Free Crochet Pattern for School
This post includes affiliate links.
This is a free crochet pattern for the Mini Backpack. This mini crochet backpack uses crochet stitches that are thick and sturdy, therefore not requiring any sewing or fabric lining. It utilizes slider buckles to adjust the length of the shoulder backpack straps.
The little boy marched into his classroom proudly. He was completely prepared for his first day of school. Paper? Check. Pencil? Check. Backpack? Check! But this was no ordinary backpack. No, this was a special mini crochet backpack. As his abuela had told him, “This backpack is lucky. It is made with all of my love for you so it will keep you safe while you are at school.”
Whether for yourself or a loved one, you can make one too!

How to Crochet a Backpack
Well, for my Summer Crochet Backpack I added fabric to the back to prevent the stretch and created lots of stability. But for this mini crochet backpack, I added two yarn strings glued to the back of the straps.
First, it created stability and prevented the stretch but it is also thinner and more comfortable on your shoulders. As most crocheters know, crocheting straps that do not stretch yet provide comfort when it comes to carrying a bag or backpack can be challenging.
Crocheting with the thermal stitch for the bottom of the little backpack and the waistcoat stitch for the body made the backpack sturdy and thick which, therefore, allows you to secure any of your school or personal items inside it without having to worry about losing them.
Furthermore, the braided drawstrings made out of t-shirt yarn let you close up the mini crochet backpack easily whereas the magnetic snaps on the flap provide the extra closure needed to make the crochet backpack look finished and adorable.
Crochet Backpack for School
In fact, I created this mini crochet backpack as I noticed that at my kid’s middle and high school most of the girls are wearing and using these stylish mini backpacks for their personal items. Instead of larger backpacks where their school supplies are carried in, these girls carry their mini backpacks on their backs and hold their school supplies in their arms.
I might not agree with that trending style as the ideal back support, but if those girls are interested in crafts and DIY, they will for sure love this yellow mini crochet backpack.
But of course, this mini crochet backpack would also be ideal for toddlers to can carry their toys or little diaries, pencils, and pens.
If you like this backpack crochet pattern, you might like these, too:


- 5 Ways to Make a Crochet Bag
- Sew Lining to a Crochet Bag or Backpack
- 10 Free Crochet Patterns for Back to School
- Simple Summer Crochet Bag
Mini Crochet Backpack PDF
Now, before I show you the materials and the actual free crochet pattern, please also be sure to add this pattern to your Ravelry Favorites by clicking the button below as that allows my pattern being shown to more people who might want to see it and also want to make it.

This pattern is also available as an ad-free, printer-friendly pdf pattern that can be purchased at the links below for only a small fee.


So let me now get started and tell you what you will need in order to crochet this amazing pattern.
How to Crochet a Backpack step by step
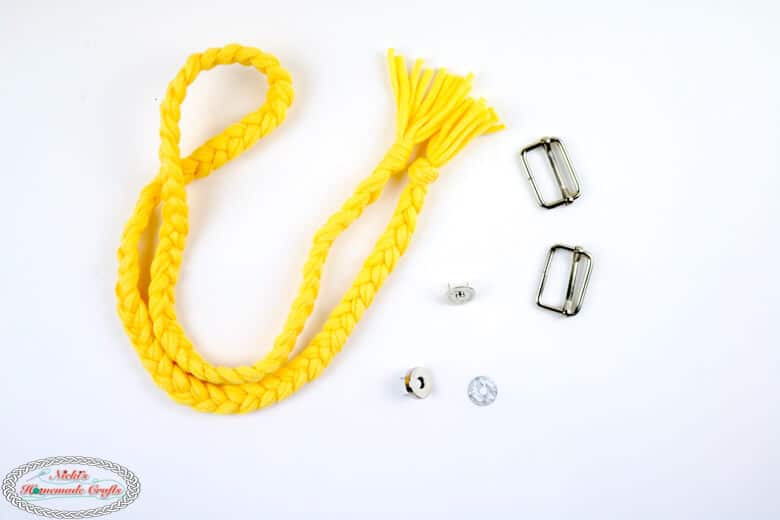
Materials
- Premier Yarns Anti-Pilling Everyday Worsted Yarn (little more than 3 skeins):
- lemon
- Bernat Maker Dec yarn (less than 1 skein):
- gold (for braided drawstrings only)
- 5.0mm hook
- scissors
- tapestry needle
- Magnetic Snaps
- Hot Glue Gun
- 1-inch Slide Buckle
Stitches used (US terms)
Click HERE to learn these basic stitches
- magic circle
- ch = chain
- sc = single crochet
- sl st = slip stitch
- dec = decrease
- wst = waistcoat stitch
- spiral rope
- thermal stitch
Gauge
4 rows x 3 sts = 1 square inch (using waistcoat stitch)
Final Size
10 (H) x 9 (W) x 5 (D) inches (without straps or loop)
Free Written Instructions for the Mini Crochet Backpack
All crochet parts are made with the lemon yarn. Only the drawstrings are braided with the t-shirt Bernat Maker Dec yarn.
Crochet Backpack Bottom
Ch 25
Row 1: starting from the 2nd ch from the hook, 1 sc in each st, ch 1, turn
Row 2 – 28: 1 thermal stitch in each st, ch 1, turn

After row 28, you will now crochet in rounds.
Round 1: place single crochets evenly all around the rectangle (I had 77 sts), making sure to crochet only 1 sc in each corner
Round 2: 1 wst (waistcoat stitch) in each sc
Round 3 – 35: 1 wst in each wst
Now lay the almost finished backpack flat on a flat surface such that the rectangle bottom is parallel to the last round you crocheted. Now divide up the front and back into 3 equal parts and add stitch markers (one each) where the 3 parts separate. Next, add stitch markers (one each) on each side. You will now have 6 stitch markers which will help you create the holes for the drawstring.
Round 36: crochet 1 wst in each wst, stop 2 sts before each stitch marker and do the following: 1 wst dec, 3 chs, 1 wst dec; then continue with the normal wst pattern
Round 37: crochet 1 wst in each wst, even into the wst dec’s from the previous round, when you reach the chs, crochet 1 sc into each and continue with the wst pattern
Round 38: crochet 1 wst in each wst, even into the sc’s from the previous round
Round 39 – 40: 1 wst in each wst
Fasten off when you reach one of the sides, so you can hide the slip stitch. Weave in the end.

Mini Crochet Loop as a Hanger
Round 1: Make a Magic Circle and add 5 sc’s
Round 2: Going in continues rounds, 1 sc in the blo of the next 5 sts
Starting Round 3: crochet 1 sc into the horizontal bars between the stitches which creates a Spiral Rope (click the link to the see the photo and video tutorial for it)
Make the Spiral Rope 6 inches long. Fasten off and weave in the ends

Flap for the Crochet Backpack
Ch 15
Round 1: starting from the 2nd ch from the hook, 1 sc into the next 13 sts (go into the back bump to make it look neater without hole later), 3 sc in the last st, now turn and work on the opposite side of your work, crochet 1 sc in each st, ch 1, turn
Round 2: 1 sc in the next 13 sts, 2 sc in the next 3 sts, 1 sc in the next 13 sts, ch 1, turn
Round 3: 1 sc in the next 13 sts, [1 sc next st, 2 sc same st] 3 times, 1 sc in the next 13 sts, ch 1, turn
Round 4: 1 sc in the next 13 sts, [1 sc next 2 sts, 2 sc same st] 3 times, 1 sc in the next 13 sts, ch 1, turn
Round 5: 1 sc in the next 13 sts, [1 sc next 3 sts, 2 sc same st] 3 times, 1 sc in the next 13 sts, ch 1, turn
Round 6: 1 sc in the next 13 sts, [1 sc next 4 sts, 2 sc same st] 3 times, 1 sc in the next 13 sts, ch 1, turn
Round 7: 1 sc in the next 13 sts, [1 sc next 5 sts, 2 sc same st] 3 times, 1 sc in the next 13 sts, ch 1, turn
Round 8: 1 sc in the next 13 sts, [1 sc next 6 sts, 2 sc same st] 3 times, 1 sc in the next 13 sts, ch 1, turn
Round 9: 1 sc in the next 13 sts, [1 sc next 7 sts, 2 sc same st] 3 times, 1 sc in the next 13 sts, ch 1, turn
Round 10: 1 sc in the next 13 sts, [1 sc next 8 sts, 2 sc same st] 3 times, 1 sc in the next 13 sts, ch 1, turn
Round 11: 1 sc in the next 13 sts, [1 sc next 9 sts, 2 sc same st] 3 times, 1 sc in the next 13 sts, ch 1, turn
Round 12: 1 sc in the next 13 sts, [1 sc next 10 sts, 2 sc same st] 3 times, 1 sc in the next 13 sts, ch 1, turn
Round 13: 1 sc in the next 13 sts, [1 sc next 11 sts, 2 sc same st] 3 times, 1 sc in the next 13 sts, ch 1, turn
Fasten off and weave in the ends.

Crochet shorter straps for shoulder backpack straps
Make 2
Ch 5
Row 1: starting from the 2nd ch from the hook, 1 sc in each st, ch 1, turn
Row 2 – 60: 1 sc in each st, ch 1, turn
Fasten off and weave in the ends.

Crochet Longer straps for shoulder backpack straps
Make 2
Ch 5
Row 1: starting from the 2nd ch from the hook, 1 sc in each st, ch 1, turn
Row 2 – 90: 1 sc in each st, ch 1, turn
Fasten off and weave in the ends.

Braid the Crochet Backpack Drawstring
Cut 9 pieces of gold t-shirt yarn (if you are using the lemon yarn instead, please cut 27 pieces) of about 1 yard each
Now braid 3 (or 9 if it is the lemon yarn) pieces per braided string into a braid (so it would be 3 x 3 strings or 9 x 3 for the lemon yarn). Tie off the ends into knots and cute the ends evenly.
Gluing all Crochet Backpack Pieces together
As I do not like hand sewing very much and my hot glue is extremely strong, I did not sew all the pieces together but rather used my hot glue gun. Feel free to sew it instead if you like.
First, glue the flap to the back of the backpack (one of the long sides). Next, weave the drawstring through the holes and then add the magnetic snap to the flap and the right below the middle where the drawstrings come out of the holes.

After that, you will make the shoulder straps (all 4) stronger and more sturdy by hot gluing 2 pieces of lemon yarn to one side of the straps.

Next, hot glue the slider buckles to one side of the short straps.

Finally, weave the longer straps through the slider buckles and then hot glue the shorter ends to the top of the backpack where the flat edge of the flap is and the longer strap to the bottom (close to the rectangle bottom, but still on the body of the backpack) of the backpack. Last, but not least, glue the spiral rope as a hanger to the back of the flap.

You are now done and can use the yellow little backpack for school supplies or personal items. I hope you enjoyed the pattern. Please share it with the world on social media using the links above or below. Thanks.
That way you will find it easily again when you need it and you also provide the world and your friends with the ability to gain extra crochet knowledge as well. And to top it off, you help me as it allows me to create more content that you love already and want to see more of – free crochet patterns and tutorials. So, thank you for sharing.
If you love my crochet patterns and the way I teach, I would suggest subscribing to my newsletter below as I share new patterns, tutorials and special announcements often.


