How to Crochet a Flower Shoulder Bag Pattern Easily
This post includes affiliate links.
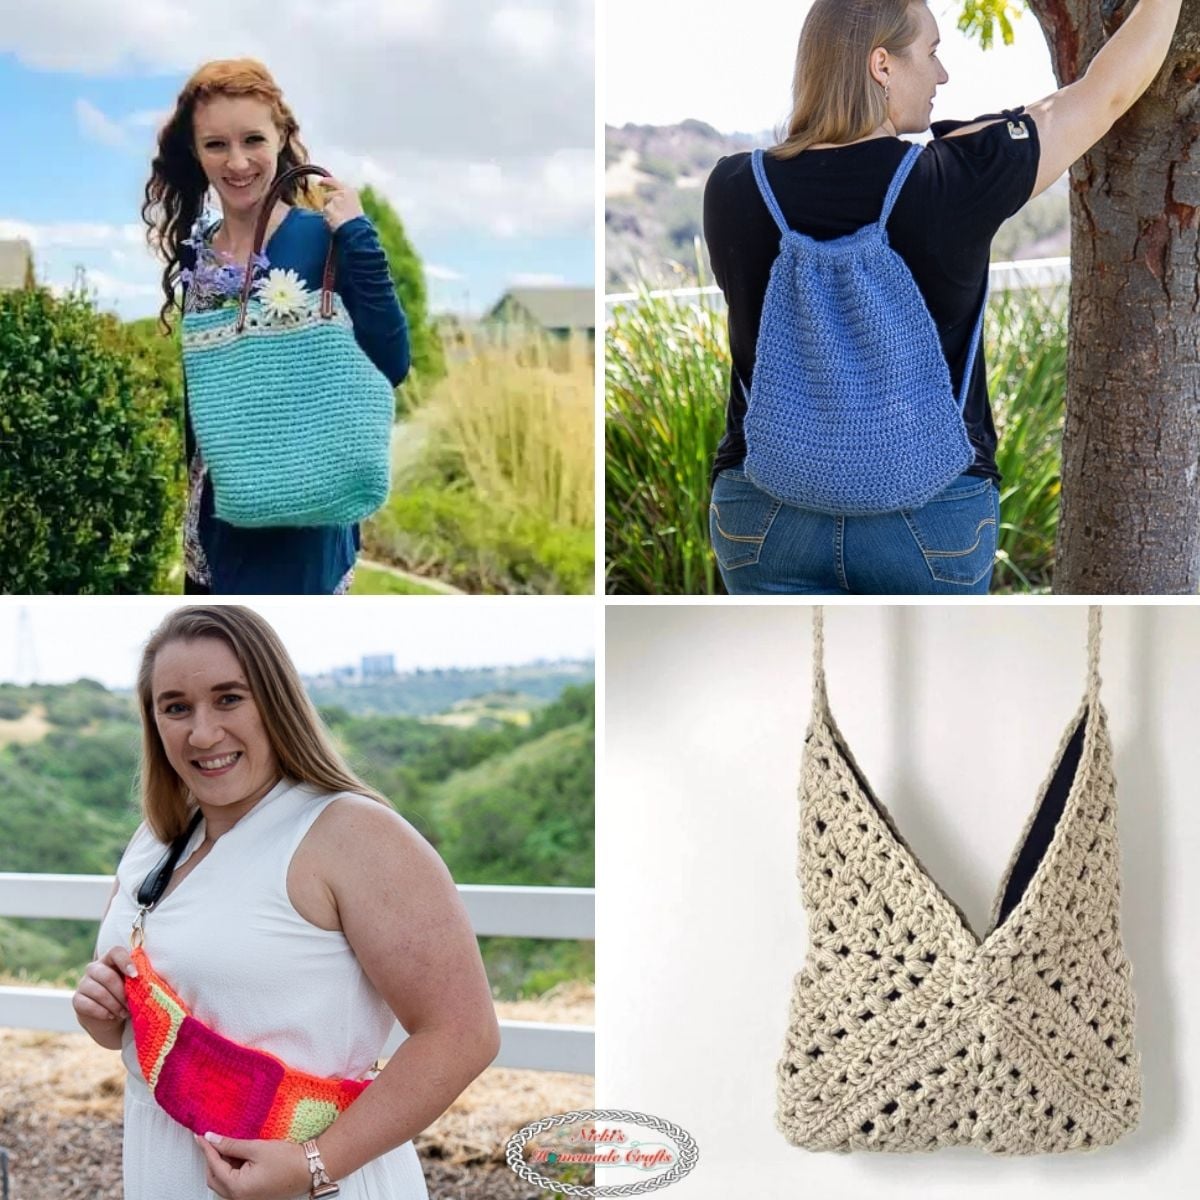
The Flower Crochet Bag pattern is a free crochet pattern here on the blog. It is a Boho-style shoulder bag with a flower in the front.
“I’ll tell you, I won’t go anywhere without my bag now.” The younger woman leaned over to look at the bag again and gave it a dubious look. “And you say you made this yourself?”
“I did. With my own two hands.” The older woman beamed. Seeing the look on the younger woman’s face, she amended. “You know, dear, it’s really not all that hard. Why…I’m sure I could teach you if you like.”
The young woman wasn’t sure if that would be what she liked at all. Although, it was a rather nice bag – albeit in an unconventional way. That is to say bohemian. And on the shoulder of an older woman no less.
The younger woman felt pretty sure that it was the young who typically influenced the fashion trends of the day. But here they were, and the younger woman was starting to warm up to the idea of a nice bohemian bag. It must be said that those artists did know how to leave an impression after all. And the lovely green flower with the yellow button center did complement the piece just so.
“Alright,” the younger woman finally conceded. “But only so long as you promise to provide the tea.”
The older woman laughed a full, hearty laugh. “But of course, my dear. That is social convention after all.”
If you too enjoy showing off your boho-style, this is the bag for you!

Flower Crochet Bag Pattern Inspiration
In California, it is starting to get pretty warm already. And when it get so nice and warm, I all I want to do is go outside and get inspired by nature when crocheting. Then I realized I also needed a new shoulder bag, but instead of buying one, I made one for myself.
I added a flower which was an inspiration from my garden. But instead of using the normal flower colors, I used a beautiful green metallic yarn. The reason for using green, you asked? Well, I decided to mix the color of grass with a flower. And I love it. It makes it special because I’ve never seen a green flower before.
Well, before I explain and list how I crocheted this flower shoulder bag, I would like to also mention that I added a zipper while crocheting, for which I included a video below. So if you have never attached a zipper while crocheting, please check out this video on the bottom of this pattern.
Get the flower crochet bag PDF pattern
Let me not hold you up anymore. Let’s get to the pattern. 🙂
But, before I show you the materials and the actual free crochet pattern, please also be sure to add this pattern to your Ravelry Favorites by clicking the button below as that allows my pattern being shown to more people who might want to see it and also want to make it.

If you add this pattern to you Ravelry Favorites and share it on social media as a link, I will be able to share a lot more free crochet patterns for you all.
In addition, I created a downloadable PDF of flower crochet bag pattern for you all, that has all the pictures separated from the pattern. So you can choose whether you want to print them or not. That can save you a lot of ink in the long run.
You can get the flower crochet bag pattern on Ravelry, Etsy, LoveCrafts, or my new membership The Crochet Club. The Crochet Club has so much more to offer than just PDF patterns! You get tutorials, references and the complete VIP treatment as well.
If you pay just twice the amount as this pattern costs and you have a month’s worth of The Crochet Club Membership with a lot more patterns! It’s well worth it.
If you do not want to join The Crochet Club, you can also purchase the ad-free, printer-friendly PDF pattern at the links below. But IF you join the All-Access Membership you will automatically get this pattern.


So let me now get started and tell you what you will need in order to crochet this amazing pattern.


How to make a Flower Crochet Bag Pattern easily
You will need these materials
- RedHeart Strata in color aran (3 skeins)
- Patrons metallic yarn in color green metallic
- 5.0mm hook
- 2.25mm hook
- yarn needle
- threading needle
- 100% cotton thread
- 9 inch zipper in white
- 1 button in yellow about 1 inch in diameter
- scissors
Gauge
4 hdc x 3 rows =1 square inch
Stitches used (US terms)
- Half double crochet = hdc
- Single crochet = sc
- Slip Stitch = sl st
- hdc in BLO (back loop only) and FLO (front loop only)
Flower Crochet Bag Pattern Instructions
Start with the Strata yarn
Ch 60, sl st to first chain to make a circle, Ch 1
Be sure to use a stitch marker now so, as you are going in continues rounds without using a sl st till the end.
Round 1-23: 1 hdc in each st all around
***Stop here, but do not sl st, we are preparing the zipper now so we can include it in the last round.


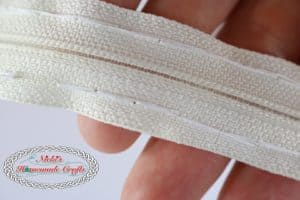
Prepare the zipper:
Using the cotton thread (make it double thread) and a threading needle, sew all the way around the zipper a straight line (26 on the elongated sides, and 2 on each side on the shorter sides), like the pictures show below.


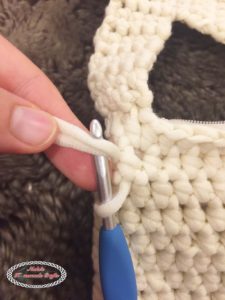
Now adding the zipper while crocheting the flower crochet bag pattern:
Now add the zipper while crocheting the last round of the bag. Switch to the 2.25mm hook as that makes it easier to go thru the thread on the zipper.
Keep crocheting hdc’s in each stitch. So to add the hdc with the zipper, do this: yo, insert hook thru the stitch, insert hook thru the thread stitch, yo, pull the yarn thru both the thread and yarn stitch, yo, pull thru all 3 loops.
Start adding the zipper on the zipper opening. 1 hdc in each of the thread stitches and yarn stitches (60 in total).
Do this all the way around. But place 2 hdc in each of the 2 sides thread stitches, such that you have 4 hdc’s on each the zipper opening and the end part of the zipper.
You should finish on one of the sides of the bag (zipper opening), you will now add the shoulder strap.
Pictures to show how to add the zipper while crocheting:


If the zipper feels too loose on the yarn, use superglue or hot glue to secure it tighter!
To add the shoulder strap, do the following:
Row 1: place 4 sc exactly where the zipper opening is, Ch 1, turn
Row 2-36: 4 sc, Ch 1, turn
If you like the shoulder strap to be longer, just do more rows. I made it bit shorter, because when you add items into the bag, it will be pulled down and therefore stretch a bit. So you should consider that when elongating the strap.
Slip stitch the shoulder strap to the end side of the zipper area.
Fasten off and weave in the ends.
Adding the inside pocket:
Turn the bag inside out.
Ch 16
Row 1: 1 sc in the second ch from the hook as well as the the 3rd loop of the hdc that was created when crocheting the bag (start on the 7th round from the bottom). See picture if you do not know what I mean. Do you see the wavy horizontal lines? Those are the 3rd loops of the hdc’s.
Repeat the process, by placing 1 sc in each ch as well as the 3rd loop of the hdc from the bag, Ch 1 , turn


Row 2-16: 1 sc in each stitch across, Ch 1 , turn

Fasten off and leave a long tail for sewing the sides on the bag. Again use the 3rd loop of the hdc’s from the bag vertically up and down to sew the sides onto the bag and in order not to have to cut the yarn for the opposite side, just weave the yarn thru the bottom part and work your way up the other side. See the picture below for a better idea on how to do the pocket and how to sew it onto the bag.


Closing the bottom of the flower crochet bag pattern
In order to close the bottom of the bag, turn the bag inside out (unless you already have it inside out) and sew from one side to the other side. Fasten off and weave in the ends.


Now turn in it the right way around again.


To add the strings to the Shoulder bag, do the following:
Use the same yarn (aran), cut 25 pieces of about 23 inches long.
Now to add one string, fold it in half and pull it thru the top left corner (see picture), now pull both strings thru and pull tight, like shown below.


Add more strings so they create a funnel/triangle, as shown on the picture below.

To cut the yarn strings all the same length, do as I show in the pictures below:


Now, it is time to add the flower. If you do not want to put a flower on it, you, of course, do not have to. This just gives it a focus point and something special to look at.
To add the flower to the Crocheted Shoulder Bag do the following:
Using the Patron yarn
Round 1: Make a magic ring, Ch 1 and crochet 10 hdc’s into the ring, pull tide, sl st to the first st
Round 2: Using the front loop only, place 2 hdc’s in the first st, *sl st to the next st, 2 hdc in the same st, repeat from * all around
Rnd 3: Using now the back loop only of the created round 1, place 2 hdc in each stitch all the way around, sl st to the first st
Round 4: Using the front loop only, place 2 hdc’s in the first st, *sl st to the next st, 2 hdc in the same st, repeat from * all around
Round 5: Using now the back loop only of the created round 1, place 2 hdc in the first stitch, place 1 hdc in the next st, *2 hdc in the next st, 1 hdc in the next st, repeat from * all the way around, sl st to the first st
Rnd 6: Using now both loops, place 2 hdc’s in the first st, *sl st to the next st, 2 hdc in the same st, repeat from * all around
Fasten off and use the yarn to tie it to the bag where you would like the flower. Also use the same yarn to add a yellow Botton to the center of the flower.

Congratulations, you have now finished your Flower Shoulder Bag.
Don’t you love it? It is just so beautiful, functional and elegant.
How to add a zipper while crocheting flower crochet bag pattern – Video Tutorial
Subscribe to my Youtube Channel here:
[youtube-subscriber channelID=UCSI4OeQQnxVQEAwMGeTCn1Q layout=full subscribers=default]
I hope you love this pattern as much as I do. If you love this pattern and technique, please use the social media share buttons above or below and share this pattern link with the world and your friends.
That way you will find it easily again when you need it and you also provide the world and your friends the ability to gain extra crochet knowledge as well. And to top it off, you help me as it allows me to create more content that you love already and want to see more of – free crochet patterns and tutorials. So, thank you for sharing.
Also, I share many more free crochet patterns and tutorials often in my Newsletter. Just for signing up I will send you a free ebook. If you are interested, please sign up below. I’m pretty sure you will enjoy my newsletter and support group on Facebook.


This is awesome! I just picked up crochet last year and this looks like something I feel ready to do! Thank you so much for sharing it.
Lovely bag, easy pattern to follow, waiting for some beads to add to tassels. Did a different flower as I found this one difficult to follow.
Thank you. Flowers are always a tricky part. I am glad you liked the bag and the pattern.
Hi Nicky. It would be sturdier and neater if you crochet around the zipper with a sharp hook/crewel needle and the same yarn for the project with slip stitches and crochet the sl st to the body of the bag where the zipper is intended to be. That way the zipper lays flat across the body of the bag and it wont move around when it is opened/closed. The bag is awesome. Thank you for the pattern. Would try this after I get some control over the ever growing chunk of WIPs. xoxo from India
Great idea. I will try that the next time. Luckily there are many ways to add crochet items to the zipper 🙂
Cute bag. In putting the zipper in yu write to “Keep crocheting cdc’s in each stitch.”. What is a cdc?
I just fixed it. Sorry, it was a small typo and meant to say hdc. Thanks for pointing it out.
The yarn you have used, Red Heart Strata the strata brand is now discontinued. Do you have another yarn you can suggest for this project?
Any T-shirt yarn (bulky, not super bulky) will do