Crochet Ear Warmers – Free Faux Knit Pattern
This post includes affiliate links.
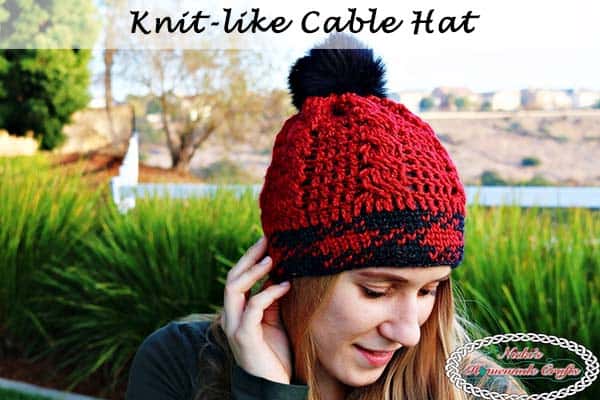
This Crochet Pattern is called the Faux Knit Ear Warmers. The ear warmer pattern uses the half double crochet in the 3rd loop which makes it look knit-like.
Yes, it’s Wintertime. But does it feel like that in Southern California? No, not really. So unless you live in the mountains, you will likely not even need a jacket – or only rarely. But when it does get a bit chilly and you want to style up, then ear warmers are great.
They are also great as a transition accessory into Spring or Fall when the weather is not warm or cold enough yet.
But this ear warmer is a bit warmer than normal ones, cause this one is made as a tube, and when it’s laid flat it’s double-layered.
The combination of faux knit (hdc in the 3rd loop) and the twist creates such a unique way to show the beauty of crochet with colors, dimension, and texture.

What is Faux Knit for Crochet Ear Warmers?
Well, faux knit means that the texture and look looks like knit, but it actually is not. It’s crocheted with a knit look.
There are many ways to create a faux knit look. You could use the waistcoat stitch or the Tunisian Knit stitch, or even slip stitches. But in this case, I used the Half Double Crochet in the 3rd loop behind the V.
In fact, the hdc in the 3rd loop stitch is super easy to crochet. The Faux Knit Ear Warmers pattern even comes with a video tutorial for it.
Furthermore, the Faux Knit Ear Warmers is made in a tube and therefore, crocheted in rounds. Most ear warmers are made in rows. But this pattern is like having 2 ear warmers sewn together, as it provides extra thickness to keep you warm and cozy, but still stylish and trendy.
More Faux Knit Crochet Patterns
If you love the faux knit look of the hdc in the 3rd loop, you may like to try the waistcoat stitch. You might like these patterns, as they are made with either one of these stitches:


Make sure you add the pattern to your Ravelry Favorites for future reference.

Get the PDF Pattern for the Crochet Ear Warmers
You can get the crochet pattern for the Faux Knit Ear Warmers on Ravelry, Etsy, LoveCrafts, or my new membership, The Crochet Club. The Crochet Club has so much more to offer than just pdf patterns. You can get tutorials, references, and the complete VIP treatment as well.
If you pay just twice the amount as this pattern costs and you have a month’s worth of The Crochet Club Membership with a lot more patterns! It’s well worth it.


If you do not want to join The Crochet Club, you can also purchase the ad-free, printer-friendly pdf pattern at the links below. But IF you join the All-Access Membership you will automatically get this pattern at no cost.


How to Crochet the Faux Knit Crochet Ear Warmers
Materials needed
- I love this Yarn – Stonewash (5oz/252yrd) in color deep violet (uses less than half a skein)
- 5.0mm hook
- scissors
- tapestry needle

Stitches used, in US terms
Click HERE to learn these basic stitches
- hdc = half double crochet
- 3rd loop behind the V
- ch = chain
- sl st = slip stitch
- mattress stitch
Final Sizes
9 x 3.5 inches
Gauge
4 hdc x 2 rows = 1 square inch
Video Tutorial for the Half Double Crochet in the 3rd Loop behind the V
Subscribe to my Youtube Channel here:
[youtube-subscriber channelID=”UCSI4OeQQnxVQEAwMGeTCn1Q” layout=”full” subscribers=”default”]
Written Instructions of the Crochet Ear Warmers
This pattern is made in a tube, then twisted, and then sewn together with the mattress stitch. This pattern is written as an adult pattern. If you want to adjust the pattern, you can change it according to the reference table attached. The width of the ear warmer is 3.5 inches (as a tube), so if you want to make it thinner, you need to reduce the number of chains you crochet in the beginning.
Ch 25, sl st to the first ch to make a circle.
R1: 1 hdc in each st
You will now go in continuous rounds, no sl st till the end.
R2 – 46 (measures 19 inches): 1 hdc in the “3rd loop behind the V” for each st
Sl st after the last round.
Now twist the tube 180 degrees and use the mattress stitch to sew the first and last round together.
Fasten off and weave in your ends.


Be sure to join my Crochet Facebook Group and show off your crochet creation. I would love to admire them and cheer you on as you’re working on creating it and after you finished it.
I’m also always here to support you through this and any other pattern and tutorial. Simply ask in my group and me and other amazing and kind crocheters will help you along.

If you love this pattern, please use the social media share buttons above or below and share this pattern link with the world and your friends.
That way you will find it easily again when you need it and you also provide the world and your friends with the ability to gain extra crochet knowledge as well. And to top it off, you help me as it allows me to create more content that you love already and want to see more of – free crochet patterns and tutorials. So, thank you for sharing.
If you love my crochet patterns and the way I teach, I would suggest subscribing to my newsletter below as I share new patterns, tutorials, and special announcements often.