Linked Treble Crochet – BEST Tutorial for LTR
This post includes affiliate links.
This Crochet Tutorial is all about the Linked Treble Crochet. It is a special stitch that does not seem to be well known. The tutorial has a complete photo and video step-by-step guide. This helps you understand how to crochet this stitch.
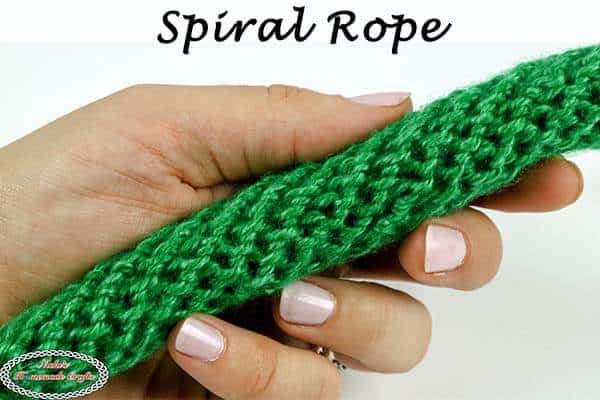
In this tutorial, you will learn how to crochet this stitch in a row and in a round. Also, this stitch looks pretty normal as rows or rounds of treble crochet. But its texture looks different when you crochet it. This technique creates a dense crochet stitch with virtually no gaps.
It is a great crochet stitch for things that require sturdy fabric like bags, baskets, or warm blankets.
Interested in this awesome crochet hook you see in my pictures? Click HERE to get your own! I love mine for sure!

As the name says, the stitches are linked as you crochet the Linked Treble Crochet. This technique allows you to prevent having gaps between the stitches. Also it makes sure you do not have too much bulkiness when creating a more tight stitch.
If you would like to know how to crochet this stitch in a double crochet version, check out my tutorial for it HERE.
Please check out the texture and look of one row of linked treble crochets. You can see that it looks like 3 rows of single crochets with two horizontal lines in between.
This means, if you want to crochet a piece that has a similar look as single crochets. you should use the linked double crochet. It will also go much faster.
Also, I have the LINKED HALF DOUBLE CROCHET – BEST TUTORIAL FOR LHDC published on my website as well as LINKED DOUBLE CROCHET – BEST TUTORIAL FOR LDC. In the mean time, check out my other very popular crochet stitch tutorials HERE.
Video Tutorial for the Linked Treble Crochet
So, let’s get started with the Linked Treble Crochet Video Tutorial. The photo tutorial can be found right underneath it.
Subscribe to my Youtube Channel here:
[youtube-subscriber channelID=UCSI4OeQQnxVQEAwMGeTCn1Q layout=full subscribers=default]
Photo Tutorial for the Linked Treble Crochet
In Rows and Rounds
How to crochet the Linked Treble Crochet in a Row
Step 1: First, make a chain of the length you desire or need. Then, insert your hook into the 2nd chain from the hook, yarn over and pull up a loop, then repeat this with the 3rd and 4th chain from the hook. You now have 4 loops on your hook. Finish this like a normal treble crochet (*yarn over, pull thru 2 loops, repeat from * two more times). You made your first linked treble crochet. Now you see these horizontal bars (picture 3 and 4).


Step 2: *Insert your hook thru the first horizontal bar and pull up a loop, insert your hook into the next bar and pull up a loop, and then insert the hook into the next chain and yarn over and pull up a loop (4 loops on hook). Finish it like a normal treble crochet. Repeat from * until the end of the row. Chain 4 and turn.
How to finish a Round using the Linked Treble Crochet:
Step 1: Let’s say, you are making rounds. If you, after round 1, want to connect the first with the last stitch via a linked slip stitch, you will need to insert the hook thru the horizontal loops of the last stitch (top down) and then insert the hook thru the bottom horizontal bar from the first stitch (bottom up), then yarn over and pull thru all 2 loops. Now, insert the hook through the top horizontal bar (bottom up) of the last stitch.

Step 2: Now, yarn over and pull through all 4 loops. Feel free to also slip stitch to the actual loops of the first stitch of that round. Although it does not make too much of a difference. You would now chain 4 and continue with linked treble crochet in the new round.

If this photo tutorial above was too confusing to you, please check out my video tutorial above. It will be much more clear for you, I promise. It includes all the parts shown above, just as a video.
If this Linked Treble Crochet Photo and Video Tutorial were helpful to you, please share it so others get to see and enjoy it also. Thank you!
Also, do not let the picture below confuse you! The stitch’s edges are straight, I just pulled it a bit too much before taking a picture. Will update it soon.
I hope you enjoyed this linked double crochet stitch tutorial. It is a very useful stitch to master. If you think your crochet friends might like to learn something new too, share this tutorial with them directly or share on social media. You can also pin it to your favorite Pinterest Board for future reference.
THE CROCHET CLUB – CROCHET PATTERN, TIPS & TUTORIAL VAULT
You can have the most amazing pattern and yarn in the world, but if you don’t have the knowledge on how to crochet in a way that makes you proud, then all your work is for nothing.
Maybe you have a dream of having perfect straight seams or have less yarn to weave in?
Let me introduce you to THE CROCHET CLUB – AN ALL-ACCESS MEMBERSHIP! It is exactly what it says on the tin. If you sign up for the membership I will teach you different techniques and tips on how to improve your crochet projects!
You will get access to all my patterns in PDF formats and full support from me to guide you through the tricky bits. I will also teach you what YOU want to learn! Join me in THE CROCHET CLUB – AN ALL-ACCESS MEMBERSHIP!
I also send out a fun and free crochet newsletter packed full of crochet goodies, patterns, and tutorials. If you don’t want to miss out, sign up for my newsletter via the form below. You will receive 8 Crochet Secret Tips delivered straight into your inbox!


This is fantastic! Thanks for sharing
Thank you for the video! I really like linked stitches. I have used them for a few original projects, a long sweater jacket and a skirt. I always told myself to make a photo tutorial of how I joined the linked stitches in the round, but I never figured out how to make it look smoother and minimize the seam. Now I know and can make a new skirt!
Just wondering how you would increase using this stitch ?
Oops, I meant decrease !