How to Crochet a Tissue Box Cover Pattern
This post includes affiliate links.
Tissue box crochet cover is such a fun make that adds a special touch to your home decor. They are so easy to make and customize to fit in within any room of your house.
Isn’t it nice sometimes to make a smaller quicker project that is just so fun? The tissue box crochet cover is exactly that! They are super fun to make because you can literally make any animal or object into a tissue box crochet cover!
Whether it is your favorite animal, pet, or things you like to use or keep in your home, they can certainly be made into a tissue box cover.
They are also a great seasonal make. That’s because you can easily customize them to the season and keep in with the color theme of your home!

Crochet Tissue Box Covers – Video Tutorial
Subscribe to my Youtube Channel here:
[youtube-subscriber channelID=”UCSI4OeQQnxVQEAwMGeTCn1Q” layout=”full” subscribers=”default”]
Why make a tissue box crochet cover?
Let’s be honest.. tissue boxes aren’t the prettiest, however, it is always practical to have tissues handy for your guests or for yourself. But that means having a plain box just sat on the table. This could create a bit of an eyesore in your otherwise carefully decorated home.
As I mentioned above, you can completely customize it and create a tissue box crochet cover that will blend into your home decor. Whatever room in your house will be the home to the tissue box you can decorate it to fit in.
Types of tissue box crochet covers
There are mostly two types of covers – square and rectangle.
I have made covers for both of these types and I must say I prefer the square box. It is easier to make and gives you more possibilities to customize it. You can also lay the box on its side and have the tissues coming out of the side or the back of the box.
One of the examples of a square tissue box crochet cover is my HOW TO CROCHET A BUNNY TISSUE BOX COVER EASILY – FREE PATTERN available on my website.

If you have a rectangular box, you can make CRAYON TISSUE BOX COVER – FREE CROCHET PATTERN which is a really fun pattern to make.

How to crochet a tissue box cover?
There are three different ways you can crochet this quick make. It does not matter whether you are making it for a square or rectangle-shaped box.
However, one thing you should keep in mind is that the sizes of the box might vary slightly depending on where in the world you are. If the dimensions differ slightly you might have to adjust the finished size. You can easily do this by working less or more rounds/rows and stitches.

A. Top Down Tissue Box Cover
This is an easy technique to make a cover for your tissue box. As the name suggests, you start working at the top and work your way down. This is more likely to be a flat square as the top with an opening in the middle. Secondly, you will work around the square to build up the sides.
There is one main advantage of working top-down and that is working the whole tissue box crochet cover in one continuous piece. There is no need to sew the cover together afterward.
I have used this technique for CROCHET SNOWMAN HEAD TISSUE BOX COVER – FREE PATTERN AND VIDEO TUTORIAL that is available for free on my website.

I have recently released another pattern using this technique. My FREE CROCHET GIFT TISSUE BOX COVER PATTERN is becoming a very popular pattern for the upcoming holiday season.

B. Bottom up Tissue Box Cover
This is the opposite technique to top-down. That means you start with the panel at the bottom whether that is a square or a rectangle. You then build up the sides of the box and finish it off with whatever shape you need for the top.
I used this technique for my CROCHET GINGERBREAD HOUSE TISSUE BOX COVER – EASY FREE PATTERN. I needed to crochet the roof separately and create a pyramid shape. Hence why I have started with the flat panel at the bottom.

HOW TO CROCHET A PENCIL TISSUE BOX COVER is another pattern on my website that worked bottom up. I added the pencil point shape to the top, so I started the main crochet cover for the tissue box at the bottom.

C. flat cover sewn together
Making a flat version of your cover is a beginner-friendly way to complete this project. You can either make an unfolded cube or cuboid shape and sew it together.
However, if you want to save yourself some time working out an unfolded shape of a cuboid, you can also make six separate pieces. You can then sew these together which can add some great texture.
You can see how the seams on this HOW TO CROCHET A CUTE ELEPHANT TISSUE BOX COVER – FREE PATTERN contributed to the extra texture for the elephant.

How to make your tissue box crochet cover unique?
There are so many ways you can make your tissue box crochet cover fun and unique. Whether you are going to play with colors or textures, the possibilities are endless.
You can also add some fun elements to the finished cover to make it into something recognizable. Here are a few ways you can achieve a unique cover.
1. Add a face
This is the easiest way to achieve a cute cover that looks like your favorite animal or a pet. You can add different shaped eyes, ears, and noses depending on which animal you are trying to make.
I have made a plain white tissue box cover which later turned into a PANDA BEAR TISSUE BOX COVER – FREE CROCHET PATTERN. I simply added large black eyes, ears, and nose to make a cute panda face.

The other cover that this works with was my HOW TO CROCHET A CUTE ELEPHANT TISSUE BOX COVER – FREE PATTERN I mentioned above. By adding a large trunk to a grey-colored cover, you will have a cute elephant.
2. Add limbs
This is a super fun way to customize your crochet cover. Mainly because you do not have to actually crochet the limbs. This is a great opportunity to get really creative and use different materials you might have lying around the house.
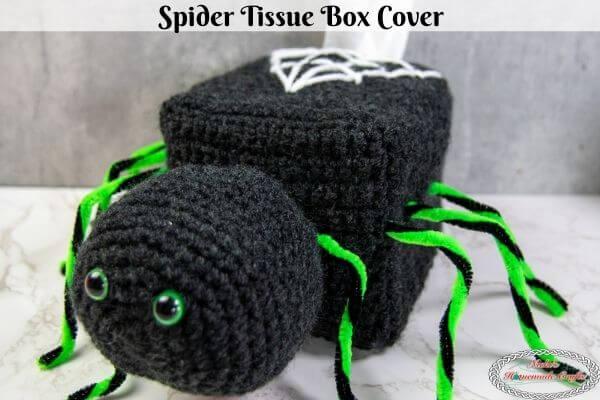
CROCHET SPIDER TISSUE BOX COVER PATTERN FOR FREE FOR HALLOWEEN was one of the makes where I added limbs. For these, I used pipe cleaners which worked perfectly for a spooky Halloween make.
3. Add hair
If you add hair to your make, you will really make it stand out. This could be for an animal or human, it will really make a difference. I have added a little bit of hair to the ears on my OWL TISSUE BOX COVER – FREE CROCHET PATTERN and I love how it has turned out! Check out the free pattern.

4. Add accessories
Endless possibilities of accessories can be added to your cover. Hats, scarves, earrings anything you can think of you can add to really make your project stand out! I have added a simple black belt with a gold buckle to a red box cover and all of a sudden it looks like a CROCHET SANTA BELT TISSUE BOX COVER – FREE PATTERN. It is available on my website.

5. Add other features
The definition of other features entirely depends on the project you are working on! For my RUBIK’S CUBE TISSUE BOX WITH REARRANGING COLORED SQUARE TILES INSPIRED BY THE BIG BANG THEORY, I have added colored squares that are removable so you can arrange them in any order you like!

And one of my favorite SECRET PUMPKIN TISSUE BOX COVER – FREE CROCHET PATTERN has the removable stalk added to the top. This completely disguises the tissues. It is a nice surprise when people realize what the pumpkin actually is!

I hope you enjoyed this guide on how to make a fun tissue box crochet cover. Why not share it with your crafty friends? You can use the social media share buttons below. Do not forget to pin it to your favorite Pinterest Board.
I also send out a fun and free crochet newsletter packed full of crochet goodies, patterns, and tutorials. If you don’t want to miss out, sign up for my newsletter via the form below and receive 8 Crochet Secret Tips delivered straight into your inbox!
THE CROCHET CLUB – CROCHET PATTERN, TIPS & TUTORIAL VAULT
You can have the most amazing pattern and yarn in the world, but if you don’t have the knowledge on how to crochet in a way that makes you proud, then all your work is for nothing.
Maybe you have a dream of having perfect straight seams or have less yarn to weave in?
Let me introduce you to THE CROCHET CLUB – AN ALL-ACCESS MEMBERSHIP! It is exactly what it says on the tin. If you sign up for the membership I will teach you different techniques and tips on how to improve your crochet projects!
You will get access to all my patterns in PDF formats and full support from myself to guide you through the tricky bits. I will also teach you what YOU want to learn! Join me in THE CROCHET CLUB – AN ALL-ACCESS MEMBERSHIP!


