Easy Beach Crochet Blanket – Free Pattern for the Summer
This post includes affiliate links.
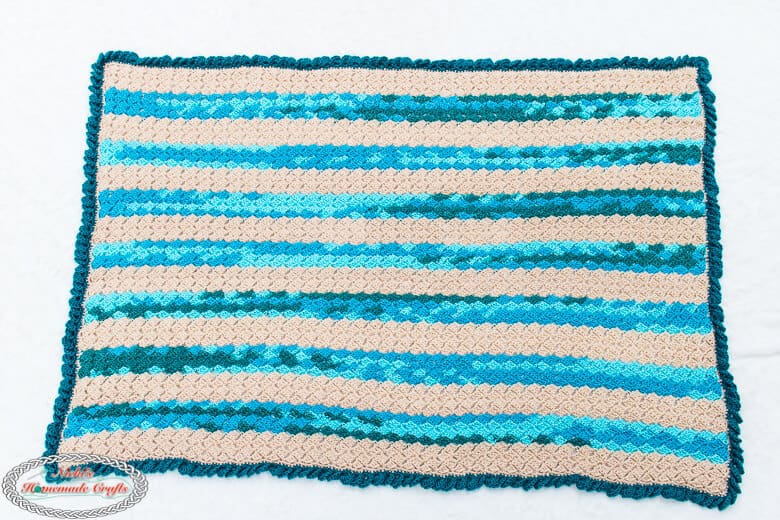
The Beach Crochet Blanket is a free pattern and made with the straight box stitch and beachy-colored yarn.
It’s summertime which means for most of us, we dream and want to go to the beach. You would think that living in San Diego means I’m at the beach often. But sadly that is not true. Though, I may not have my feet in the sand and ocean often, I do like to see the ocean waves. I love the view of the water splashing onto the soft ocean sand.
This Crochet Beach Blanket creates that feeling when I designed it and now I look at it all the time. The teal zeal colored yarn from Caron sure represents the ocean waves and its different blue shades when the sun shines onto it.
The oat heather yarn, on the other hand, shows off the beauty of the soft sandy beach. Beautiful and almost perfect sandy beige colors.
The border crocheted, using the reversed shell stitch, just makes the blanket complete. The stitch looks like shells or ocean waves that make you dream you are right on the ocean right now.

Ok, I might have to grab my beach bag right now and hop in the car and drive to the beach. Are you coming?
Well, maybe you want to crochet the blanket right now. I get it. Let me help you with that.
So, let me now give you the supplies you need in order to crochet this Crochet Beach Blanket pattern.

This pattern is also available as an ad-free, printer-friendly pdf pattern that can be purchased at the links below for only a small fee.


If you like this blanket crochet pattern, you might like these also:


How to crochet the
Beach Crochet Blanket
What you need for the crochet beach blanket pattern:
- Caron Simply Soft Paint Ombre, worsted (5 oz/141 g/skein OR 235 yds/215 meters/skein)
- Premier Yarns Anti-Pilling Yarn, worsted (3.5 oz/ 100 g/skein OR 180 yds/ 165 m/skein)
- Caron Simply Soft, worsted (6 oz/ 170.1 g/skein)
- 5.0 mm hook
- scissors
- tapestry needle
Gauge:
1 straight box stitch (3 dc’s) = 1 square inch
Crochet Beach Blanket Size:
42 x 55 inches (w x h)
Stitches used:
Learn all the basic crochet stitches HERE
- sc = single crochet
- dc = double crochet
- Tulip stitch aka Straight Box Stitch
- Reverse Shell Stitch using SC as Border
- dec = decrease
- ch = chain
- sk = skip
Written Pattern for the Beach Crochet Blanket:
You will be making the striped straight box stitches in 2 different colored yarn skeins first and then add the border.
I would suggest cutting your yarn after each color stripe (not each row). You may have to weave in more ends, but it will look prettier in the end.
Striped Straight Box Stitches for the Beach Blanket Pattern
Start with Oat Heather and chain 165
You can find the video tutorial for the Straight Box Stitch here.
R1: crochet 3 dc in the 5th ch from the hook. *Skip 3 chains and place 1 sc in the next ch. Ch 3 and place 3 dc in the same st as the sc. Now repeat from * until the end, stopping after the last sc is placed. Turn
*** You can replace the sc with a slip stitch if you prefer (like the traditional C2C is made).
R2: Chain 5 (some tutorials make it with 4) and place 3 dc in the 5th ch from the hook (in the 4th ch if you made only 4 chains). *Skip [1sc, 3 dc] and place 1 sc in the ch-3 space. Chain 3 and place 3 dc’s in the same ch-3 space. Repeat from * until the end of the row finishing with 1 sc. Turn
Repeat row 2 two more times
Now do the following 6 times using the pattern in row 2.
4 rows of teal zeal
4 rows of oat heather
Now crochet 4 more rows of teal zeal and then 3 rows of oat heather.
For the last row of oat heather, do the following:
Chain 5 and place 3 dc’s as a decrease in the 5th ch from the hook. *Skip [1sc, 3 dc] and place 1 sc in the ch-3 space. Chain 3 and place 3 dc’s as a decrease in the same ch-3 space. Repeat from * until the end of the row finishing with 1 sc.
Reverse Shell Border using SC for the Beach Blanket
Using Oat Heather, crochet 1 row of single crochet stitches all around the beach blanket. When you get to a chain space, crochet 3 sc’s, when you see a sc, crochet 1 sc, and when you reach a corner, place 2 sc’s into it. Then slip stitch to the first stitch. Fasten off and weave in the ends.
Now use Pagoda yarn to crochet the reverse shell border. Heart Hook Home has a great video tutorial for it.
- Ch 1, then 1 sc in the next first 3 sts.
- Ch 3 and turn your work (so you are looking at the backside) and sl st to the top of the 1st sc made. Chain 1. You now have a ch 3 space you will need to crochet the shell into.
- Turn your work back to front and place 7 dc’s into the ch 3 space
Now repeat this pattern all around to finish the border of the Beach Throw Blanket.

You can now use this awesome throw to go to the beach, to keep warm or to spice up your home with some beach flare.
My son demonstrates that this throw even works great for very tall people. And since he loves going to the beach, I think he claimed this blanket for himself now. LOL

I hope you love this Beach Crochet Blanket Pattern as much as I do. If you love this pattern and technique, please use the social media share buttons above or below and share this pattern link with the world and your friends.

That way you will find this crochet beach blanket free pattern easily again when you need it and you also provide the world and your friends with the ability to gain extra crochet knowledge as well. And to top it off, you help me as it allows me to create more content that you love already and want to see more of – free crochet patterns and tutorials. So, thank you for sharing.
If you love my crochet patterns and the way I teach, I would suggest subscribing to my newsletter below as I share new patterns, tutorials and special announcements often.


I love this blanket and the stitches involved in it. Lot of new stitches for me to learn. But am courious as why a decrease in the last row Any help u can give me will help out a lot.
Thanks
Merry
I just checked. I can’t see a decrease. Sorry. I’ll check again for a typo. But there is not decrease.