Best Crochet C2C Rectangle Pattern Tutorial & Learn to Read a Graph
This post includes affiliate links.
This is a free tutorial to learn how to crochet a C2C rectangle and learn how to read a graph at the same time. The tutorial has both step-by-step photos and a video tutorial.
One of the most popular crochet techniques is C2C, aka corner-to-corner crochet where you use a graph and the box stitch and crochet diagonal rows to create a square or rectangle. It can include color changes and even make pictures or words.
Although it’s mostly a technique where the edges increase and decrease by 1 box stitch (which would create a square), you can also have a middle section where you increase and decrease at the same time, hench making a rectangle.
But that can be confusing for some, cause when you turn your project it can be hard to see which is the right and wrong side unless you have a picture that can guide you along. So it makes it easier, I created this tutorial with lots of tips to allow you to learn how to crochet a rectangle, plus learn how to read a graph at the same time.
Now, are you ready to learn how to crochet a C2C rectangle?

C2C Crochet Tutorials
Although this C2C Rectangle tutorial includes everything you need as a crochet beginner of this technique, I still would recommend you check out these additional tutorials that would really help you perfect this technique even more!
More C2C Crochet Tutorials:
- C2C Double Crochet Square Tutorial
- C2C Half Double Crochet Square Tutorial
- C2C Color Change Tutorial
Crochet C2C Rectangle – Video Tutorial
Subscribe to my Youtube Channel here:
[youtube-subscriber channelID=UCSI4OeQQnxVQEAwMGeTCn1Q layout=full subscribers=default]
How to: Crochet C2C Rectangle
– Photo Tutorial
Before we hop into the detailed tutorial, here are a few tips to consider right consider immediately. The video above is extremely detailed and will provide you with more tips than I can write down. So make sure to use the video and photo tutorial at the same time.
Now, let’s grab your crochet hook – I used a 6.00mm Furls Crochet Odyssey Hook – and your yarn – I used a bulky weighted Mary Maxim Marvelous Chunky yarn – to practice this fun C2C rectangle.
How to Read a C2C Graph
Before we get started though, I would like to explain to you the basic foundation chain for the Corner-to-Corner, which is the box stitch (chain number + 3 stitches) connected with a slip stitch.
Typically graphs are worked from the right bottom corner – first pixel and first box stitch – to the top left corner – the last box stitch and pixel of the graph.
Check off each square you crocheted to keep track of where you are in the graph! You can do that digitally or old-fashion by printing out the graph and using a pen.
Lefties may go the other direction if they prefer. As long as you go from one corner to another, it doesn’t matter.

Change Direction – From Increase to Decrease in C2C
If you are new to C2C it’s important to understand how to see WHEN you need to start decreasing. The best way to see when you need to switch from increasing to decreasing is WHEN the direction of the arrow changes. See the picture above and the video tutorial to understand that clearly.
Quick Tips:
Use differently colored Stitch Markets to mark the increasing vs decreasing edge for the C2C rectangle.
Increasing edge = ch 6
Decreasing edge = 3 sl st + ch 3
Crocheting the C2C Rectangle
C2C Rectangle Row 1 – Increasing
Make a chain of 6, and 1 dc in each of the 4th, 5th, and 6th chain from the hook. You made your first box stitch, aka C2C pixel or square.

C2C Rectangle Row 2
Now, crochet another chain of 6 (you always do that when increasing at the beginning of each diagonal row) and crochet 1 dc in each of the 4th, 5th, and 6th chain from the hook, and then flip the first square over and slip stitch to the chain space of the first square.

As we are not done with the 2nd diagonal row yet, you will crochet a chain of 3 (you will always do that on the squares where you do not increase or decrease) and crochet 3 dc’s in the same chain space where you placed your slip stitch.
C2C Rectangle Row 3
Now, you will repeat this process. Increase on the edge (ch 6, 3 dc in the 4th, 5th and 6th ch from the hook) and slip stitch your square to the next square.
Then for the next 2 squares, you will not increase or decrease. So simply chain 3 and place 3 dc’s in the chain space and slip stitch to the next square.

C2C Rectangle Row 4 – Decreasing on 1 edge
Now, you will start your first decrease on one side, which in the picture is the top edge. But you will still increase on the bottom edge. To decrease, you will slip stitch 3 times (one per stitch) into the dc stitches you made in the previous square, aka box stitch. Then chain 3 and place 3 dc’s in the chain space.
Then for the next 2 squares, you will not increase or decrease. So simply chain 3 and place 3 dc’s in the chain space and slip stitch to the next square.

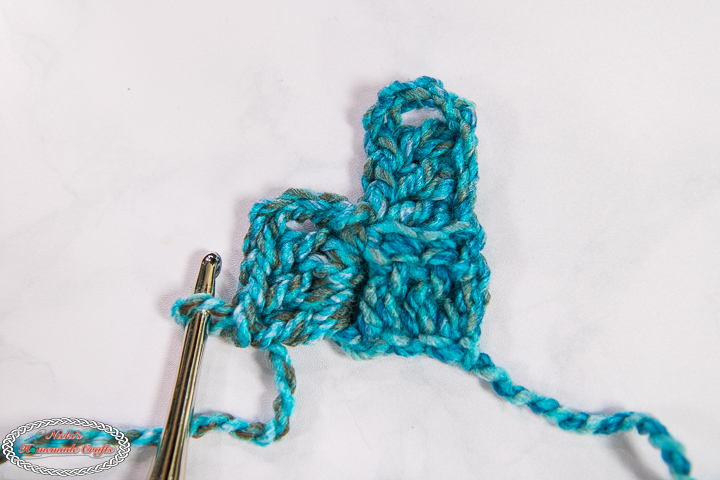
C2C Rectangle Row 5
Since row 5 still has one more square in the increasing direction, we will increase again by chaining 6 on the edge and placing 3 dc’s, one in each of the 4th, 5th, and 6th chain from the hook, and sl st to the next square.
Then for the next 2 squares, you will not increase or decrease. So simply chain 3 and place 3 dc’s in the chain space and slip stitch to the next square.

C2C Rectangle Row 6 – just decreasing edges
Now that both edges of row 6 are on the decreasing direction, you will start with 3 slip stitches again, and crochet a chain of 3 and 3 dc’s in the chain space, and slip stitch to the next box stitch.
Then for the last square of the row you will simply chain 3 and place 3 dc’s in the chain space and slip stitch to the next square.

C2C Rectangle Row 7
To finish this specific rectangle, row 7 is the last diagonal row and only 1 more square in the decreasing direction. So, you will start with 3 slip stitches again, and crochet a chain of 3 and 3 dc’s in the chain space, and slip stitch to the next box stitch. Fasten off and weave in your ends as you finished your rectangle swatch.

C2C Crochet Patterns
There are literally endless possibilities for crocheting C2C projects due to the endless amount of ways to sign a graph – square or rectangle – with any row count imaginable.
In fact, we’re currently crocheting a beautiful C2C pattern for the Mystery Crochet Along right here. It’s a quick and fun crochet project. Hope you give it a try.
If you have enjoyed this C2C crochet stitch tutorial, be sure to share the link with your crafty friends on social media using the buttons above or below this stitch tutorial. I hope you enjoy it. Thanks for sharing.

THE CROCHET CLUB – CROCHET PATTERN, TIPS & TUTORIAL VAULT
You can have the most amazing pattern and yarn in the world, but if you don’t have the knowledge on how to crochet in a way that makes you proud, then all your work is for nothing.
Maybe you have a dream of having perfect straight seams or have less yarn to weave in?
Let me introduce you to THE CROCHET CLUB – AN ALL-ACCESS MEMBERSHIP! It is exactly what it says on the tin. If you sign up for the membership I will teach you different techniques and tips on how to improve your crochet projects!
You will get access to all my patterns in PDF formats and full support from myself to guide you through the tricky bits. I will also teach you what YOU want to learn! Join me in THE CROCHET CLUB – AN ALL-ACCESS MEMBERSHIP!
Does getting 8 Crochet Secret Tips delivered straight into your inbox sound like something you would find useful? If so, sign up for my crochet newsletter below. I send out a weekly newsletter packed full of crochet patterns and tutorials.


