How to Crochet Loop Stitch Easily – Photo and Video Tutorial
This post includes affiliate links.
This is a free step-by-step tutorial for creating the crochet loop stitch. The tutorial has both photos and videos for this fun stitch.
Are you looking for a stitch that really jumps off of the page? Not just a 3-D effect, but a stitch that will really come out of the project?
Try the crochet loop stitch! It’s great for fringe, shag, or you can even snip the loops to make doll hair.
This fun crochet stitch is sure to make a great addition to any project.
If you think the crochet loop stitch will be perfect for you, please read below for the full tutorial.
I will teach you how to crochet this interesting stitch with my step-by-step tutorial.

Crochet Loop Stitch Tips And Tricks
In this crochet tutorial, you will learn how to make the crochet loop stitch. We will be using photos as well as a detailed video tutorial.
This fun and interesting stitch provides extra texture and dimension. That makes the crochet stitch look like a natural rug such as a grass field or even pine needles.
In fact, I used the stitch in one of my crochet patterns which is called the Advent Wreath.
For that wreath, I used the loop stitch to create a pine needle-like texture around the wreath to make it look more real.
Simple single crochet rows would have not provided that extra dimension.
The stitch itself is very easy and fast to crochet. You just need to make sure that the loops are longer when crocheting them than you want them to be in the end.
As the loops are created with the single crochet together, you might have a tendency to pull the yarn as you keep crocheting which in return makes the loop shorter.
But if you keep your tension consistent and pull the finished loops after, you should be fine.
Although, I do not recommend this stitch as the main stitch for any wearables. It creates too many holes and the project might pull too much making the loops disappear.
How To Crochet The Loop Stitch – Video Tutorial
Subscribe to my Youtube Channel here:[youtube-subscriber channelID=UCSI4OeQQnxVQEAwMGeTCn1Q layout=full subscribers=default]
If you enjoyed the video tutorial, be sure to subscribe to my YouTube channel! Do not forget to press the bell button to turn on notifications. This way you will be notified when I upload a new video or tutorial.
Learn how to crochet the Loop Stitch – Photo Tutorial
Start by making a chain in the length desired or needed for the project.
Then either start with a row of single crochets or start crocheting the loop stitch right away. This is totally up to you.
In order to make the loop stitch, you will wrap your yarn you use for making your stitches, around your middle finger (if you are holding the yarn like me).
Then, insert your hook into the stitch you want the loop stitch to be. Then yarn over around the yarn that is already wrapped around your middle finger to create and secure the loop.
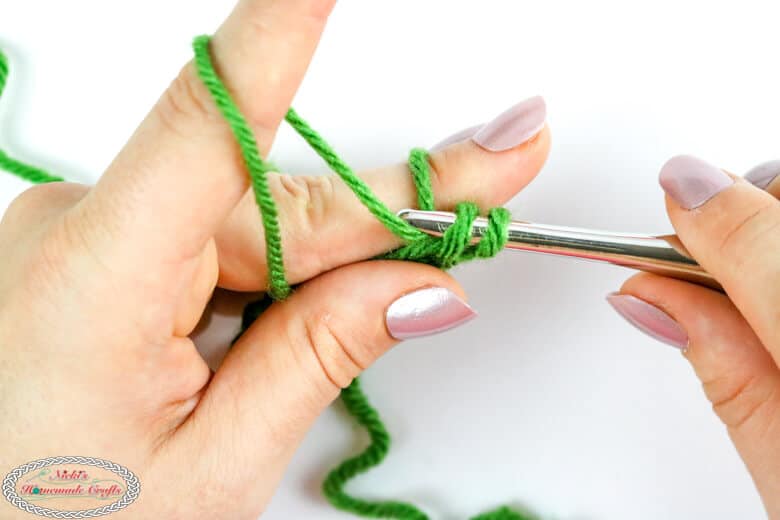
Next, you will keep holding the yarn around your finger and pull the just wrapped yarn (around the hook) thru the stitch.
You will now yarn over again and finish the stitch just like you would for normal single crochet.

Now, you can pull your middle finger out of the loop and let it go.
You can now crochet into the next stitch the same way as you just did to create the next loop stitch.

After you finish a row of loop stitches, your project should like something similar to mine below.

Second row
In order to make sure your loops are only on one side, you will now crochet one simple row of single crochet. This is to get back to the starting point of making loop stitches.


Repeat the above steps to crochet another row of loop stitches.
The more rows of loop stitches and in between single crochet rows you crochet the more texture and dimension you see.
If the above picture tutorial was not clear to you, please watch the below video tutorial to help you learn the loop stitch more visually.
To Summarise…
I hope this crochet loop stitchtutorial was helpful.
Firstly, if you love this tutorial, please use the social media share buttons above or below. Please share this link with the world and your friends.
That way you will find this crochet loop stitch tutorial easily again when you need it. And you also provide the world and your friends with the ability to gain extra crochet knowledge as well.
Secondly, to top it off, you help me as it allows me to create more content that you love already and want to see more of – free crochet patterns and tutorials. So, thank you for sharing.
Lastly, if you love my crochet patterns and the way I teach, I would suggest subscribing to my newsletter. I share new patterns, tutorials, and special announcements often.
THE CROCHET CLUB – CROCHET PATTERN, TIPS & TUTORIAL VAULT
You can have the most amazing pattern and yarn in the world, but if you don’t have the knowledge of how to crochet in a way that makes you proud, then all your work is for nothing.
Maybe you have a dream of having perfect straight seams or have less yarn to weave in?
Let me introduce you to THE CROCHET CLUB – AN ALL-ACCESS MEMBERSHIP! It is exactly what it says on the tin. If you sign up for the membership I will teach you different techniques and tips on how to improve your crochet projects!
You will get access to all my patterns in PDF formats and full support from me to guide you through the tricky bits. I will also teach you what YOU want to learn! Join me in THE CROCHET CLUB – AN ALL-ACCESS MEMBERSHIP!


