Peppermint Slouchy Beanie – Free Crochet Pattern
This post includes affiliate links.
This free crochet pattern is called the Peppermint Slouchy Beanie which gets its name from the iconic Peppermint Christmas Ornament and candy.
The pattern is very easy to crochet and comes with a detailed photo and video tutorial to help you along to make it.

When thinking about Christmas candy most people think about Candy Canes and Peppermint. Well, I have a Candy Cane Peppermint Ornament on my tree which gave me the idea of making a beanie, but because the swirl would be on the top of the hat, I thought making a slouchy beanie would allow you to see the actual swirl when wearing it.
Also be sure to add this pattern to your Ravelry Favorites by clicking the button below.

If you add this pattern to you Ravelry Favorites and share it on social media as a link, I will be able to share a lot more free crochet patterns for you all.
In addition, I created a downloadable pdf for you all.
If you pay just twice the amount as this pattern costs and you have a month’s worth of The Crochet Club Membership with a lot more patterns! It’s well worth it.
If you do not want to join The Crochet Club, you can also purchase the ad-free printer-friendly PDF pattern at the links below. But IF you join the All-Access Membership you will automatically get this pattern.
In addition, I created a downloadable PDF that has all of the pictures separated from the pattern, so you an choose whether you want to print them or not. This can save you a lot of ink in the long run. You can buy the ad-free, printer-friendly PDF on Ravelry, Etsy, LoveCrafts, and my VIP crochet membership, The Crochet Club.


How to crochet the Peppermint Slouchy Beanie
You will need:
- 3.75mm and 5.0mm hook
- scissors
- tapestry needle
- Worsted weighted yarn, I used Premier Yarns Anti-Pilling Everyday Solids (in color really red, snow white)
Gauge:
4 dc x 2 rows = 1 square inch
Used Stitches:
- Sc
- Hdc
- Fpdc and Bpdc
- Swirl stitch, pictures with instructions are at the end of the pattern also
NOTE: These instructions are for a teen/adult head, but you could make it smaller by not increasing anymore for row 3, 4 or 5 depending on what size head you are making the beanie for. It helps to measure the diameter of the beanie before the rows start where no more increases are being made. Multiply the diameter size by 3.41 which gives you the head circumference of the head. That should help to determine when to stop increasing for a different hat size. Once determined, continue with the instructions of row 15.
Instructions:
Do not slip stitch after any round unless specifically mentioned! And use 2 different looking stitch markers (one for when a new row starts, one when a color changes (most helpful when a mistake was done and you need to frog, otherwise it will be obvious when to switch to the other color).
With red yarn and a 5.0mm hook: Make a magic ring, 12 dc into the ring, pull ring tide
Row 1: (place one stitch marker onto the first dc of this row which will help to know when a new row starts!) 2 dc into each of the next 6 stitches, then pull the loop on the hook long, so you won’t lose a stitch, drop the color, and start with the white yarn for the next stitches, 1 sc (place a stitch marker here as a sign when to switch colors in the next row) and 1 hdc in the same stitch, 2dc in the same stitch in the next 5 stitches
Row 2: continue with white yarn, 2 dc in the same stitch (move the stitch marker to the first of the 2 dc, again to show when a new row starts), 1 dc in the next stitch, *2 dc in the next stitch, 1 dc in the next stitch, repeat from * till no more stitches possible, then pull the loop long to not lose the stitch, and pick up the red yarn again and continue the repeat of 2 dc in one stitch and 1 dc in the next stitch until the next stitch marker
Row 3: continue with red yarn, 2 dc in the same stitch (move the stitch marker to the first of the 2 dc, again to show when a new row starts), 1 dc in the next 2 stitches, *2 dc in the next stitch, 1 dc in the next 2 stitches, repeat from * till no more stitches possible, then pull the loop long to not lose the stitch, and pick up the white yarn again and continue the repeat of 2 dc in one stitch and 1 dc in the next 2 stitches until the next stitch marker
Row 4: continue with white yarn, 2 dc in the same stitch (move the stitch marker to the first of the 2 dc, again to show when a new row starts), 1 dc in the next 3 stitches, *2 dc in the next stitch, 1 dc in the next 3 stitches, repeat from * till no more stitches possible, then pull the loop long to not lose the stitch, and pick up the red yarn again and continue the repeat of 2 dc in one stitch and 1 dc in the next 3 stitches until the next stitch marker
Row 5: continue with red yarn, 2 dc in the same stitch (move the stitch marker to the first of the 2 dc, again to show when a new row starts), 1 dc in the next 4 stitches, *2 dc in the next stitch, 1 dc in the next 4 stitches, repeat from * till no more stitches possible, then pull the loop long to not lose the stitch, and pick up the white yarn again and continue the repeat of 2 dc in one stitch and 1 dc in the next 4 stitches until the next stitch marker
Row 6-14 (stop early for a non-slouchy beanie, meaning row 12 or 13 depending on the head size or make it even more slouchy by continuing on with additional rows): you will now not increase anymore, cut continue on with changing red and white yarn back and forth as needed.
So first continue with red, 1 dc in each stitch until no more stitches can be made, then drop the red yarn and pick up the white yarn, continue by placing 1 dc in each stitch until no more stitches possible, switch back to red yarn and continue on with the pattern until satisfied with the length, remember that you will make 4 rows of bpdc and fpdc at the end to finish the beanie.
To finish the swirl, stop with one color at one stitch marker and stop the other color at the next stitch marker by placing in the last 3 stitches 1 hdc in one stitch, 1 sc in the next stitch and 1 sl st in the last stitch before fasting off with the first color, do the same with the other color (for me that was red, because I wanted to use it for the last 4 rows) but do not fasten off and continue with row 15
Switch to a 3.75mm hook
Row 15-18: Ch 2 (does not count as a stitch), 1 fpdc in the first stitch, 1 bpdc in the next stitch, repeat from * till the end of the row, sl st to the first fpdc, (ignore the color switches in between on row 15 and do not do a fpdc or bpdc on the sl st of the previews row, but rather use the dc one row below and continue on), fasten off and weave in the ends.
Swirl stitch picture instructions (video tutorial is below):
After placing 2 dc in the first 6 stitches of row 1 (before adding the white yarn):

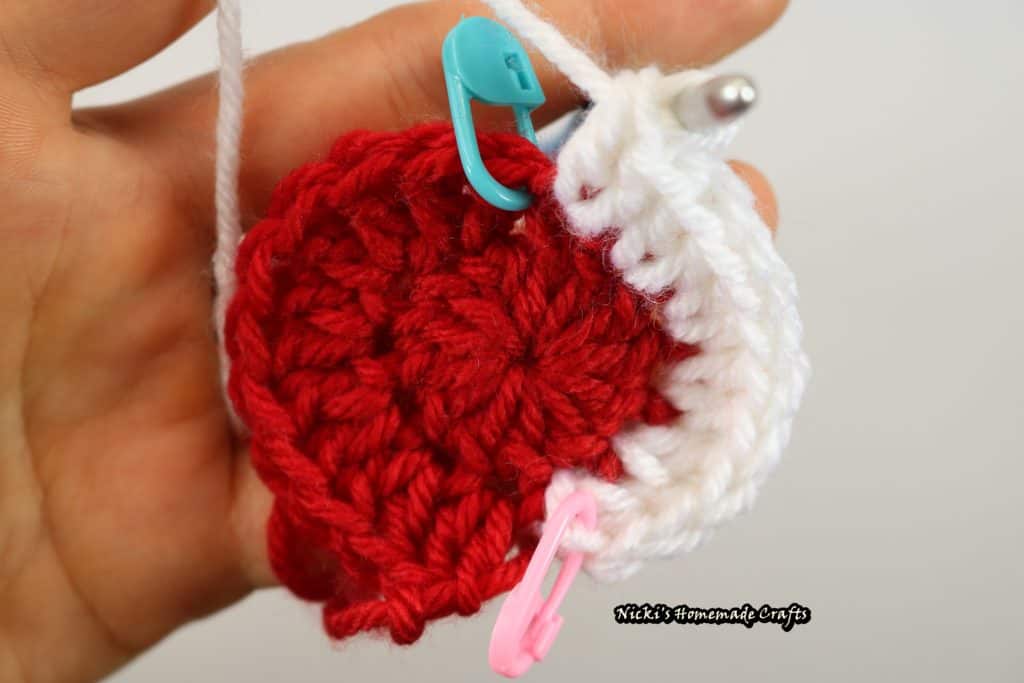
After adding 1 sc and adding a stitch marker (red yarn is dropped on the side):

Finishing row 1, continue with white yarn (moving stitch marker (my blue one broke, so I used a green one on the next picture) up once first dc of row 2 was made which is shown on the right):

Time to drop white yarn, pick up red yarn and continue repeat for row 2:

First dc after white yarn was dropped (stitch marker moved up):


After finishing row 2:

VIDEO TUTORIAL of the Swirl Stitch:
It uses a special stitch that is called the swirl stitch. Don’t be scared about the way it sounds, it is actually very easy and once mastered is very fast to create. I have below a video that can help you with the stitch (not a full tutorial, only helps to learn the stitch).
Here is also the Video tutorial for the swirl stitch:
Subscribe to my Youtube Channel here:
[youtube-subscriber channelID=UCSI4OeQQnxVQEAwMGeTCn1Q layout=full subscribers=default]
PDF (ad-free) Pattern links:
Be sure to share this pattern with the world on social media by using the share buttons below or above. Thank you.


