Best Yarn Storage Shelves – Easy DIY Solution
This post includes affiliate links.
This tutorial will show you step by step how to create your own Yarn Storage Shelving Unit. These shelves are also ideal for books or displaying other creative things such as toys, memorabilia, or even clothes.
When I recently went through my yarn storage I realized I had way too much yarn, because I could not find certain yarn colors or certain yarn anymore. It is so frustrating, I came to a point where I almost went to the craft store to buy the yarn I needed for a certain project rather than organizing my own yarn stash.
I do love the cheap storage unit I bought, and I will continue to use it, but I just needed to figure out how to get my yarn organized and visible for me to see and get inspiration from.

Bookshelves for Yarn Storage
As you can see I love the cubby idea for my yarn storage, but you can of course also get normal bookshelves. They usually require you to put them together with typically simple instructions.
The drawback of using bookshelves is that they have a set amount of height and width you have to go by – not mentioning the style, too.
Using wooden crates as cubbies, allows you to change their style and look easily by painting or staining them and rearranging them as you like. Typically these wooden crates can be found for wine storage as a wine rack also. They are sturdy and can be used for more than just your yarn.
I’ve seen many crafters use them in their craft room or in their closets to store more than just their yarn, things like their craft supplies, papers, books, and more.
Yarn Storage Creativity Ideas
Need more yarn storage ideas? Well, here are a few to help you decide what might work best for you. Although my favorites are the bookshelves and the wooden crates.
- DIY pegboard
- Plastic Shoe Pockets
- DIY PVC Pipe Shelf
- Tin Can Organizers
- Plastic Cubbies or Baskets
- Wire Baskets
- Old Crib Rail
- Old Hutch
- Old Wine Rack
- Metal Wire Bins
I’m sure there are more ideas and DIY yarn storage solutions, but let’s focus on the wooden crate idea and provide you with step-by-step instructions for you to replicate to storage your balls of yarn.
Yarn Storage Idea to Store Yarn
So, I remembered my friend Jess from Make and Do Crew who created her awesome new yarn storage shelves from wooden crates. Well, after looking around and trying to find a cheaper or better situation for me, I was not pleased with the possibilities out there.
I called my local Costco that has free wine crates all the time. I really wanted to get those as they are so nice and perfect for a project like this. But they don’t receive wine crates very often and I did not want to wait so long as I am very impatient.
In the end, I fell in love with Jess’s solution and went to my local Joann’s Craft storage where they had these wooden crates on sale. On top of the sale, I was able to use a 20% off total purchase coupon and saved over $150! Wow
A thrift store might also have these cubbies for a lot cheaper. But you may be limited on how many you can get, the condition, and the style. It may also take longer to get them. Let your creativity free and see what you can do to find some fun wooden crafts for this project.
Need more tips and tricks? See my huge list HERE!
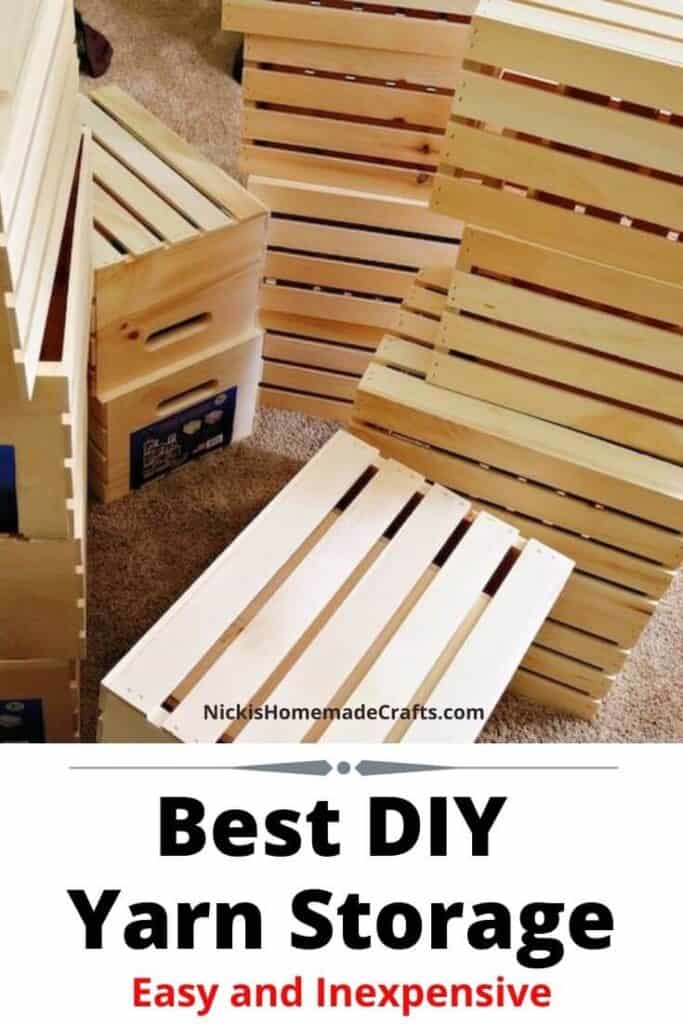
I loved the color of the wood of the wooden crates so much, I did not want to stain them at all. So I used them as the cubbies the way they are. The only extra items needed were some zip ties, a drill, and a wall anchor to prevent my kids from getting hurt or even myself as I am in an earthquake-prone area.
Let me list all the materials I used for you, so you can easily access them.
Make your own DIY Yarn Storage Shelves
Materials used for the Yarn Storage Idea
- Wooden Crates (I used 24)
- zip ties
- a drill
- wall anchor
- scissors
- my hand vacuum
- screws for the wall anchor
DIY Your Own Yarn Storage – Step By Step
Once you have all your materials, you will need to decide whether or not to stain it. If you do, you will need an extra brush, stain, and sandpaper. I really liked the beige color of the wooden crates as it really warmed up my room. So I kept it unstained. The surface was also really nice and smooth, so I did not want to mess with it at all.

Next, I stacked them in different directions on top of each other. I also have a large TV where I placed my yarn storage shelving unit. So it was ideal for me to use wooden crates for this project rather than buying bookshelves that were too large or could not frame the TV.

Once I was satisfied with the way it looked, I started drilling holes right by the handle, so I was able to use zip ties to connect the crates with each other. Once I was done with that, I used my hand vacuum to get rid of all the wooden particles that were produced when drilling holes.
I then connected the crates to each other by using simple, but long zip ties. Of course, you can also use nails or screws. But I wanted to be able to make my shelves mobile and modular, so I can redo and change it any time I wanted to.

Be sure to cut off the overhanging of the zip ties so your yarn does not get tangled in it.

Before I added all my yarn into the shelves of the storage unit, I also attached it to the wall using a wall anchor to prevent anyone from getting hurt in case it tumbles over due to an accident or earthquakes that happen in my area frequently.
Organize my yarn into the Storage Baskets
Now, I was finally ready to get my yarn and organize it into the wooden crate cubbies. I decided to organize them by color, rather than yarn company, which I had done previously. And I am so glad I did. It looks so nice and much better having them organized that way.

Furthermore, I do have a lot more yarn in my other cheap but good storage unit, but as some of it is tangled I still need to wind them up using my awesome yarn winder. I will do that as I have time.
Also, I was asked what I would do with the paper if I wind my yarn. Well, I just fold it up and add it to the center of the yarn ball. That way I won’t lose it and will always know which yarn it is.
In addition, I do have my photo and video, as well as a computer station right across from it. So if you ever watched me on Facebook LIVE you will probably know that. I really like my small but easy-to-use motivation board where I can create crochet memes that keep me happy and motivated if I have a bad day.

I am curious, how do you organize your yarn? Leave me a comment below. Here is another section of my great Yarn Storage Shelving Unit. Now, my yarn is nicely organized and I will sure keep it that way.

I love how the colors will now keep me from buying yarn skeins I already have. Unless of course, I need a lot of the same one. Then my hubby can’t be mad at me, right?
I hope you liked this tutorial and I sure hope you will share it with others. Tag me on social media with #nickishomemadecrafts.
Be sure to share this tutorial as a link on social media as well, so you can encourage others to create their own DIY Yarn Storage Shelving Unit and get their wonderful yarn organized and invisible.
I also send out a fun and free crochet newsletter packed full of crochet goodies, patterns, and tutorials. If you don’t want to miss out, sign up for my newsletter via the form below and receive 8 Crochet Secret Tips delivered straight into your inbox!
THE CROCHET CLUB – CROCHET PATTERN, TIPS & TUTORIAL VAULT
You can have the most amazing pattern and yarn in the world, but if you don’t have the knowledge on how to crochet in a way that makes you proud, then all your work is for nothing.
Maybe you have a dream of having perfect straight seams or have less yarn to weave in?
Let me introduce you to THE CROCHET CLUB – AN ALL-ACCESS MEMBERSHIP! It is exactly what it says on the tin. If you sign up for the membership I will teach you different techniques and tips on how to improve your crochet projects!
You will get access to all my patterns in PDF formats and full support from myself to guide you through the tricky bits. I will also teach you what YOU want to learn! Join me in THE CROCHET CLUB – AN ALL-ACCESS MEMBERSHIP!


I wanted to share a photo of my storage cube system that cost us $70.00, is metal, and is self-standing. Up the wall is the way to go!
When I mentioned the “old storage unit” I think referred to the came as you are talking about 🙂 I liked it above
I love this idea, but I have a lot of scrap yarn that is in ball form, how would you carral all of these little gems of miscellaneous string ,?