Tips, Tricks and Helpful and Useful Accessories and Tools for Crochet
This post includes affiliate links.

I was asked so many times to provide a post all about tips and tricks and useful accessories and tools that I personally use, that I finally had to create it.
So this will be a summary of all my most helpful resources I have ever used in crochet. Also included my personal preferences, when it comes to certain crochet techniques and which tools I use most often.
I started my blog in under 5 Minutes! You can do it too! See how I did it HERE!
I recently updated this collection. So be sure to see the new additions at the end of this long collection of tips, tricks, and accessories and tools! Trust me, you will not regret it.
So here is now my long list of Tips, Tricks and Accessories & Tools:
1. Do you have problems with your wrist when crocheting? I noticed a huge different once I started using clover hooks. They are ergonomic crochet hooks and very helpful and soft on your fingers. I also notice less slipping of the crochet hook from my fingers as the surface is rubber rather than metal. You can get those awesome hooks HERE.
2. Are you like me and browse Amazon very often? Well, you should for sure sign up for their Prime membership as you will save so much money on shipping and also have a peace of mind when you know you can get your shipping in 1-2 business days in case you forgot to buy enough yarn or need an extra crochet accessory or gift for a special one.
Especially during the holiday season, that is such a time saver and provides me with a calm and stress free time. Click on the picture below to try Amazon Prime for FREE!
In fact, I have all my most favorite and recommended crochet accessories, tools and books listed in my Amazon store HERE

3. Sometimes I noticed that certain people seem to have trouble holding their yarn while crocheting, whether it is due to an illness or even due to crocheting for too long in one sitting.
Well, I found an awesome tool which is called the LoRan Norwegian Knitting Thimble that seems to be extremely popular. I posted a video on Facebook of me using it and the video has been seen more than 100K times. Incredible. I added the video below, in case you want to see and share it too. 🙂 To share it on Facebook, click HERE. To buy this tool, click HERE.
Subscribe to my Youtube Channel here:[youtube-subscriber channelID=UCSI4OeQQnxVQEAwMGeTCn1Q layout=full subscribers=default]
4. How often do we have projects and then we need to add more yarn? Nobody wants to see knots in a project. I found and use 2 techniques that seem to help me a lot. The first one makes a small knot, but it is acceptable as it is small. Watch the video below, and share it on Facebook by clicking HERE.
Subscribe to my Youtube Channel here:[youtube-subscriber channelID=UCSI4OeQQnxVQEAwMGeTCn1Q layout=full subscribers=default]
But the second technique, which is the Russian Knot, makes no knot at all is very sturdy. never made one? Check out the video below! I also posted it on Facebook, click HERE if you want to share it with everyone.
Subscribe to my Youtube Channel here:[youtube-subscriber channelID=UCSI4OeQQnxVQEAwMGeTCn1Q layout=full subscribers=default]
5. Did you ever want to make a long chain and needed to connect to make a circle and it got all twisted? Well, I found a technique to prevent the twist. It is awesome, I can’t believe how easy it is. Watch the video below to check it out and share it in Facebook, by clicking HERE.
Subscribe to my Youtube Channel here:[youtube-subscriber channelID=UCSI4OeQQnxVQEAwMGeTCn1Q layout=full subscribers=default]
6. When you make a graphgan or a crochet project where you need to switch colors often, you should carry the yarn along and pick up the color you need to use as you go. Be sure to change the colors during the last pull thru (the last loop) during the stitch before you change colors.
7. When creating your own pixelgraph whether it is for Corner-To-Corner or just a graphgan or afghan, you can use excel or Stitch Fiddle to create your own images. One pixel/square is one single crochet for an afghan for example, or one Corner-To-Corner square.
8. To make Pom-Pom, either watch the video below. which shows how to use a Pom-Pom maker to make Pom-Poms, or use a cardboard or fork to make Pom-Poms. With a fork, the Pom-Poms might be small, but with cardboard you can make them as big as you want, by simply cutting out a U shape form.
Subscribe to my Youtube Channel here:[youtube-subscriber channelID=UCSI4OeQQnxVQEAwMGeTCn1Q layout=full subscribers=default]
You can even wrap yarn around a chair and then tie off the long yarn bundle evenly with yarn strips and then cut between them. With this technique you can make Pom-Poms at once with less work.
9. Do you have a lot of scrap yarn? Use it to fill amigurumis instead of polyfill, or use it to fill pillow cases. I use mine as stitch markers. Please don’t give birds left over yarn, as it has chemicals in it and it would hurt or kill the birds.
10. Do you run errands a lot and usually bring your yarn projects with you? Make your own yarn storage bag with my FREE pattern, or buy this awesome storage bag below. It is my absolute favorite yarn storage bag, besides the one I made myself. haha


11. When you fasten off a project try using a yarn needle instead of a hook (during the slip stitch or slip knot) so, you can weave in the ends right away and make it more secure. Also it might save some time and forces us right away to weave in the ends instead of waiting till later.
12. When you have multiple projects going on at the same time, but you use the same hook for it, you probably want to mark your project so you remember which hook you used. There are many ways to do it.
a) buy a kit, to just clip it on your project -> click HERE
b) use a small paper, write the size of the hook (letters or numbers), laminate the paper, make a hole with a hole punch and tie with a some yarn string and tie it to your project
c) use a bobby pin and add some nail polish at the tip (have the color correspond to your hook color) and hang it onto your project
d) put your WIP projects into a bag and write onto the bag what it is, when you started and write down the hook size (be sure to add your project pattern)
e) Do you know more ideas? Let me know I will add it here 🙂
13. Do you know all 3 ways how to start a single crochet row with a chain? Click HERE to see the tutorial which includes photos and a video.
14. Do you use a pattern over an over again? Well, print it and either laminate it or put it inside a plastic sheet protector. Now you can use a dry eraser to mark which row you are on.
15. Are you tired of using a simple single crochet? Try these different tutorials, which are all variations of a normal single crochet:
a) Waistcoat stitch aka Knit stitch -> TUTORIAL
b) Turkish Star Stitch -> TUTORIAL
c) Tunisian simple stitch -> TUTORIAL
d) Tunisian knit stitch -> TUTORIAL


16. Tired of your yarn running around on the ground? Buy this useful tool below, or make your own by using baskets or boxes (make holes for the yarn to go thru, be sure to cut the holes with a long line to the edge of the box, so you can remove the yarn any time) or even use a paper towel holder.
17. Another way to prevent your yarn from running around on the ground would be to pull the yarn from the middle of the skein. Some yarn skeins are actually made in a way that you can easily pull it our from the middle; Premier yarns for example does that.
18. Do you know how to make bag bottoms or shoe soles? If you do, do you know how to prevent the gasp that are created some times? Check out my tutorial HERE to learn how to prevent or even fix them.
19. When buying yarn at Michael’s or JoAnn’s, do you know you can use their coupons at the other store. I use coupons from Micheal’s and JoAnn’s at Michael’s or JoAnn’s all the time. Saves you more money. Remember thought that this only works in stores, not online.
20. Do you have a storage container for your hooks? Use a pencil box, buy a zipper pouch like the one below or make your own, like my Pencil Shaped Pencil Holder which you can find HERE.


21. Do you have a too much yarn left over, but it is not enough for new projects? Make your own yarn cakes using a yarn winder, like the one below.
22. Have you ever had trouble making the perfect beanie or hat? OMG! I created a very detailed tutorial on how to make them perfect every time. Furthermore, learn how to crochet them with 3 different techniques.

23. Now, lets say you do have the perfect top down beanie, but you do not like the front and back post stitches? Well, how about you crochet the perfect ribbed brim that is usually used on bottom up hats? I created a very thoroughly tutorial on how to crochet the perfected ribbed brim.

24. Of course, so many times, I hear crocheters say: “My cable stitches never look great.” Well, never get frustrated again and learn how to make them perfect every time, no matter whether it is for flat or round patterns. It even does not matter how many stitches or which stitch you use! Brilliant.

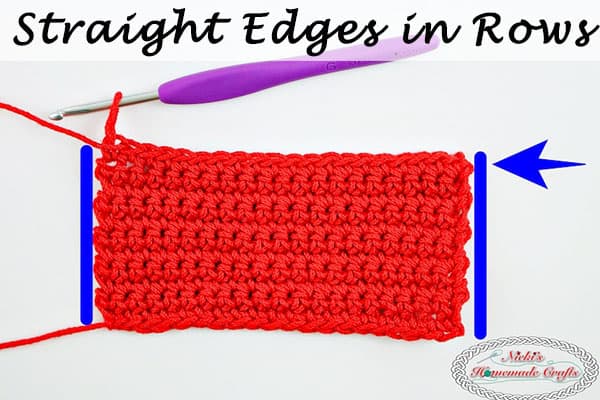
25. Ever had trouble with STRAIGHT EDGES? Well, I found the BEST FORMULA EVER! Seriously it works for every stitch! Never have problems again! It is a MUST read, share and bookmark! <3
I hope you enjoyed this collection of tips, tricks and helpful accessories or tools. Do you have more ideas that are missing in this collection? Please leave a comment below and either add it or ask you all to check for very cool ideas from fellow crocheters. Thanks 🙂
BE SURE TO SHARE THIS Crochet Tips and Tricks and useful tools and accessories COLLECTION AS A LINK ON SOCIAL MEDIA! Thanks 🙂


I love to put my yarn in zip lock bags and cut a corner to stick the yarn through. Then I can tape the label on the outside so I can remember what it was if I need more!
What a great idea! Will add that later as another point. Is that ok with you?
I use large safety pins for stitch markers.
When weaving in ends, I go one direction then the opposite, locks them in better!
Here is another way of remembering your hook size for the project you put away for a while: make as many knots in your running yarn as the number of your hook. Just undo them when you get back to it.
My bits and random odds and ends of yarn that seem to accumulate in my tote, side table, coffetable etc I tie them together joining end to end. (After watching the first video of how to join two yarn ends together in the above tips I’m going to start implementing that technique to join my bits and pieces….such a great tip!). Once you have your pieces from different skeins joined I wrap around a stiff piece of cardboard that I’ve cut the sides out like the flat spools you see in your local craft store. I continue collecting and joining left over bits and pieces adding to my spoil of many colors. What do I use this colorful kaleidoscope spool of collected yarn for? I use this spool to make crazy kaleidoscope colored Pom poms and add them to wrapped gifts instead of bows. Make a few pom poms of various sizes and instead of using a wine gift bag; I tie the Pom poms around the neck of the wine bottle to give as a hostess gift for parties, dinners etc. I’ve seen my friends and family hang these Pom poms from zippers on bags and purses, hanging from key rings, ceiling fan chains, rear view mirrors in the car etc. They really love them and one dear friend of mine calls Pom poms “warm fuzzies” because that’s what they look and feel like. . The smiles that beam from their faces and seeing how each person reuses their “warm fuzzies” makes me smile and very happy too! I have a “warm fuzzy” hanging from my scissors that I use to snip the yarns of my crochet projects and it makes finding this scissors much easier at a glance. The kaleidoscope Pom poms really are gorgeous and very unique to look at!
I use tall m&m mini candy containers to hold my hooks. They work perfectly.
Thanks for all of these tips!
I have quite a different way to make a pompom for the baby hat I make for newborns. After I finish making the baby hat, there is usually a long strand of yarn that I use to make the pompom. I put the strand of yarn between my fore finger and the next finger, keeping it the same length on each side and putting the two fingers together, I start to wrap the yarn around the two fingers , up to about 50 times. While holding the 2 fingers together you take the 2 strands and wrap around to make a knot and then once more, do it again, making that twice,then tying, (for some reason, it keeps the yarn from getting loose), sliding the wrapped yarn off your fingers and tying it tight, you have the pompom ready to be trimmed. Just right for the baby hats.
You will have to check with your local Joanns but the one in my area will take up to 6 coupons for 6 different items. They can be from several different craft stores if available. For example I might use 2 from Joanns, 2 from Michaels, 1 from Hobby Lobby and 1 from AC Moore. They just have to have a different bar code on each one. I can usually find 6 using coupons from the mail and online. http://www.mommysavesbig.com always has printable coupons for craft stores.
Thanks for all you tips and tricks. Very helpful.
To make a handy dandy quick sew portable crochet hook storage system out of a placemat: Materials – rectangle placemat (flexible enough to be rolled), sewing machine, thread to match, straight pins, approximately 18″ of coordinating ribbon. Instructions- fold long edge of placemat in half and mark center line lengthwise with a pin. Unfold and bring bottom up to the line you marked with a pin. Pin along both folded outside edges and sew 1/4 inch down both sides of fold. Next you will be sewing thru the fold in 1/4″ to 3/4″ increments all along the fold to make hook pockets (the size depends on size of your crochet hooks). Sewing from the top of the fold to the bottom creates the “pencil type” pockets for your hooks. Once sewn, insert your crochet hooks. Roll up fairly tight ( with hooks inside) and tie with a ribbon ( ribbon can be left separate or hand stitched onto the back of placemat).
Very helpful! Happy to have found this site.