Secret Pumpkin Tissue Box Cover – Free Crochet Pattern
This post includes affiliate links.
The Secret Pumpkin Tissue Box Cover is a free crochet pattern. It has a detachable top to hide the tissues when not in use. This tutorial includes photos and a video.
Decorating the house for the Halloween Party was almost an automatic tradition at this point but still required a minute amount of planning as decorations were always added. This year, as they surveyed the house, they wondered what they could add. Then she spotted it! The unadorned tissue box sat in the middle of spiders and a cauldron and looked very much like a party-goer without a costume.
“That’s it!” she said to her husband. “It’ll have to be put away.” “But, dear,” he said, musingly, “perhaps this box can be used for our new decoration.” “How so?” she inquired. “All it needs is a costume,” he observed. “Maybe a pumpkin?” If your underdressed tissue boxes require costumes for fall or Halloween, why not try making them pumpkins?

Decorate with a Crochet Pumpkin Tissue Box Cover
After making many crochet tissue box covers, it really is starting to be my thing. They are so fun and easy to make. Well, I have been thinking about a Pumpkin Tissue Box Cover for a while now. But I had trouble getting it to work until it finally clicked in my head and it came to life.
Besides looking like an awesome crochet tissue box cover, this pumpkin can also serve as decoration purpose only since it has a lid that can be added to the top to hide the tissue box component. The lid looks like a piece of the pumpkin with the stem that was carved out.
When my kids came in to check out my newest creation, the pumpkin tissue box cover, they were all kinds of surprised about this neat looking pumpkin. At this point they did not know what it was yet. And as kids, they always need to explore further. You should have seen their faces once they realized it had a secret compartment! I loved that reaction!
The yarn I used is Premier Universal Cotton Supreme which was sponsored by Premier Yarns.
This yarn is super soft with a cotton-acrylic blend and is very easy to work with. It was perfect for this kind of project.
Get the PDF Pattern of the Pumpkin Tissue Box Cover
You can get the crochet pattern for the Pumpkin Tissue Box Cover on Ravelry, Etsy, LoveCrafts, or my new membership The Crochet Club. The Crochet Club has so much more to offer than just PDF patterns! You get tutorials, references and the complete VIP treatment as well.
If you pay just twice the amount as this pattern costs and you have a month’s worth of The Crochet Club Membership with a lot more patterns! It’s well worth it.
If you do not want to join The Crochet Club, you can also purchase the ad-free, printer-friendly PDF pattern at the links below. But IF you join the All-Access Membership you will automatically get this pattern.

As always, my pattern is available for free, but if you prefer, I created a pdf of this pattern which you can easily purchase in my Ravelry or Etsy store at the links below.


More Crochet Tissue Covers Ideas


- Elephant Tissue Box Cover
- Piggy Bank Tissue Box Cover
- Rubik’s Cube Tissue Box Cover
- Crayon Tissue Box Cover
So, let’s get right into what you will need to make this awesome looking Secret Pumpkin Tissue Box Cover for the fall season. If you need help with this pattern, I also have a guided video tutorial below that shows certain parts of the pattern. Although some may find it difficult, it actually is very easy.
How to Crochet the Pumpkin Tissue Box Cover
Materials (click the names below to see which ones I used!):
- Premier Universal Cotton Supreme, in colors
- Coral (less than one skein)
- Green (only a small amount needed)
- Scissors
- 5.0mm hook
- tapestry needles
- Polyfill
- Kleenex Tissue Box Cube
- optional: use wire to make the leaf be movable and stand up
Gauge:
3 dc x 2 rows = 1 square inch
Stitches used (US terms):
- dc = double crochet
- sc = single crochet
- inc = increase
- dec = decrease
- hdc = half double crochet
- sl st = slip stitch
Final Size:
6.5 w/o the stem (with the stem 11) in height x 11 inches in diameter
Instructions:
Notes: All starting or turning chains are not counted as stitches.
Cover of actual tissue box
Start with orange.
Make a chain of 60 and connect the ends with a sl st to make a loop (make sure not to twist, click HERE for a trick on how to prevent twisting), ch 1
Use a stitch marker, as you will make continuous rounds.
Round 1 – 23: 1 sc in each st all around (60 sts per round)
Sl st and fasten off.

Inside lid of the actual tissue box
Start with orange.
Row 1: Ch 16, 1 sc in each ch starting from the 2nd ch from the hook, ch 1, turn (15 sts)
Row 2 – 6: 1 sc in each st, ch 1, turn

Now you will work on one side at a time to create a hole in the middle.
Row 7: 1 sc in the next 5 sts, ch 1, turn (5 sts)
Row 8 – 11: 1 sc in each st, ch 1, turn (fasten off at the end of row 11)

Now start on the other side.
Row 7: when looking at the 5 sc you made on the other side, sk 5 sts, then connect the yarn to the next st (there are 5 sts leftover in that row), 1 sc in the next 5 sts, ch 1, turn (5 sts)
Row 8 – 11: 1 sc in each st, ch 1, turn
Row 12: 1 sc in the next 5 sts, ch 5 (to connect to the other side again), 1 sc in the next 5 sts, ch 1, turn (15 sts)
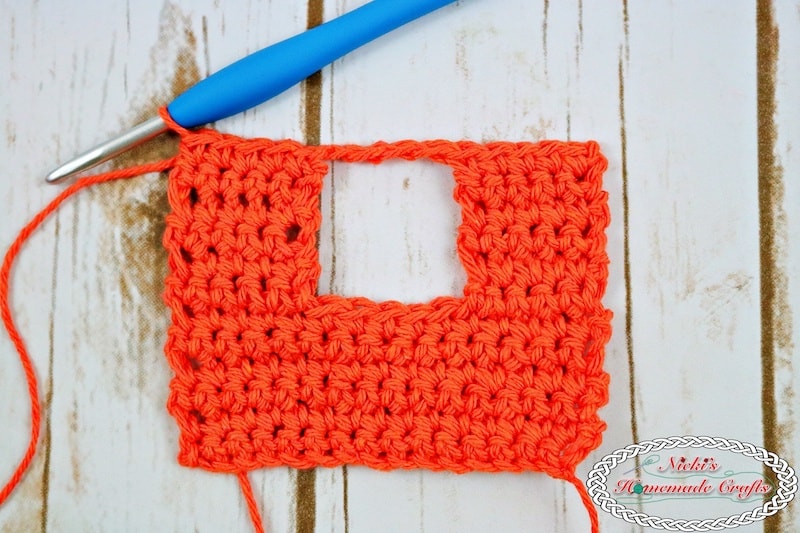
Row 13: 1 sc in the next 5 sts, 1 sc in each of the 5 chs, 1 sc in the next 5 sts (15 sts)
Row 14 – 16: 1 sc in each st, ch 1, turn

After row 16, you will connect the lid to the cover of the tissue box by using either sc’s, sl sts, or sewing. I used single crochets. As this part will not be shown once the pattern is done, it does not matter how you connect these 2 pieces. Fasten off and weave in the ends.

Extension of the tissue box opening
Starting with orange.
Connect the yarn to one corner of the opening and ch 1.
Round 1: 1 sc all around such that the sides have 5 sc’s and the corner has 1 sc (24 sts)
Use a stitch marker now, as these are continuous rounds.
Round 2 – 4: 1 sc all around (24 sts), by the end of round 3, sl st to the first st of that round

Do not cut the yarn now, as you will now start making the actual pumpkin part (no continuous rounds anymore).
Pumpkin Part of the Tissue Box Cover
Round 1: ch 1, *1sc in the next 2 sts, 1 dc, 2 dc in the same st, 1 dc, repeat from * all around, sl st to the first st (30 sts)
Round 2: ch 1, *1sc in the next 2 sts, 1 dc in the next 2 sts, 2 dc in the same st, 1 dc, repeat from * all around, sl st to the first st (35 sts)
Round 3: ch 1, *1sc in the next 2 sts, 1 dc in the next 2 sts, 2 dc in the same st, 1 dc in the next 2 sts, repeat from * all around, sl st to the first st (40 sts)
Round 4: ch 1, *1sc in the next 2 sts, 1 dc in the next 3 sts, 2 dc in the same st, 1 dc in the next 2 sts, repeat from * all around, sl st to the first st (45 sts)
Round 5: ch 1, *1sc in the next 2 sts, 1 dc in the next 3 sts, 2 dc in the same st, 1 dc in the next 3 sts, repeat from * all around, sl st to the first st (50 sts)
Round 6: ch 1, *1sc in the next 2 sts, 1 dc in the next 4 sts, 2 dc in the same st, 1 dc in the next 3 sts, repeat from * all around, sl st to the first st (55 sts)
Round 7: ch 1, *1sc in the next 2 sts, 1 dc in the next 4 sts, 2 dc in the same st, 1 dc in the next 4 sts, repeat from * all around, sl st to the first st (60 sts)
Round 8: ch 1, *1sc in the next 2 sts, 1 dc in the next 5 sts, 2 dc in the same st, 1 dc in the next 4 sts, repeat from * all around, sl st to the first st (65 sts)
Round 9: ch 1, *1sc in the next 2 sts, 1 dc in the next 5 sts, 2 dc in the same st, 1 dc in the next 5 sts, repeat from * all around, sl st to the first st (70 sts)
Round 10: ch 1, *1sc in the next 2 sts, 1 dc in the next 6 sts, 2 dc in the same st, 1 dc in the next 5 sts, repeat from * all around, sl st to the first st (75 sts)
Round 11: ch 1, *1sc in the next 2 sts, 1 dc in the next 6 sts, 2 dc in the same st, 1 dc in the next 6 sts, repeat from * all around, sl st to the first st (80 sts)
Round 12: ch 1, *1sc in the next 2 sts, 1 dc in the next 7 sts, 2 dc in the same st, 1 dc in the next 6 sts, repeat from * all around, sl st to the first st (85 sts)
Round 13 – 15: ch 1, *1sc in the next 2 sts, 1 dc in the next 15 sts, repeat from * all around, sl st to the first st (85 sts)
Round 16: ch 1, *1sc in the next 2 sts, 1 dc in the next 7 sts, 1 dc dec, 1 dc in the next 6 sts, repeat from * all around, sl st to the first st (80 sts)
Round 17: ch 1, *1sc in the next 2 sts, 1 dc in the next 6 sts, 1 dc dec, 1 dc in the next 6 sts, repeat from * all around, sl st to the first st (75 sts)
Round 18: ch 1, *1sc in the next 2 sts, 1 dc in the next 6 sts, 1 dc dec, 1 dc in the next 5 sts, repeat from * all around, sl st to the first st (70 sts)
Round 19: ch 1, *1sc in the next 2 sts, 1 dc in the next 5 sts, 1 dc dec, 1 dc in the next 5 sts, repeat from * all around, sl st to the first st (65 sts)
Round 20: ch 1, *1sc in the next 2 sts, 1 dc in the next 5 sts, 1 dc dec, 1 dc in the next 4 sts, repeat from * all around, sl st to the first st (60 sts)

Flip the pumpkin around the inside tissue box cover.

At this point, you need to add the polyfill. But before you do so, insert an actual tissue box into the cavity of the inside tissue box cover in order to prevent overfilling the pumpkin with polyfill. Now add polyfill, but do not over stuff it.

Next, you will use single crochets to close up the pumpkin. Meaning, you will connect the inside cover to the outside pumpkin. Both part of 60 sts in the round. So connect them such that all stitches aline.
Add some strings to the dents of the pumpkin using some orange yarn and a tapestry needle. You will insert the needle from the inside right where the inside lid and the inside tissue box cover are connected. Push the needle thru so it comes out on the outside of the pumpkin. Now tie the ends of the string together, but do NOT pull too tight as the tissue box will be shown on the bottom otherwise. Do that for all 5 indents of the pumpkin.


Lid with Stem
Start with christmas green.
These are continuous rounds, so be sure to use a stitch marker.
Round 1: Make a magic ring, ch 1, and add 8 sc into it. Pull tight to close the ring.
Round 2 – 13: 1 sc all around
During the last stitch (the last loop), change the color to orange
Round 14: 2 sc in each st (16 sts)
Round 15: *1 sc , 2 sc in the same st, repeat all around from * (24 sts)
Round 16 – 17: 1 sc in each st all around
Round 18: *1 sc , 1 sc dec, repeat all around from * (16 sts)
Add some polyfill into the stem and the cavity of the orange circle
Round 19: 1 sc dec all around (8 sts)
Round 20: 1 sc dec all around (8 sts)
Fasten off and weave in the ends.

Leaf
Start with Christmas Green
Ch 10
Now working in the next 8 chs, crochet one of each of these stitches into 1 ch each in that order starting from the 2nd ch from the hook: sc, hdc, hdc, dc, hdc, sc.
Now lay the stem of the leaf (the leftover chains) above the hook, and crochet this sequence (sc, hdc, dc, hdc, hdc, sc) on the other side of the chain.
Fasten off and weave in the ends. Optionally add a wire to the leaf before sewing it onto the stem of the pumpkin.

You are now done and can enjoy and trick your family, friends and guest to your home with this Secret Pumpkin Tissue Box Cover.
Check out my partial voice over video tutorial for this pattern below.
Video Tutorial for Pumpkin Tissue Box Cover
Subscribe to my Youtube Channel here:
[youtube-subscriber channelID=UCSI4OeQQnxVQEAwMGeTCn1Q layout=full subscribers=default]

I hope you love this Secret Pumpkin Tissue Box Cover as much as I do. If you love this pattern, please use the social media share buttons above or below and share this pattern link with the world and your friends.
That way you will find it easily again when you need it and you also provide the world and your friends with the ability to gain extra crochet knowledge as well. And to top it off, you help me as it allows me to create more content that you love already and want to see more of – free crochet patterns and tutorials. So, thank you for sharing.
If you love my crochet patterns and the way I teach, I would suggest subscribing to my newsletter below as I share new patterns, tutorials and special announcements often.


Can you make a video from beginning to end so it can be understood better
I understand you might be having trouble. But I am actually very busy right now. It really is super easy. Please check the photos to understand it better. I might have some time in the future to make a video, just sadly not right now. Thanks for understanding. If you have a specific question I can answer, please let me know.
Really cute. Did i miss something
I’m not sure how you remive the empty tissue box and add a new full one..
There is an opening on the bottom to change them out.
Nicki, I really love your pattern!!!!!
I have a question for you….I know you’re really busy right now but please tell me how to count rows using the thermal stitch. You’ve got the best instructions for this stitch-better than others! But, no one has instructions for counting the rows!
Thanks in advance! You’re the best!!!!