Fun & Easy Crayon Tissue Box Cover – Free Crochet Pattern
This post includes affiliate links.
This is a free crayon tissue box cover pattern. Fun and easy pattern on how to make this fun cover for your rectangle tissue box cover.
When I was recently on Facebook LIVE I asked my followers what kinds of patterns they would like me to design and create.
Well, one of the requested patterns was a Crayon Tissue Box Cover.
It turned out better than I thought and is really cool looking.
It is a fairly large tissue box cover, about two times as long as a normal rectangular (American) tissue box.
In order to make the crayon look like a little fat over-used crayon, I needed to extend the cover and add poly-fill.
This Crayon Tissue Box Cover is ideal for Back to School, whether it is for a teacher or a student.
You basically just need 3 different colors.
One of the colors is black which is used for the lines of the crayon and the other two colors need to be the same type of color, but one is lighter than the other.
In my example, I used a light blue and a dark blue.
You will need a lighter and darker type of the same color because the wrapper of the crayon is always lighter than the actual crayon itself.

Have you seen my other Tissue Box Covers?
Subscribe to my Youtube Channel here:[youtube-subscriber channelID=UCSI4OeQQnxVQEAwMGeTCn1Q layout=full subscribers=default]
Crayon Tissue Box Cover PDF Pattern
Now, before I show you the materials and the actual free crochet pattern, please also be sure to add this pattern to your Ravelry favorites.
Click the button below as that allows my pattern being shown to more people who might want to see it and also want to make it.

In addition, I created a downloadable PDF for you all in case you feel like you really want to have the ad-free version.
You can get the crochet pattern for the Crayon Tissue Box Cover on Ravelry, Etsy, LoveCrafts, or my new membership The Crochet Club.
The Crochet Club has so much more to offer than just PDF patterns! You get tutorials, references and the complete VIP treatment as well.
If you pay just twice the amount as this pattern costs and you have a month’s worth of The Crochet Club Membership with a lot more patterns! It’s well worth it.
If you do not want to join The Crochet Club, you can also purchase the ad-free, printer-friendly PDF pattern at the links below.
But IF you join the All-Access Membership you will automatically get this pattern.
In addition, I created a downloadable PDF that has all of the pictures separated from the pattern, so you an choose whether you want to print them or not.
This can save you a lot of ink in the long run.
You can buy the ad-free, printer-friendly PDF on Ravelry, Etsy, LoveCrafts, and my VIP crochet membership, The Crochet Club.


How to crochet Crayon Tissue Box Cover
You will need:
- Caron simply soft in black, royal blue and soft blue (1 skein each) -> royal blue will be called color A (for the darker color) and soft blue will be color B (for the lighter color)
- 5.0mm hook
- scissors
- tapestry needle
- polyfill
- Tissue box with the dimensions: 9 x 4.75 x 3.5 inches
Final size of the Crayon Tissue Box Cover:
21 x 5.5 x 3.75 inches
Gauge:
4 sc x 4 rows = 1 square inch
Stitches used (US terms):
- single crochet (sc)
- invisible single crochet decrease (inv sc dec = sc dec in the front loop only instead of both loops)
- surface crochet
Instructions:
Start with color A
Row 1: ch 19, 1 sc in each st starting from the 2nd ch from the hook (18 sts), ch 1, turn
Row 2 – 16: 1 sc in each st, ch 1, turn

Now you will work on 3 sides of this created square as shown on the picture below.
Basically, you will build a 3 sided “wall” that will be elongated to create the top and the sides of the tissue box cover.

Row 17: 14 sc’s equally along the first side, 1 sc in the corner, 18 sc’s across what used to be row 1, 1 sc in the corner, 14 sc’s equally along the parallel side to the first side, ch 1, turn (48 sts)
Row 18 – 19: 1 sc in each st, ch 1, turn
Change yarn to color B (leave tail of about 10 inches for both beginning and end of a yarn color, as you will use it later for sewing, DO THAT FOR ALL COLOR CHANGES UNLESS MENTIONED OTHERWISE)
Row 20 – 21: 1 sc in each st, ch 1, turn
Change yarn to color black
Row 22 – 23: 1 sc in each st, ch 1, turn
Row 24 – 27: repeat rows 20-23
Change yarn to color B
Row 28 – 34: 1 sc in each st, ch 1, turn
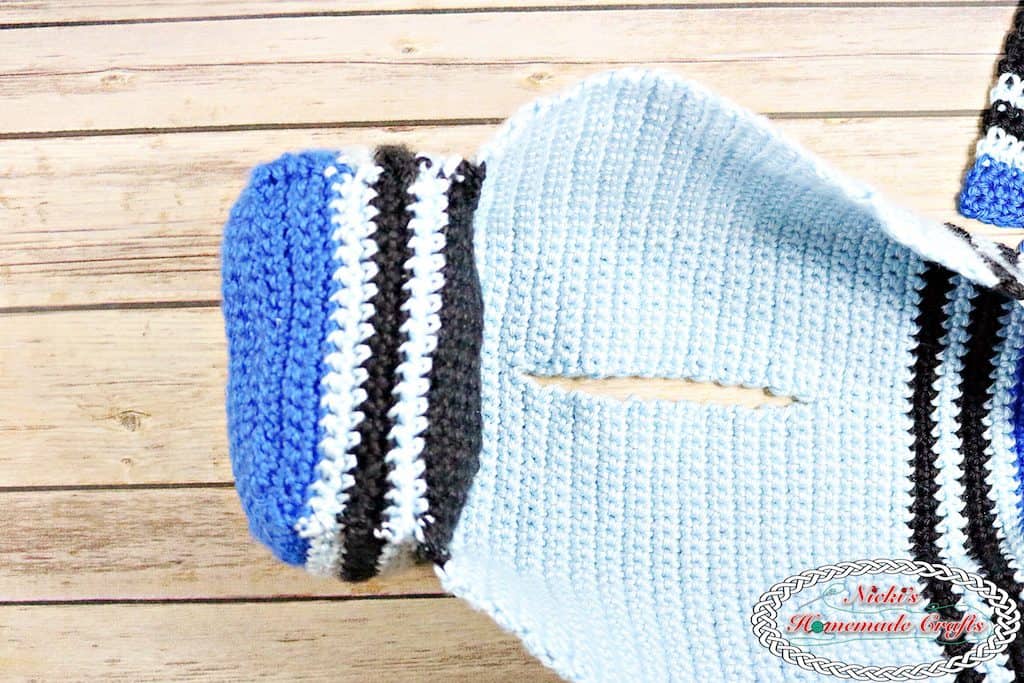
Now you will create the opening for the tissues on your crayon tissue box cover.
So you will work on one side first, and then the other side, before connecting both sides again to keep on going.
See the picture for a better understanding.
Row 35: 1 sc in the next 24 sts, ch 1, turn
Row 36 – 57: 1 sc in each st, ch 1, turn, on the last sts of the last row, fasten off
Now re-attach the yarn to the 25th stitch that was not crocheted into in row 35.

Repeat rows 35 – 57 for that side also, but do not fasten off after row 58.
Row 58: 1 sc in each st (just keep going with single crochets as of the first and second side where attached, see picture), ch 1, turn (48 sts)

Row 59 – 65: 1 sc in each st, ch 1, turn
Change yarn to color black
Row 66 – 67: 1 sc in each st, ch 1, turn
Change yarn to color B
Row 68 – 69: 1 sc in each st, ch 1, turn
Change yarn to color black
Row 70 – 71: 1 sc in each st, ch 1, turn
Change yarn to color B
Row 72 – 73: 1 sc in each st, ch 1, turn
Change yarn to color A
Row 74 – 77: 1 sc in each st, ch 1, turn, after the last st in row 77 DO NOT CH 1 or TURN, as you now work in continues rounds (for the tip), use a stitch marker!

Round 1: ch 18 (that will connect to the other side), 1 sc in each st all around

Round 2: 1 sc in each ch and then in each st all around (66 sts)

Round 3: *1 inv sc dec, 1 sc in the next 9 sts, repeat from * all around
Round 4: 1 sc in each ch and then in each st all round
Round 5: *1 inv sc dec, 1 sc in the next 8 sts, repeat from * all around
Round 6: 1 sc in each ch and then in each st all round
Round 7: *1 inv sc dec, 1 sc in the next 7 sts, repeat from * all around
Round 8: 1 sc in each ch and then in each st all round
Round 9: *1 inv sc dec, 1 sc in the next 6 sts, repeat from * all around
Round 10: 1 sc in each ch and then in each st all round
Round 11: *1 inv sc dec, 1 sc in the next 5 sts, repeat from * all around
Round 12: 1 sc in each ch and then in each st all round
Round 13: *1 inv sc dec, 1 sc in the next 4 sts, repeat from * all around
Round 14: 1 sc in each ch and then in each st all round
Round 15: *1 inv sc dec, 1 sc in the next 3 sts, repeat from * all around
Round 16: 1 sc in each ch and then in each st all round
Round 17: *1 inv sc dec, 1 sc in the next 2 sts, repeat from * all around
Round 18: 1 sc in each ch and then in each st all around
Round 19: *1 inv sc dec, 1 sc in the next st, repeat from * all around
Round 20: 1 inv sc dec all around
Round 21: 1 sc in each ch and then in each st all around, fasten off, sew together the hole and weave in the end


Now you will create 2 flat pieces that will be sewn on after making them to the underside of the front and back of the tissue box cover.
So that it can be filled with polyfill and then allows the tissue box to be placed in the middle pocket.

Start with color black (leave a long starting tail of about 30 – 40 inches for sewing later)
Row 1: ch 19, 1 sc in each st starting from the 2nd ch from the hook (18 sts), ch 1, turn
Row 2 – 16: 1 sc in each st, ch 1, turn
Change yarn to color B
Row 17 – 18: 1 sc in each st, ch 1, turn
Change yarn to color black
Row 19 – 20: 1 sc in each st, ch 1, turn
Change yarn to color B
Row 21 – 22: 1 sc in each st, ch 1, turn
Change yarn to color A
Row 23 – 26: 1 sc in each st, ch 1, turn, fasten off after the last st, leave a tail of about 20 inches or more for sewing.
Sewing the Crayon Tissue Box Cover all together
Now it is time to sew the two flat pieces onto the outer color A on both ends of the crayon.
Then you sew the sides on using the corresponding color yarn that is hanging down after it was fasten off during crocheting.
In the end, sew the piece to the inner black line (that is closest to the tissue opening).
Be sure to not stretch any of the pieces while sewing, so that the crayon does not look twisted later.
Also once you have about 3 inches left of sewing, fill the empty cavity with polyfill and finish sewing together the pieces.
Picture Tutorial for the Non-pointy side


Picture Tutorial for the Pointy Side


You are now done and you can add the tissue box underneath the Crayon Tissue Box Cover.


However, you can now also add the word “crayon” plus the oval around the name using the surface crochet stitch.
HERE is a video, if you have never done this stitch before (video is for a different pattern, BUT it is the same stitch/technique).
It is just like a slip stitch or a chain but over an already created crochet piece (just like embroidery, but with a crochet hook).


TO SUMMARISE…
Firstly, if you love this crochet crayon tissue box cover pattern, please use the social media share buttons above or below. Share this pattern link with the world and your friends.
That way you will find it easily again when you need it. You will also provide the world and your friends with the ability to gain extra crochet knowledge as well.
Secondly, to top it off, you help me as it allows me to create more content that you love already and want to see more of – free crochet patterns and tutorials. So, thank you for sharing.
Lastly, if you love my crochet patterns and the way I teach, I would suggest subscribing to my newsletter. I share new patterns, tutorials, and special announcements often.