Thermal Crochet Circles – Easiest and Best Tutorial
This post includes affiliate links.
This is a free tutorial to learn how to crochet circles with the Thermal Stitches which works for any thermal crochet stitch. The tutorial has both step-by-step photos and a video tutorial.
The Thermal Crochet Technique on its own is a bit tricky to understand, but once you do you will want to use it all the time. It’s a warm and sturdy stitch and great for beanies, potholders, coasters, bags, and baskets, but also garments and other accessories.
But in order to learn Thermal Crochet in circles, I would highly recommend you first learn the different types of basic Thermal Crochet Stitches:
Once you learn those, then it’s time to learn how to increase, decrease (tutorial for this coming soon!), and crochet rounds using Thermal Crochet Stitches. Once you get the concept of all those techniques you are ready for Thermal Crochet Circles. Otherwise, this concept will be completely challenging for you.
Now, are you ready to learn how to crochet circles using any Thermal Crochet Stitch?

Thermal Crochet
Thermal Crochet is such an amazing technique to create thick, warm, and protective crochet projects. Whether you need a crochet pattern to keep your hands from freezing or burning from heat the Thermal Crochet Stitch has you covered. But it’s also a great stitch to create very sturdy and durable bags, pouches, and clutches.
You can find all the Thermal Crochet Tutorials ad-free and printer-friendly, plus 22 crochet patterns in my ebook Thermal Crochet Made Easy.
How to Crochet Thermal Crochet Circles
– Video Tutorial
Subscribe to my Youtube Channel here:
[youtube-subscriber channelID=UCSI4OeQQnxVQEAwMGeTCn1Q layout=full subscribers=default]
How to: Thermal Crochet Stitch Circle
– Photo Tutorial
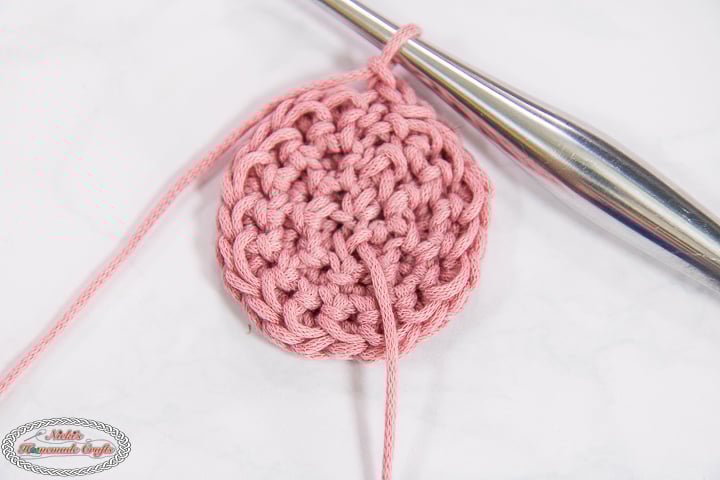
Crocheting any Thermal Crochet circles is a bit different than crocheting regular circles. In fact, there are a few different techniques to get started. But the technique I found makes the most sense to me and is very clear. So, I’ll teach you this version only.
In order to understand crocheting circles in thermal crochet, it’s best that you practice increasing first, and then how to crochet it in rounds. Cause here you’ll be combining these 2 techniques in one.
The first thing to know is that you can’t crochet continuous rounds using the Thermal crochet stitch technique. As you always crochet in ½ rows you need to catch up with the second half of the round. The same is true for increases.
Remember to use a stitch marker to mark the slip stitches that connect each ½ round.
Thermal Crochet Stitches
There are different types of Thermal Crochet Stitches. You’ll be able to use this technique for any of the thermal crochet stitches (sc, hdc, dc and taller stitches).
Here are a few Thermal Crochet Stitches to learn:
Crochet Chain Count for Thermal Crochet Circles
The only difference is the beginning chain or stitch count. Follow the following table to get started the right way.

Basic Crochet Stitch Circle
Make a chain circle, then crochet 2 stitches per chain of the stitch you chose to use. For example, if you used the sc thermal stitch (sct), you’ll make a chain of 4, connect it with a sl st to make a circle, and then crochet 2 sc per stitch, and sl st to the sl st to end up with 8 sc stitches.

Begin Thermal Crochet Rounds
2. Next, you’ll be doing a catch-up round using the thermal crochet technique. So you’ll crochet 8 sct stitches in total for this round. So that means you’ll be crocheting 2 stitches each time into 1 back loop of 1 stitch and the same leftover loop (from the chain). The video tutorial shows this very clearly.

Increase Round using Thermal Crochet
3. Now, you’ll be increasing again 2 stitches per stitch. So for sct, you’ll end up with 16 sct stitches at the end of this round. Don’t forget your slip stitches.

Thermal Crochet Catchup Round
4. Now, again you need to do a catch-up round. So all catch-up rounds have NO increases! You’ll just need to make sure you’ll use the leftover loops sometimes twice.
So, in this round, you’ll crochet 2 stitches each time into 1 back loop and the same leftover loop (from the chain). The video tutorial shows this very clearly.

Next Increasing Round using Thermal Crochet
5. Now you’ll be doing an increasing round again. But this time you’ll do it this way: 1 st into 1 st, 2 sts into the next st, and repeat till the end. So, for sct you’ll end up with 24 sts at the end of the round.
Next Catchup Round using Thermal Crochet
6. Now we’ll be doing a catch-up round again. So no increases again. You’ll crochet 2 stitches each time into 1 back loop and the same leftover loop (from the chain) wherever there was an increase. The video tutorial shows this very clearly.

Continue with the Thermal Crochet Pattern
So the following rounds would look like this:
R7: 1st in 1 st, 1 st in the next st, 2 sts in the following st
R8: catch up round – 1 st per stitch (same stitch count as R7)
R9: 1 st in the next 3 sts, 2 sts in the next st
R10: catch up round (same stitch count as R9)
R11: 1 st in the next 4 sts, 2 sts in the next st
R12: catch up round (same stitch count as R11)
Etc
I think at this point you get the rhythm of increasing in one ½ round and then doing a catch-up round after with the same stitch count.
As mentioned before, this technique works for all thermal crochet stitches. Just that the starting chain count is different.
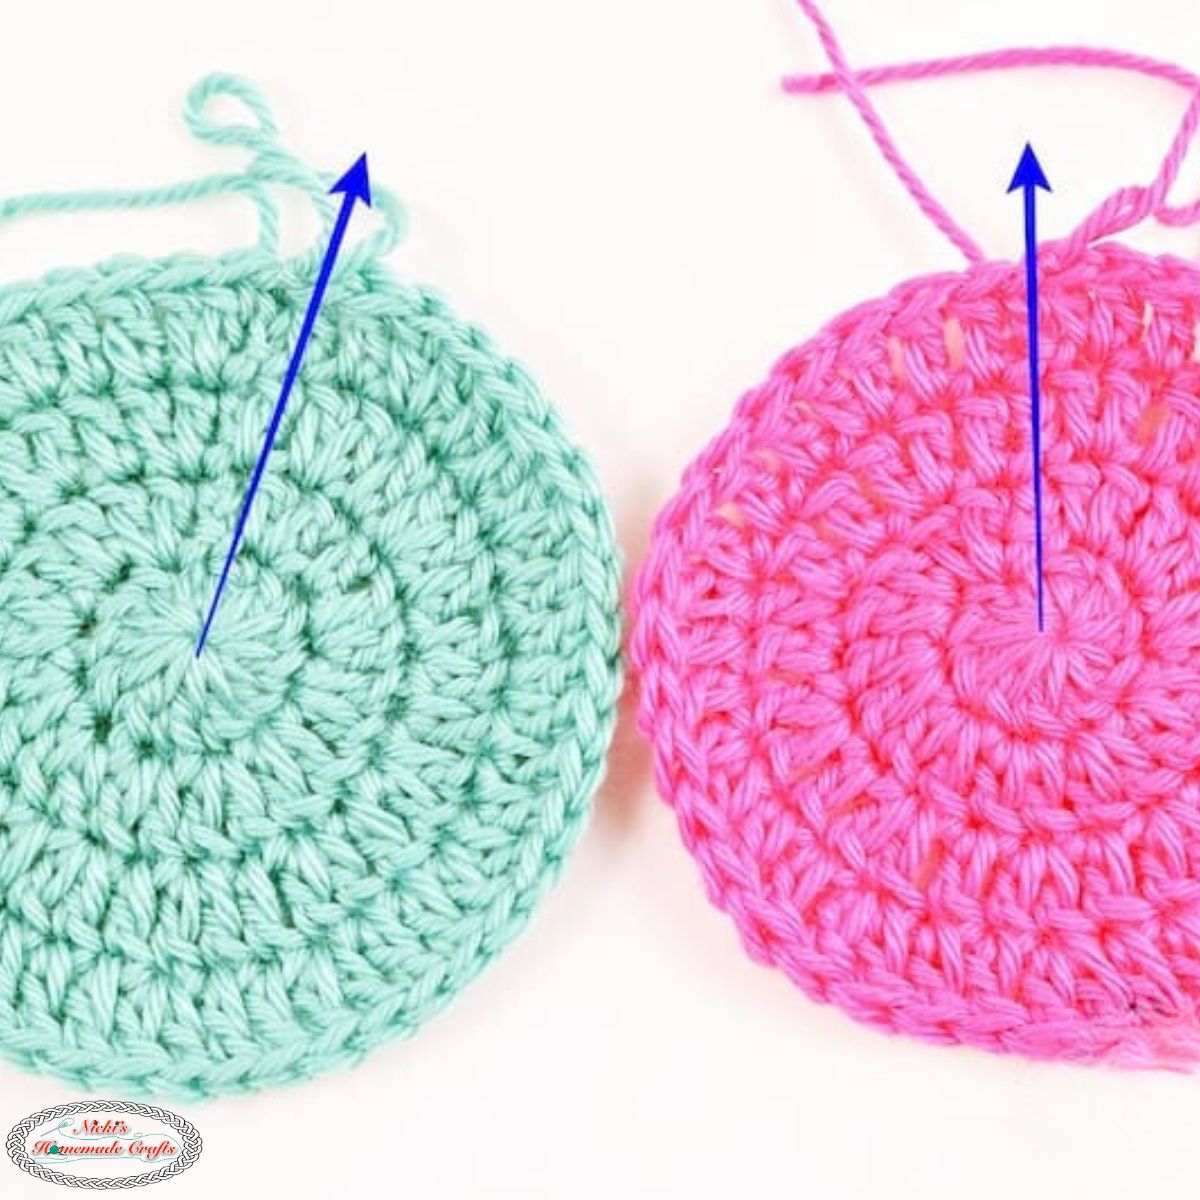
Once you finished your circle or project make sure to use the yarn end to close the hole in the center by weaving in the yarn end.
Make sure you always remember to mark your slip stitches. You’ll be making your thermal crochet stitch experience so much better.
What Projects can I use Thermal Stitch Circles for?
Once you practiced making circles for all thermal stitches your crochet world will open wide and suddenly you can make a lot of creations with this thicker crochet technique.
For a few practice patterns, see the following patterns in this ebook:
- Coaster
- Mini Basket
- Beanie
My favorite way to crochet circles using the Thermal Crochet Stitch is for beanies, hats, bags, and baskets as well as coasters.
You can find all the Thermal Crochet Tutorials ad-free and printer-friendly, plus 22 crochet patterns in my ebook Thermal Crochet Made Easy.
If you have enjoyed this Thermal crochet stitch tutorial, be sure to share the link with your crafty friends on social media using the buttons above or below this stitch tutorial. I hope you enjoy it. Thanks for sharing.

THE CROCHET CLUB – CROCHET PATTERN, TIPS & TUTORIAL VAULT
You can have the most amazing pattern and yarn in the world, but if you don’t have the knowledge on how to crochet in a way that makes you proud, then all your work is for nothing.
Maybe you have a dream of having perfect straight seams or have less yarn to weave in?
Let me introduce you to THE CROCHET CLUB – AN ALL-ACCESS MEMBERSHIP! It is exactly what it says on the tin. If you sign up for the membership I will teach you different techniques and tips on how to improve your crochet projects!
You will get access to all my patterns in PDF formats and full support from myself to guide you through the tricky bits. I will also teach you what YOU want to learn! Join me in THE CROCHET CLUB – AN ALL-ACCESS MEMBERSHIP!
Does getting 8 Crochet Secret Tips delivered straight into your inbox sound like something you would find useful? If so, sign up for my crochet newsletter below. I send out a weekly newsletter packed full of crochet patterns and tutorials.