Easy Crochet DNA Helix – Free Pattern
This post includes affiliate links.
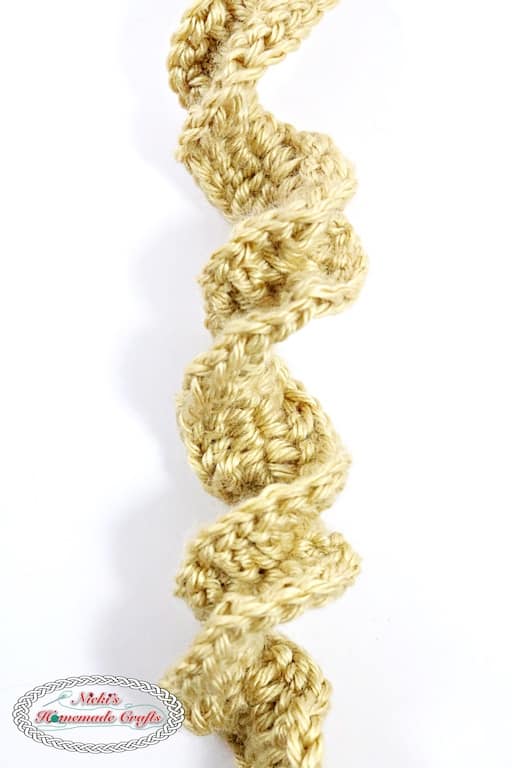
This is a free crochet DNA helix pattern. Use this fun and quick pattern to bring awareness to science. Includes both left and right handed instructions.
April 25th is International DNA Day!
You may not know but I have a BS in Biochemistry and Cell Biology from UCSD.
I used to work in research which is focused on sequencing and analyzing DNA and RNA.
This is to learn more about how to cure and prevent diseases. So naturally, this day means a lot to me!
DNA is so important to understand, not just for people in science.
We have so many different diseases in the world that we can now treat or even prevent. The main reason is because of the understanding of DNA.
Before I geek you out too much, let me tell you how to make this crochet DNA helix pattern.
But, in case you want to know more about science and what I do and how you can donate to research to cure and prevent diseases, please just contact me.
I am happy to tell you more about it.
What can you do with this crochet DNA helix pattern?
Well, you can use it to educated others. Secondly, make a bunch of them or one giant one for a school for educational purpose.
Maybe you want to shrink it down and make it as earrings or a keychain or even a bracelet or necklace.
So many possibilities.

Crochet DNA Helix PDF Pattern
Now, before I show you the materials and the actual free crochet pattern, please also be sure to add this pattern to your Ravelry favorites.
Firstly, click the button below. That allows my pattern being shown to more people who might want to see it and also want to make it.

You can get the crochet pattern for the crochet DNA helix on Ravelry or my new membership The Crochet Club.
The Crochet Club has so much more to offer than just PDF patterns! You get tutorials, references and the complete VIP treatment as well.
If you pay just twice the amount as this pattern costs and you have a month’s worth of The Crochet Club Membership with a lot more patterns! It’s well worth it.
If you do not want to join The Crochet Club, you can also purchase the ad-free, printer-friendly, PDF pattern at the links below.

You will need:
- any type of yarn, depending on what you want to do with it (I used Caron Simply Soft in the color bone and Knit Picks Dishie in color blush)
- a corresponding hook (I used a 5.0mm)
- scissors
- tapestry or yarn needle
Crochet DNA Helix Written Instructions
Before you start it is important to understand one adjustment. You will need to make adjustments to be able to crochet the correct DNA chirality.
DNA turns towards the right. That means if you crochet right-handed the DNA will turn towards the left. However, that would be wrong.
So, unless you are left-handed or can crochet left-handed you will need to either learn to crochet left-handed or crochet the below instructions backward (like the crab stitch), so the DNA will turn the correct way.

- make a chain in the length of your desire (for a DNA bracelet I used 23 chains)
- starting from the second chain from the hook crochet 3 dc in each chain, until the last chain where you crochet 3 dc, ch 1, 1 sc, ch 1, 3 dc all in the same stitch
- now you work your way backwards, in each chain crochet 3 dc again
- sl st when you reached the end
If you feel the tension is too tight and it does not look right, try doing 2 dc’s instead of 3 dc’s. That might help 🙂
Now you can fasten off and weave in the ends. You can attach the crochet DNA helix to something such as earrings, keychain or anything else.
It is a very easy pattern if you know how to either crochet left handed or know how to crochet backwards.
FINAL THOUGHTS
Please share this crochet DNA helix pattern on social media as SCIENCE IS IMPORTANT! WE NEED STEM in the kids schools!
Many schools don’t have the finances to be able to have STEM classes! Let’s bring awareness by making these DNA Helixes and share them!
STEM stands for Science, Technology, Engineering and Math! Thank you!
I hope you love this crochet DNA helix pattern as much as I do.
If you love it, please use the social media share buttons above or below and share it with the world and your friends.
Do not forget to pin it to your Pinterest Board so you can easily find it later.
That way you will find it easily again when you need it and also provide the world and your friends with the ability to gain extra crochet knowledge.
And to top it off, you help me as it allows me to create more content that you love already and want to see more of – free crochet patterns and tutorials. So, thank you for sharing.
THE CROCHET CLUB – CROCHET PATTERN, TIPS & TUTORIAL VAULT
You can have the most amazing pattern and yarn in the world, but if you don’t have the knowledge of how to crochet in a way that makes you proud, then all your work is for nothing.
Maybe you dream of having perfect straight seams or less yarn to weave in?
Let me introduce you to THE CROCHET CLUB – AN ALL-ACCESS MEMBERSHIP! It is exactly what it says on the tin. If you sign up for the membership I will teach you different techniques and tips on how to improve your crochet projects!
You will get access to all my patterns in PDF formats and full support from me to guide you through the tricky bits. I will also teach you what YOU want to learn! Join me in THE CROCHET CLUB – AN ALL-ACCESS MEMBERSHIP!


At last something that a left hander can do easily!