How to Dye Cotton Yarn Beautifully and Easy
This post includes affiliate links.
This tutorial will teach you how to dye cotton yarn with liquid Rit Dye easily at home. The bare cotton yarn that is used in this tutorial is from Knit Picks.
When something does not work out as planned, I don’t give up on figuring out how to make it work. My science heart loves experiments. So even though, I was not able to dye cotton yarn successfully with Koolaid or with natural dyes such as food juices, I finally figured out how to dye cotton yarn
And guess what? It was so easy. I just needed to use a different dye. After researching the internet, I found one video that helped and taught me to dye cotton yarn with liquid Rit Dye. I used the information and created my own version.
Now, you make your own dyed cotton yarn at home and add them to your yarn stash or use them right away in your next project. You just need some simple ingredients and some bare cotton yarn, which I received graciously from Knit Picks for free to try out this experiment.

I promise you this technique is so much easier than you might think. I did it within a few hours at home using pots and pans I already had at home.
I also decided to try to dye my cotton yarn in different ways, using the same dyes and amounts of them, but having the yarn wound in a different way – as a skein and as a hank. And the results are different but so beautiful in their own ways.
What Do You Need To Dye Cotton Yarn?
You really do not need much. You mainly need cotton yarn, water, liquid Rit Dye, and some pots. You might need some extra things to prevent getting dyed hands or burning yourself, but I listed them all conveniently below.
Materials
- Knit Picks Bare Yarn:
- Simply Cotton Worsted (6 skeins) -> 3 made into hanks
- Large, deep pots or pans (like roasting pans)
- Liquid Rit Dye
- Salt
- water
- thongs
- spare yarn to tie the yarn together
- soap
- gloves
How To Dye Cotton Yarn with Rit Dye
First, before we start to actually dye the yarn, we need to prepare the yarn. In order for all hanks and skeins not to tangle up in the water, they need to be made into big loops and tied up in several spots. But to make it more interesting, I only made 3 of the 6 skeins into big loops. I kept 3 as skeins to see if the dyes distribute differently depending on how they are wound.

Next, I added 20 cups of water to each my pot (left) and my roasting pan (right), plus 2/3 cups of salt. I stirred it around until the salt dissolves while the water is heating up.
Once the water was warm, I added 1/3 cup of Fuchsia dye each to the pot and the pan. And then, it was finally time for the cotton yarn to be added.
I placed the intact 3 skeins into the left pot and the big loops of previously hanked yarn into the right pan. I used my thongs to submerge them. As I knew before, this cotton has a hard time staying in the water.
Using the Supplies To Dye Cotton Yarn

So, I started squeezing it with the thongs (and my hands with gloves while the water was not too hot yet). I did the same for both types of wound cotton yarn. After a while, it seemed like the cotton took on not only the water but the dye. It actually took on the dye a lot faster than I thought it would.
I then poured a little bit of the purple on one side of the skeins and drizzled it over the looped yarn. Then I turned the skeins around and repeated the same thing with the navy blue dye. I did not disturb the loop yarn during this process.
I let the yarn boil for about 15 minutes and then removed the pot and pan from the heat. Next, I added hot water into the sink and added about 6 tablespoons of Rit fixative to the water. Lastly, I added the still hot yarn into the water with the fixative into the sink. I stirred it around a bit and let it sit for about 30 minutes.
After that, I started washing the yarn, one at a time, with soap until no more dye was coming out of the yarn and the water started to run clear.
Dyeing Cotton Yarn – Photo Tutorial

Finally, I was able to see how true colors looked. But I still could not yet see how far the dye went into the skeins. I saw that the big loops had dye everywhere, although in different concentrations due to having added extra dye colors.
So, I turned the skeins into big loops as well, so the yarn could dry properly. In that process, I started seeing that some parts still had some white spots. But it not only worked that most got dyed, but it also made it more beautiful. The cotton yarn that was in skeins had lots of dark areas, some purple areas, and some white.
I also realized that some parts still had some soap on the yarn which I was not able to remove while it was still in a skein. So, I rewashed it again once I finished making it into big loops.
Results of Dyeing Cotton Yarn with Liquid Rit Dye
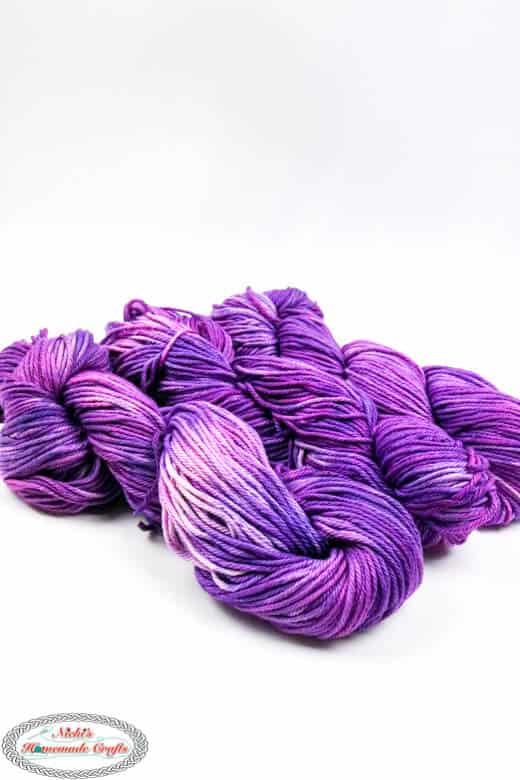
Once, they were dried, which took about a day, I made the big loops into hanks. And oh my goodness, I realized I created some masterpieces of art. I just can’t believe that the cotton yarn I had so much trouble with dyeing, turned out so beautiful using liquid Rit dye.
Below, you can see the results of the big loop yarn that was dyed in the big roasting pan. The different dye is clearly visible and made this whole skein in such pretty shades of purple.
On the other hand, the yarn hanks below are the results of the skeined yarn being dyed. It looks so different, yet it is so beautiful. I actually can’t decide which type is my favorite.
I can’t wait to crochet something with it. Seriously, anything I will crochet using these dyed cotton yarns will look incredible. I am pretty sure of it.
I am curious which type is your favorite and which type of dyeing you will try.

Now that you made the bare worsted weighted yarn into gorgeous-looking yarn hanks you can use them to crochet. Check out my free crochet pattern collection where you will surely find one perfect for your hand-dyed yarn.
Don’t Judge Me – Here is what I would do differently next time
If I dye my own cotton yarn again, which I will do very likely as it is a lot of fun, I would try to soak the yarn before dyeing the yarn. I am not sure if that makes a big difference, but I could imagine it might be easier for the yarn to stay in the dye water without me having to squeeze it for a while.
Although I know cotton yarn can be tricky to dye with certain types of dyes, I just got some professional acid dyes and also ordered some special ingredients that will hopefully help to dye the cotton yarn, not just the wool yarn. So, I will expand on this subject very soon. Stay tuned for that. If you sign up for my Newsletter below you will know when the next part is published and available to read and replicate.
If you love this tutorial on how to dye cotton yarn with Rit Dye as much as I do, please use the social media share buttons above or below and share this tutorial link with the world and your friends. They and I will thank you! I promise!