How to Crochet a Unique Trick or Treat Bag – Free Pattern
This post includes affiliate links.
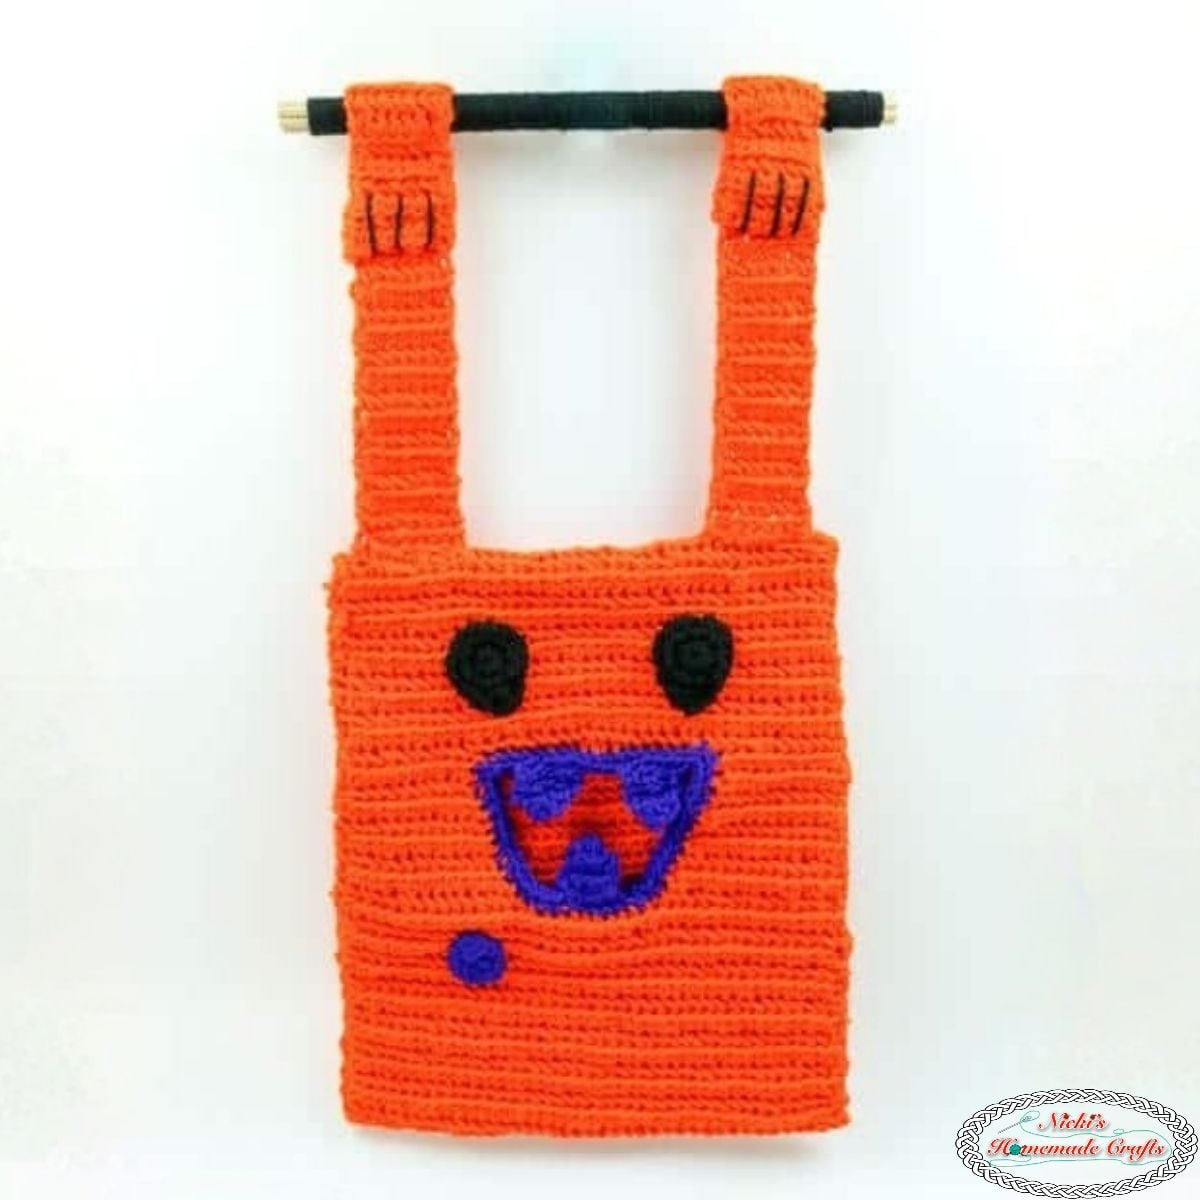
This free crochet pattern is called the Cute Pumpkin Trick or Treat Bag that has two arms as the bag handles and the mouth as the bag opening for the candy to be added on Halloween by children.
Have you ever gone to the Halloween Store wanting to buy a candy bag for Trick or Treating only to realize that there aren’t many options? The last time I went, I saw a few bags, usually white and black that glow in some kind of combination. And of course there are the bigger plastic pumpkin bowls with handles.
But none of them really screamed (pun intended) at me and told me to buy the Trick or Treat bag for my kids. So I decided to do my usual search on Pinterest and find some inspiration. And it did not take long until I found what I was looking for.
I just recently created the most amazing ebook that will make the gift giving season a breeze for you! Click here to get your gift idea crochet pattern ebook now!
I got inspired by a sewn bag that looked like a ghost with a huge mouth. And right away, it came to me. Like a light bulb! I needed a special bag that no one else has and that would make my children feel like the most amazing kids on the block.
I needed to create a bag that had a mouth in the front where the candy was added into the bag. That allows kids to feel extra special when asking for candy on Halloween. Also it would likely fill up their Cute Pumpkin Trick or Treat Bag with the most candy, too. Can you imagine their eyes if they get a bag like this on Halloween instead of the cookie-cutter bags that everyone else has?

Although I am not a huge Halloween fan, I do love decorating, especially with pumpkins – inside and outside of my home. So this Cute Pumpkin Trick or Treat Bag fills the hands of the children and my Spiral Pumpkin, Striped Pumpkin and Pumpkin Tissue Box make my home feel so warm and cozy and festive.
The cute Pumpkin Trick or Treat Bag makes my heart warm up as the scary season is all around us. It features some black eyes and purple mouth, teeth and blood drop that make the bag alive, but still cute and adorable. It is not too scary for kids to use, but still eye-catching enough to have it on the most wanted list for Halloween decor and costume accessories.
What Makes This Crochet Pumpkin Trick or Treat Bag Unique?
Unlike a traditional crochet Halloween tote bag, this pumpkin has a fun character design with little arms that become the handles and a large mouth where kids can drop their Halloween candy.
The bag uses linked single crochet stitches to create the main body, with separate details for the eyes, teeth, and handles. The wooden dowels help form the distinctive handle design, making this a fun project if you enjoy trying different crochet construction techniques.
I especially love that you can customize the colors to create your own Halloween character. Stick with orange for a classic pumpkin or switch to white and red to make a spooky ghost-inspired version!
Now, before I show you the materials and the actual free crochet pattern, please also be sure to add this pattern to your Ravelry Favorites by clicking the button below.

If you add this pattern to your Ravelry Favorites and share it on social media as a link, I will be able to share a lot more free crochet patterns for you all.
In addition, I created a downloadable pdf for you all, that has all the pictures separated from the pattern. So you can choose whether you want to print them or not. That can save you a lot of ink in the long run.



So let me now get started and tell you what you will need in order to crochet this amazing pattern.
How to crochet the Pumpkin Trick or Treat Bag
Materials:
- Impeccable Yarn from Michael’s Stores
- orange crush (2 skeins)
- purple punch
- black
- 5.0mm hook
- scissors
- tapestry needle
- 7 Wood Dowels with measurements: 3/16 in x 11 7/8 in
Stitches used (US terms):
Click here to learn these BASIC CROCHET STITCHES.
- ch = chain
- sc = single crochet
- sl st = slip stitch
- linked sc = linked single crochet
- hdc = half double crochet
- tr = treble crochet
- dec = decrease
Gauge:
5 rows x 8 linked sc sts = 2 square inches
Final Size:
Finished Size
Approximately 12.5 inches high × 10.5 inches wide, excluding the handles. The handles measure approximately 9 inches.
How to crochet the Pumpkin Trick or Treat Bag – Video Tutorial
Instructions:
Using the orange yarn and the linked single crochet tutorial
Chain 41
Row 1: ch 1, 1 sc in the 2nd ch from the hook, 1 linked sc in each of the following chs until the end, ch 1, turn
Row 2 – 33: 1 sc, 1 linked sc in the rest of the sts, ch 1, turn
Fasten off the first part of the bag (which is the back of the bag).

Front of the bag
Ch 41
Row 1: ch 1, 1 sc in the 2nd ch from the hook, 1 linked sc in each of the following chs until the end, ch 1, turn
Row 2 – 14: 1 sc, 1 linked sc in the rest of the sts, ch 1, turn
Row 15: 1 sc, 1 linked sc in each of the next 14 sts, ch 1, turn
Row 16: 1 sc dec, 1 linked sc in each of the next 13 sts, ch 1, turn (14 sts)
Row 17: 1 sc, 1 linked sc in each of the next 13 sts, ch 1, turn
Row 18: 1 sc dec, 1 linked sc in each of the next 12 sts, ch 1, turn (13 sts)
Row 19: 1 sc, 1 linked sc in each of the next 12 sts, ch 1, turn
Row 20: 1 sc dec, 1 linked sc in each of the next 11 sts, ch 1, turn (12 sts)
Row 21: 1 sc, 1 linked sc in each of the next 11 sts, ch 1, turn
Row 22: 1 sc dec, 1 linked sc in each of the next 10 sts, ch 1, turn (11 sts)
Now fasten off and re-attach the yarn 10 sts over where you stopped on row 15 (you are now creating the other side of the mouth), so I will restart with row 15 to get to the side height as the other side.
Row 15: 1 sc, 1 linked sc in each of the next 14 sts, ch 1, turn
Row 16: 1 sc, 1 linked sc in each of the next 12 sts, 1 sc dec, ch 1, turn (14 sts)
Row 17: 1 sc, 1 linked sc in each of the next 13 sts, ch 1, turn
Row 18: 1 sc, 1 linked sc in each of the next 11 sts, 1 sc dec, ch 1, turn (13 sts)
Row 19: 1 sc, 1 linked sc in each of the next 12 sts, ch 1, turn
Row 20: 1 sc, 1 linked sc in each of the next 10 sts, 1 sc dec, ch 1, turn (12 sts)
Row 21: 1 sc, 1 linked sc in each of the next 11 sts, ch 1, turn
Row 22: 1 sc, 1 linked sc in each of the next 9 sts, 1 sc dec, ch 1, turn (11 sts)
You are now connecting the left and right side again.
Row 23: 1 sc, 1 linked sc in each of the next 10 sts, ch 18, 1 linked sc in the rest of the stitches on the other side, ch 1, turn
Row 24: 1 sc, 1 linked sc in each of the next 10 sts, 1 linked sc in each ch, 1 linked sc in the rest of the stitches on the other side, ch 1, turn
Row 25 – 33: 1 sc, 1 linked sc in the rest of the sts, ch 1, turn
Fasten off and weave in the ends.
Sew the front and back side of the bag together on ALL 4 sides using the whip stitch.
Mouth
Using the purple yarn, attach the yarn in any corner and now crochet evenly 1 linked single crochet all around the inside of the mouth (one round only), then fasten off and weave in the ends.
Teeth (make 3 of the below)
Ch 6
Row 1: 1 sc in the 2nd ch from the hook, 1 linked sc in each of the rest of the sts, ch 1, turn
Row 2: 1 sc dec, 1 linked sc, 1 linked sc dec (see video to see), ch 1, turn
Row 3: 1 sc dec using all 3 leftover sts, fasten off.
Attach all the teeth using a tapestry needle and the whip stitch.
Blood droplet
Make a magic ring,ch1, and add 8 sc’s to it and then pull the ring tight, sl st to the first st
Row 1: 1 hdc, 1 tr, 1 hdc, sl st to the next st and fasten off
Sew the blood droplet to the bag using the whip stitch.
Eyes (make 2 of the below)
Using the black yarn
Make a magic ring,ch1, and add 8 sc’s to it and then pull the ring tight, sl st to the first st
Round 1: 2 sc in each st, sl st to the first st
Round 2: 1 sl st to the next st, 1 hdc, 1 tr, 1 hdc, 1 sl st to the next st again and fasten off and sew on the eyes to bag.

Arm handles for bag (make 2)
Using the orange yarn again
Ch 9
Row 1: ch 1, 1 sc in the 2nd ch from the hook, 1 linked sc in each of the following chs until the end, ch 1, turn
Row 2 – 33: 1 sc, 1 linked sc in the rest of the sts, ch 1, turn
Fasten off.
Now using the black yarn and a tapestry needle sew on the lines to make the arms/ hands look like they have fingers. The picture on the left shows the back of the sewn on piece and the one on the right shows the right side.


Stick handle for arm handles for the bag
Using 7 wood dowels and black yarn, wrap the yarn around the dowels and weave in the ends at the end (or glue them on). To make it more secure, add some hot glue to the end, so the kids won’t hurt themselves in the end.

Finish it up
Now to finish up the Cute Pumpkin Trick or Treat Bag, sew the handles to the bag itself by wrapping it around the wood stick with the black yarn and then sewing the handles to the bag using the whip stitch again.

You are now done and finished your Cute Pumpkin Trick or Treat bag. Your kids or grandchildren will now have an awesome unique bag that no one else has.
If you want more awesome crochet patterns, I just made a collection as an ebook that will be perfect for the gift giving season.
In case, you had any trouble, I also created a video tutorial for the pattern. You can find it for your convenience right below.
Frequently Asked Questions About the Crochet Trick or Treat Bag
Is this crochet pumpkin trick or treat bag suitable for beginners?
This pattern is a fun project for crocheters who already know the basic stitches and want to try something a little different. You’ll use linked single crochet stitches, simple shaping, and sewing techniques to create the pumpkin bag and its fun Halloween details.
If you’re new to linked single crochet, don’t worry! I’ve included a stitch tutorial to help you learn the technique.
What yarn should I use for a crochet Halloween bag?
I used worsted-weight Impeccable yarn in orange, purple, and black for my pumpkin trick or treat bag. The orange creates the main body, while the purple and black are used for the facial features and finishing details.
You can also experiment with other worsted-weight yarn colors to make your own Halloween character.
Can I make this trick or treat bag look like a ghost?
Absolutely! One of the fun things about this crochet Halloween bag is how easy it is to customize the colors. Instead of using orange and purple for the pumpkin, try white and red to create a spooky ghost-inspired trick or treat bag.
How big is the finished crochet pumpkin bag?
The finished bag measures approximately 12.5 inches tall and 10.5 inches wide, not including the handles. The handles measure approximately 9 inches.
It’s a fun size for collecting Halloween candy and can also be used as a seasonal decoration when Halloween is over.
Now you are done with the Pumpkin Trick or Treat Bag and can use it as fall decor, gift it or sell it. If you love the pattern as much as I do, please use the social media share buttons above or below and share this pattern link with the world and your friends. Thank you.