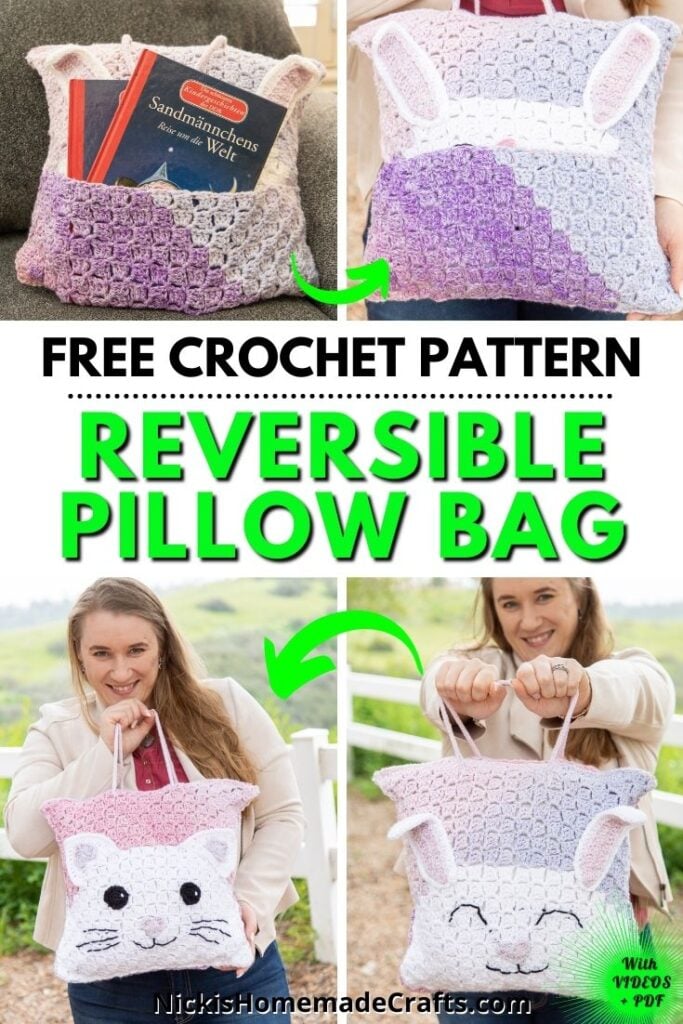
Free Cat Bunny Reversible C2C Crochet Bag Pillow Pattern with Book Pouch
This post includes affiliate links.
This is a free cat bunny reversible C2C crochet bag pillow pattern with a book pouch. This is a great beginner C2C crochet pattern using Premier Anti-Pilling Everyday Worsted and Medley yarn.
Are you a fan of animals, crafting, and books? If so, you’re in luck! This article will show you how to make a reversible cat-bunny crochet bag-pillow pattern with a book pouch, so you can easily switch between designs and bring your favorite stories with you wherever you go.
Whether it’s a cozy reading corner at your local cafe, a trip to the beach, or just lounging around at home, this piece of crochet art is sure to bring you joy, with its cute and playful design and functionality.
And of course to make this cat bunny reversible crochet bag pillow pattern even more unique, the front and back panel as well as the book pouch are crocheted in c2c (corner-to-corner).
And if you are a visual learner, I also added a few video tutorials to learn the stitches needed to help you along with the written pattern as well. This pattern used to be a mystery crochet along and is broken up like that accordingly.
Plus, you can customize it with any colors and yarns you choose! We will also provide helpful tips and tricks to ensure that your project turns out perfect. So if you’re ready to create yourself a one-of-a-kind accessory, let’s get started!
Ready to make this one?
Corner-to-Corner Crochet
Well, this C2C (Corner-to-Corner) cat bunny reversible crochet bag pillow pattern is not my first C2C crochet pattern. I have designed 70 other C2C crochet patterns.
My ebook includes all 71 C2C crochet patterns (including this crochet bag pillow pattern) plus 50 graphs, 7 stitch tutorials as well as 13 video tutorials. This ebook is a must-have for any crocheter who loves C2C or crocheting with colors.
Get the PDF of the Reversible Cat Bunny C2C Crochet Bag Pillow Pattern

This pattern is also available as an ad-free, printer-friendly pdf pattern that can be purchased at the links below for only a small fee.


If you like C2C, cat or bunny crochet patterns, you might like these also:


So, let me now give you the supplies you need in order to crochet this cute pattern.
How to Crochet the Reversible Cat Bunny Bag Pillow Pattern
Materials you will need
- Premier Momenti Worsted Yarn (58% Cotton, 42% Acrylic, 437yds/200g) – 1 skein of the color Hydrangea (I used this color)
- Premier Anti-Pilling Everyday Worsted Yarn (100% Anti-Pilling Acrylic, 180yds/100g) – 2 skeins of the color WHITE (I used this color)
- 4.5mm hook
- scissors
- tapestry needle
- 2 pieces of 16 x 16 inches of fabric
- 16-inch zipper
- hand i-cord knitting machine
- Sewing Machine (or sew by hand)
- a little bit of black yarn
- pillow case (16×16)
Gauge
1 c2c dc pixel = 1 square inch
Size
16 x 16 inches
Stitches used in the pattern
Learn all the basic crochet stitches HERE
- st/sts = stitch/stitches
- ch = chain
- sk = skip
- sl st = slip stitch
- dc = double crochet
- invisible join
- C2C = corner to corner
Free Written Crochet Pattern for the Reversible C2C Crochet Bag Pillow with Book Pouch
IF you would like the pattern ad-free you can join “The Crochet Club” membership as a full member and get access to the pattern ad-free and more than 300 patterns, even with interactive checkboxes to save your progress row by row.
You can join the “The Crochet Club” Membership here if you want to have the entire pattern ad-free.
Already a member? Login HERE to see the ad-free version
Pattern Notes
First, you’ll crochet the book pouch, then the pillow front and back panels, before crocheting the cat and bunny faces, and assemble the bag pillow, including a lining and bag straps as i-cords. Keep in mind that this pattern used to be part of a Mystery CAL and therefore is broken up into 3 pieces and 3 videos.
C2C Crochet Rectangle as Book Pouch
Subscribe to my Youtube Channel here:
[youtube-subscriber channelID=”UCSI4OeQQnxVQEAwMGeTCn1Q” layout=”full” subscribers=”default”]
I recommend using the pixel graph to guide you with C2C. IF you never did that before, make sure to watch the video above as I go through everything.
Using only Momenti (pink – pi), crochet the rectangle pixel with double crochet stitches. Watch the video above to learn how to crochet C2C. But just in case I also have written down the pattern below.
Use Momenti for the book pouch.

pi = pink (aka Momenti)
→ Row 1 [WS]: (pi) x 1 (1 square)
← Row 2 [RS]: (pi) x 2 (2 squares)
→ Row 3 [WS]: (pi) x 3 (3 squares)
← Row 4 [RS]: (pi) x 4 (4 squares)
→ Row 5 [WS]: (pi) x 5 (5 squares)
← Row 6 [RS]: (pi) x 6 (6 squares)
→ Row 7 [WS]: (pi) x 7 (7 squares)
← Row 8 [RS]: (pi) x 8 (8 squares)
→ Row 9 [WS]: (pi) x 9 (9 squares)
Corner: Start decreasing on WS
← Row 10 [RS]: (pi) x 9 (9 squares)
→ Row 11 [WS]: (pi) x 9 (9 squares)
← Row 12 [RS]: (pi) x 9 (9 squares)
→ Row 13 [WS]: (pi) x 9 (9 squares)
← Row 14 [RS]: (pi) x 9 (9 squares)
→ Row 15 [WS]: (pi) x 9 (9 squares)
← Row 16 [RS]: (pi) x 9 (9 squares)
→ Row 17 [WS]: (pi) x 9 (9 squares)
← Row 18 [RS]: (pi) x 9 (9 squares)
→ Row 19 [WS]: (pi) x 9 (9 squares)
← Row 20 [RS]: (pi) x 9 (9 squares)
Corner: Start decreasing on RS
→ Row 21 [WS]: (pi) x 8 (8 squares)
← Row 22 [RS]: (pi) x 7 (7 squares)
→ Row 23 [WS]: (pi) x 6 (6 squares)
← Row 24 [RS]: (pi) x 5 (5 squares)
→ Row 25 [WS]: (pi) x 4 (4 squares)
← Row 26 [RS]: (pi) x 3 (3 squares)
→ Row 27 [WS]: (pi) x 2 (2 squares)
← Row 28 [RS]: (pi) x 1 (1 square)
Total: (pi) x 180
Fasten off and leave about 2 feet of a tail.

C2C Square as Crochet Bag Pillow Front and Back Panels
Ok, now that we finished the rectangle, it’s time to learn color changes and make a square 🙂 Be sure to watch the video as I go through several color-changing tips with a small swatch.
Subscribe to my Youtube Channel here:
[youtube-subscriber channelID=”UCSI4OeQQnxVQEAwMGeTCn1Q” layout=”full” subscribers=”default”]
Crochet 2 panels (one for the front and one for the back)

pi = pink (aka Momenti)
w = white (aka Everyday yarn)
→ Row 1 [WS]: (w) x 1 (1 square)
← Row 2 [RS]: (w) x 2 (2 squares)
→ Row 3 [WS]: (w) x 3 (3 squares)
← Row 4 [RS]: (w) x 4 (4 squares)
→ Row 5 [WS]: (w) x 5 (5 squares)
← Row 6 [RS]: (w) x 6 (6 squares)
→ Row 7 [WS]: (w) x 7 (7 squares)
← Row 8 [RS]: (pi) x 1, (w) x 7 (8 squares)
→ Row 9 [WS]: (w) x 8, (pi) x 1 (9 squares)
← Row 10 [RS]: (pi) x 2, (w) x 8 (10 squares)
→ Row 11 [WS]: (w) x 9, (pi) x 2 (11 squares)
← Row 12 [RS]: (pi) x 3, (w) x 9 (12 squares)
→ Row 13 [WS]: (w) x 10, (pi) x 3 (13 squares)
← Row 14 [RS]: (pi) x 4, (w) x 10 (14 squares)
→ Row 15 [WS]: (w) x 11, (pi) x 4 (15 squares)
← Row 16 [RS]: (pi) x 5, (w) x 11 (16 squares)
→ Row 17 [WS]: (w) x 12, (pi) x 5 (17 squares)
← Row 18 [RS]: (pi) x 6, (w) x 12 (18 squares)
→ Row 19 [WS]: (w) x 12, (pi) x 7 (19 squares)
← Row 20 [RS]: (pi) x 8, (w) x 12 (20 squares)
Corner: Start decreasing on both ends
→ Row 21 [WS]: (w) x 11, (pi) x 8 (19 squares)
← Row 22 [RS]: (pi) x 8, (w) x 10 (18 squares)
→ Row 23 [WS]: (w) x 9, (pi) x 8 (17 squares)
← Row 24 [RS]: (pi) x 8, (w) x 8 (16 squares)
→ Row 25 [WS]: (w) x 7, (pi) x 8 (15 squares)
← Row 26 [RS]: (pi) x 8, (w) x 6 (14 squares)
→ Row 27 [WS]: (pi) x 13 (13 squares)
← Row 28 [RS]: (pi) x 12 (12 squares)
→ Row 29 [WS]: (pi) x 11 (11 squares)
← Row 30 [RS]: (pi) x 10 (10 squares)
→ Row 31 [WS]: (pi) x 9 (9 squares)
← Row 32 [RS]: (pi) x 8 (8 squares)
→ Row 33 [WS]: (pi) x 7 (7 squares)
← Row 34 [RS]: (pi) x 6 (6 squares)
→ Row 35 [WS]: (pi) x 5 (5 squares)
← Row 36 [RS]: (pi) x 4 (4 squares)
→ Row 37 [WS]: (pi) x 3 (3 squares)
← Row 38 [RS]: (pi) x 2 (2 squares)
→ Row 39 [WS]: (pi) x 1 (1 square)
Total: (pi) x 190, (w) x 210
Fasten off and leave a tail of about 3-4 feet


Crochet Cat and Bunny Faces
You can make it into a bag, but also a pillow. Now HOW you customize it, is up to you. I made a cat and bunny plus added a book pouch using the rectangle which also can be a separate pouch if you prefer.
Depending on how you finish it, you may need a few extra things. I also used a little bit of worsted black, some fabric, zipper, Tulip Knitting Machine (you can crochet it too), and a sewing machine (you can do it by hand or skip it). And a pillow insert if you make one.
So how will you customize it?
Video Tutorial to take you through many possible Customizations:
Subscribe to my Youtube Channel here:
[youtube-subscriber channelID=”UCSI4OeQQnxVQEAwMGeTCn1Q” layout=”full” subscribers=”default”]
Zipper Lining (optional) – if you want to make it into a bag
Cut two 16 x 16 inch fabric pieces and sew (I used a sewing machine) a zipper to the 2 pieces. Then add the optional sewn button holes (or just cut it with a pair of scissors), and then sew the 3 leftover sides together. Watch the video HERE on how to add a zipper to a lining.

2 Bag Straps
I used my small hand-held knitting machine to make 2 straps, each about 18 inches long. A video on how to make one with the machine is here. If you want to crochet it, please check out this tutorial here.

Crochet Cat Mouths and Inner Ears
Crochet 4 hearts like this:
Make a Magic Ring (or add an extra chain to the chain of 3 and put all the stitches in the first chain) and add every stitch into the magic ring(or chain) 3 tr, 3 dc, Ch 1, 1 tr, Ch 1, 3 dc, 3 tr, Ch 3, sl st into the same Ch as all the other stitches, do another sl st towards the back of the heart to hide the yarn, fasten off, but leave a tail for sewing later.
Crochet 2 Cat Eyes
R1: with black make a magic ring, add ch 1, and 6 sc, close the ring
R2: 2 sc per st
R3: *1sc, then 2 sc in the next st, repeat from * all around
Fasten off and leave a tail for sewing later
Using white, sew a small loop 4 times in the same place, then weave in your ends.
Crochet 2 Cat’s Outer Ears
R1: Magic Ring, add ch 1, ATC (or ch 3 and count either of them as a stitch), and 8 dc, turn, and close the ring (9 sts)
R2: [1 ATC, 1 dc] in the same st, 1 dc in the next 3 sts, 5 dc in the next st, 1 dc in the next 3 sts, 2 dc in the last st, turn
R3: [1 ATC, 1 dc] in the same st, 1 dc in the next 6 sts, 5 dc in the next st, 1 dc in the next 6 sts, 2 dc in the last st, turn
R3: [1 ATC, 1 dc] in the same st, 1 dc in the next 9 sts, [1dc, ch1, 1 tr, ch1, 1dc] in the next st, 1 dc in the next 9 sts, 2 dc in the last st, turn
Fasten off and leave a tail for sewing later

Crochet 2 Bunny’s Outer Ears
R1: with white, ch 20, starting from the 2nd ch from the hook, 1sc, then 1 hdc in the next 3 sts, 1 dc in each st till you have 1 st left, 6 dc in the last st, now you’ll work on the other side of the chain, 1 dc in each st until you have 4 sts left, 1 hdc in the next 3 sts, 1 sc in the last st
R2: ch 2, 1 sc, 1 hdc in the next 3 sts, 1 dc in each st until you reach the center of the 6 dc you made in the previous round, then place 6 dc in the next st, 1 dc in each until you have 4 sts left, 1 hdc in the next 3 sts, 1 sc in the last st, sl st to the first st of round 2
Leave a tail for sewing later
Crochet 2 Bunny’s Inner Ears
R1: with Momenti, ch 20, starting from the 2nd ch from the hook, 1sc, then 1 hdc in the next 3 sts, 1 dc in each st till you have 1 st left, 6 dc in the last st, now you’ll work on the other side of the chain, 1 dc in each st until you have 4 sts left, 1 hdc in the next 3 sts, 1 sc in the last st, sl st to the first st
Leave a tail for sewing later

Crochet Bag Pillow Assembly
Sew on all the pieces of the crocheted face to the 2 squares. One side is the bunny, and the other side is the cat.
With black sew on the mouth on both animals, the whiskers for the cat, and the 2 half circles for the bunny eyes.
Sew the inner ears to the outer ears, then sew the ears to the top of the head of both animals.


Now lay the squares facing outwards on top of each other (empty sides touch each other) and then add the rectangle on the bottom face of one of the animals.
Now sew all around (I used a running stitch) the 3 pieces together on 3 sides together (4 sides of you make a pillow only without a bag)
Finally, add the lining to the inside on the top opening and sew it to the crochet (I used my sewing machine for the long sides and my hand for the corners of the zipper).
Pull the bag straps through the holes and knot them on the inside.

Now, let’s see what the final result looks like:


Be sure to join my Crochet Facebook Group and show off your crochet creation. I would love to admire them and cheer you on as you’re working on creating it and after you finished it.
I’m also always here to support you through this and any other pattern and tutorial. Simply ask in my group and me and other amazing and kind crocheters will help you along.
If you love this pattern, please use the social media share buttons above or below and share this pattern link with the world and your friends.

That way you will find it easily again when you need it and you also provide the world and your friends with the ability to gain extra crochet knowledge as well. And to top it off, you help me as it allows me to create more content that you love already and want to see more of – free crochet patterns and tutorials. So, thank you for sharing.
If you love my crochet patterns and the way I teach, I would suggest subscribing to my newsletter below as I share new patterns, tutorials, and special announcements often.