Free Crochet Heart Pillow – Reversible Pattern
This post includes affiliate links.
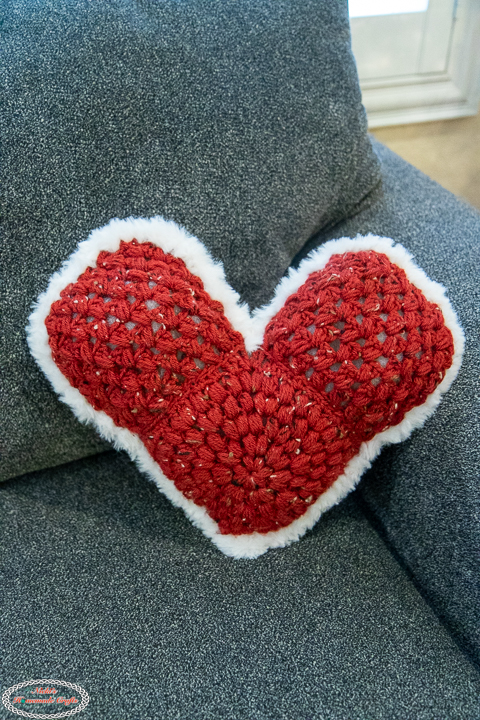
This Reversible Heart Pillow is a free crochet pattern that features easy-to-follow puff-inspired crochet stitches, such that even a beginner can crochet it. This free crochet pattern is made with acrylic worsted-weight yarn and includes 3 detailed video tutorials.
Valentine’s Day is coming up, and I don’t know about you, but I love adding little handmade touches to my home this time of year. There’s just something about crocheting hearts that makes everything feel extra cozy and festive! Whether you’re making them for yourself, as gifts, or just because you love crochet (same here!), heart projects are always a hit.
Pillows are one of my favorite things to crochet because they’re both pretty and practical. They instantly make a space feel more inviting, and when you make one yourself, you get to pick the perfect colors, yarn, and texture to match your style. A heart-shaped pillow? Even better! It’s the perfect mix of cute and cozy, and it makes such a sweet gift for someone special—or a fun treat for yourself.

Make This Reversible Heart Pillow – A Fun & Fluffy Valentine’s Crochet Project
But this isn’t just any heart pillow. I wanted to design something unique, so I came up with this Reversible Heart Pillow—which means you get two different looks in one! It’s made with three different textured stitches and pieced together in a way that gives it a really fun, eye-catching design. It’s not your average heart pillow, that’s for sure!
For this pattern, I used worsted-weight yarn (WeCrochet Brava Worsted Yarn and WeCrochet Heatherly Worsted Yarn) and played around with three gorgeous stitches: the puff stitch in circles, the jasmine stitch, and the zig-zag puff stitch. You’ll crochet six separate pieces and then join them to form two full hearts, which are then crocheted together. The best part? A super soft and fluffy border using WeCrochet’s Fairy Yarn that makes it extra huggable!

If any of these stitches sound tricky, don’t worry—I’ve got you covered! I put together three step-by-step video tutorials to walk you through everything, from making the individual pieces and learning 3 different stitches to putting it all together. So whether you’re already comfortable with textured stitches or trying them for the first time, you’ll have all the help you need.
I seriously love how this pillow turned out, and I know you will too! You can make it in classic Valentine’s colors or switch things up with neutrals or pastels to match your home year-round. Ready to get started? Grab your yarn, and let’s make this adorable heart pillow together!
This pattern used to be a mystery crochet along and is broken up like that accordingly.
It’s time to get creative, so let’s get started!
Crochet Stitches Made Easy
This Reversible Heart Pillow allows you to learn 3 different stitches. But did you know this pattern is also a bonus pattern in the Crochet Stitches Made Easy Ebook here?
The Crochet Club
This pattern is also part of the popular “The Crochet Club” which hosts over 500 ad-free patterns with check-off boxes as well as a vault of videos, plus weekly new tutorials and patterns as well as twice-a-month virtual meetups.
Get the PDF of the Crochet Heart Pillow – Reversible Pattern

This pattern is also available as an ad-free, printer-friendly pdf pattern that can be purchased at the links below for only a small fee on Ravelry or Etsy.


More Free Heart Crochet Patterns
If you like more free patterns, you might also like to try one of these:


- Heart Pouch
- Heart Drawstring Pouch
- Heart Mosaic Crochet Afghan Square
- Heart Basket with Flower Insert
So, let me now give you the supplies you need in order to crochet this unique heart pillow pattern.
How to Crochet a Heart Pillow – Free Reversible Pattern
Materials you will need
- 4mm hook – I used the WeCrochet Dots Hook
- scissors
- tapestry needle
- For the Heatherly yarn hank you’ll need:
- WeCrochet Brava Worsted Yarn (100% Acrylic, worsted, 218 yds/100g)
- Poinsettia (3/4 skein)
- WeCrochet Heatherly Worsted Yarn (100% Acrylic, worsted, 218yds/ 100g)
- Juice Box (3/4 skein)
- WeCrochet Fairy Tale Yarn – Eisbar
- Polyfill
Gauge
4 puff stitches x 3 rounds = 2 square inches
Size
14 x 11 inches
Stitches used in the pattern (US Terms)
Learn all the basic crochet stitches HERE
- st/sts = stitch/stitches
- ch = chain
- sk = skip
- sl st = slip stitch
- sc = single crochet
- dc = double crochet
- tr = treble crochet
- hdc = half double crochet
- puff stitch = (yo, insert hook, pull up a loop) 3 times, 7 loops on hook, yo and pull through all 7 loops
- Puff Stitch in Rounds (explained in video 1)
- Jasmin Stitch (explained in detail in video 2)
- Zig Zag Puff Stitch (explained in video 3)
Free Written Heart Pillow as Reversible Pattern with Videos
IF you would like the pattern ad-free you can join “The Crochet Club” membership as a trial or as a full member and get access to this pattern ad-free and more than 500 patterns, even with interactive checkboxes to save your progress row by row.
You can join the “The Crochet Club” Membership here if you want to have the entire pattern ad-free.
Already a member? Login HERE to see the ad-free version
Written Pattern Notes
Keep in mind, that this pattern used to be a Mystery CAL, and therefore the pattern is broken up as such.
Pattern Notes:
Quick note: First you’ll crochet each piece 2 times (2 colors per 3 pieces) then sew them together and crochet them together in the end to make the pillow with polyfill inside.
Puff Stitch In Circles – Part 1 of the Heart Pillow
Video Tutorial for Part 1 – Puff Stitch in Circles to Make a Square
Subscribe to my Youtube Channel here:
[youtube-subscriber channelID=”UCSI4OeQQnxVQEAwMGeTCn1Q” layout=”full” subscribers=”default”]
Written Pattern for Part 1
Puff Stitch in Circles
Make 2 Squares in 2 Colors (1 in pink, 1 in red)
R1: Magic ring, ch 1 or 2, (1 puff st, ch 1) 7 times, sl st
R2: sl st until the next ch space, (1 puff st, ch 1) twice per ch space, sl st (14 puff sts)
R3: sl st until the next ch space, *(1 puff st, ch 1) in 1 ch sp, (1 puff st, ch 1) twice in the next ch space, repeat from * all around, sl st (21 puff sts)
R4: sl st until the next ch space, *(1 puff st, ch 1) in 2 ch spaces, (1 puff st, ch 1) twice in the next ch space, repeat from * all around, sl st (28 puff sts)
R5: sl st until the next ch space, *(1 puff st, ch 1) in 3 ch spaces, (1 puff st, ch 1) twice in the next ch space, repeat from * 5 MORE TIMES, **(1 puff st, ch 1) in 1 ch sp, (1 puff st, ch 1) twice in the next ch space, repeat from ** one time, sl st (36 puff sts)
R6: each set of stitches in placed into the ch spaces, *2 sc, 2 hdc, 2 dc, 2 dc, [2 tr, ch 1, 2 tr], 2 dc, 2 dc, 2 hdc, 2 sc, repeat from* 3 more times
Fasten off and weave in ends.
Each Square should be about 6 inches.
Make sure to post your picture with the hashtag #JAN25MCAL to the Facebook group so we can find and celebrate you!

Jasmine Stitch – Part 2 of the Heart Pillow
Video Tutorial for Part 2 – Jasmine Stitch using Puff Stitches
Subscribe to my Youtube Channel here:
[youtube-subscriber channelID=”UCSI4OeQQnxVQEAwMGeTCn1Q” layout=”full” subscribers=”default”]
Written Pattern for Part 2
Jasmine Stitch
Make 2 Pieces in 1 Color (2 in pink)
Be aware these puff stitches are made differently than normal ones.
1 puff stitch: (yo, insert hook, pull up a loop) 3 times, 7 loops on hook, yo AND HOLD TIGHT ON YARN and pull through all 7 loops, insert hook into yarn you held onto, yo and pull through 2 loops, then ch 1
ALL new puff stitches are placed into the space created by the “yo and pull through 2 loops”
It’s very important to watch the video tutorial to guide you with this stitch!
R1: crochet 9 foundation puff stitches, turn
R2-5: 1 edge puff stitch, *3 puff stitches together (19 loops on hook) into the top of last puff stitch, the base of that puff stitch, and the next puff stitch, continue from * until the end, turn
R6-7 are best to see on the video as it shows the decrease on each side very clearly
R6-7: 2 puff stitches together (as an edge decrease), then crochet *3 puff stitches together (19 loops on hook) into the top of last puff stitch, the base of that puff stitch, and the next puff stitch, continue from * until you have 2 puff stitches left to create, but instead crochet a 4 puff stitch together as a decrease, turn
Fasten off and weave in ends
Each piece should be about 6 inches for the base.
Make sure to post your picture with the hashtag #JAN25MCAL to the Facebook group so we can find and celebrate you!

Puff Stitch In A Zig Zag and Assembly – Part 3 of the Heart Pillow
Video Tutorial for Part 3 – Zig Zag Puff Stitches WITH Reveal
Subscribe to my Youtube Channel here:
[youtube-subscriber channelID=”UCSI4OeQQnxVQEAwMGeTCn1Q” layout=”full” subscribers=”default”]
Written Pattern for Part 3 with Reveal
Zig Zag Puff Stitch
(2 pieces – same color – mine is red)
Ch 19 (multiple of 2 +3)
R1: starting from the 4th ch from the hook, *1 dc, crochet 1 puff st in the ch BEFORE the dc, ch 1, repeat from * until the end, 1 dc in the last st, turn
R2-8: ch 2, *1 dc into the ch 1 from the puff st from the previous row, 1 puff st into the space before and below the dc, ch 1, repeat from * until the end, 1 dc on top of the turning chain, turn
R9-10: ch 2, 1 dc tog over 2 ch1-spaces, crochet 1 puff st below the 2nd dc as normal, ch 1, *1 dc into the ch 1 from the puff st from the previous row, 1 puff st into the space before and below the dc, ch 1, repeat from * until you have left to crochet (before the turning chain), crochet a decrease like this: 1 dc tog (no puff made), turn
Fasten off.
Each piece should be about 6 inches for the base.

Assembly
Aline all the same colored pieces together such that they make a heart.


Now sew the red pieces where they touch together (mattress or whip stitch).
Finally, use the fairy yarn (or sew/crochet with another color/yarn) the 2 hearts together (sc sts evenly all around). I used this WeCrochet Fairy Yarn (you can use ANY yarn for this!)
Once almost around (maybe 3/4 of the way around) stuff with polyfill (optionally create a lining for the polyfill first and then add it in there), then finish crocheting till the end. Fasten off and weave in ends.

Make sure to post your picture with the hashtag #JAN25MCAL to the Facebook group so we can find and celebrate you!
Wanna learn more about Crochet Stitches? Watch this Video here
I’m also always here to support you through this and any other pattern and tutorial. Simply ask in my group and me and other amazing and kind crocheters will help you along.
If you love this pattern, please use the social media share buttons above or below and share this pattern link with the world and your friends.

That way you will find it easily again when you need it and you also provide the world and your friends with the ability to gain extra crochet knowledge as well. And to top it off, you help me as it allows me to create more content that you love already and want to see more of – free crochet patterns and tutorials. So, thank you for sharing.
If you love my crochet patterns and the way I teach, I would suggest subscribing to my newsletter below as I share new patterns, tutorials, and special announcements often.


