Crochet Christmas Tree Hat – Easy Free Pattern
This post includes affiliate links.
The Crochet Christmas Tree Hat is a free crochet pattern that is long enough that it can be wrapped around your neck as a scarf. You can also add lights to add some sparkle to your Christmas tree hat.
Whether it’s Christmas in July or the Holiday Season, we all love Christmas decor and accessories, right? Well, I also love unique Christmas creations, that not many people have especially crocheted. This Crochet Christmas Tree Hat resembles just that! It used to be part of a Crochet Along, aka CAL, which was sponsored by DMC yarns. The yarn they provided for me is the Natura XL yarn which is incredibly easy to work with and very soft also.

Features of a Crochet Christmas Tree Hat
I actually used to call this pattern a “Christmas Tree Hat Scarf” because the hat is actually so long you can wrap it around your neck and keep you warm as a scarf does. But let’s be honest, it really is just a hat.
You’ll first crochet the entire hat with a Christmas tree stem as the hat ribbing. Next, you will crochet the circular ornaments and crochet the surface crochet lighting before putting it all together.
I designed this crochet Christmas Tree Hat such that the pattern can be easily adjusted to any head size that it is needed for as the pattern is made from the bottom up. Once you have the ribbing finished the hat is decreased every so often until it is really long. You could spread out the increases even more and make the Christmas Tree Hat even longer.
Furthermore, I decided to use hot glue to attach all the ornaments as it would have taken too long and would not have looked as neat if I would have sewn them all down. That way you won’t see sewing lines and the ornaments look very pretty in every spot you glue them on. But of course, feel free to sew them on, instead of gluing them on with hot glue or fabric glue.
Light up Christmas Tree Hat
Furthermore, I add some battery-operated LED lights which of course are optional. I happen to have some and they just made the whole Christmas Tree Hat come all together. However, it is to note that the lights plus the batteries might feel heavy and pull down the hat scarf a bit. Furthermore, the bulky cotton yarn I picked for this pattern is also very heavy, although warm and cozy. But that is something to keep in mind when combining bulky cotton yarn with the led lights.
Speaking of the bulky yarn, I would suggest you pick some bulky yarn that is not as heavy as cotton. I do love the heaviness of the cotton yarn, but it can also add some neck strain while wearing it. So if I ever crochet this Christmas Tree Hat again, I would use WeCrochet’s Brava Bulky Yarn which is not only lighter but also more affordable.

Get the Crochet Christmas Tree Hat Pattern PDF
Also, be sure to add this pattern to your Ravelry Favorites by clicking the button below.

This pattern is also available as an ad-free, printer-friendly pdf pattern that can be purchased at the links below for only a small fee.


If you love this Christmas Tree Hat, you might also love these related patterns:


- Small Foldable Christmas Tree
- Loop Yarn Christmas Trees
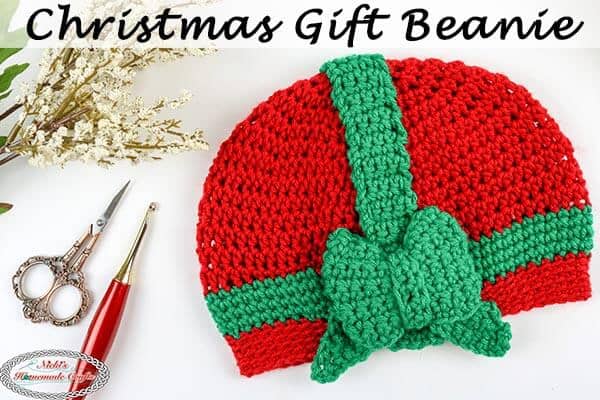
- Christmas Gift Beanie
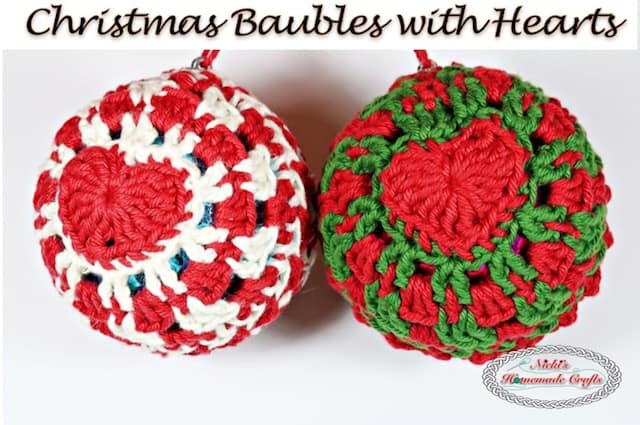
- Christmas Baubles with Hearts
So let me now get started and tell you what you will need in order to crochet the Crochet Christmas Tree Hat
How to Crochet the Christmas Tree Hat
Material List
- DMC Natura XL Yarn which is super bulky 100% cotton yarn (the colors are mentioned as number on their website, which I provided names as guidance)
- 4 skeins of the color 08 (green)
- 1 skein of the color 111 (brown)
- 1 skein of the color 05 (red)
- 1 skein of the color 06 (purple)
- 1 skein of the color 42 (pink)
- 1 skein of the color 09 (yellow)
- 1 skein of the color 92 (gold)
- 6.0mm hook
- scissors
- tapestry needle
- optional: hot glue gun
- optional: battery operated LED lights
Size of the Christmas Tree Hat
The hat is made for a teen/ adult size head but can be easily adjusted to make it fit for any head size.
Dimensions: 46 inches (with star) long/in height x 10 inches in diameter
Gauge
9 dc x 4 rows = 3 square inches
Stitches used, in US terms
- sc = single crochet
- dc = double crochet
- hdc = half double crochet
- hdc in BLO = half double crochet in back loop only
- sl st = slip stitch
- ch = chain

Written Instructions of the Crochet Christmas Tree Hat Pattern
All starting chains are not counted and the first stitch of every round or row goes into the same stitch as the starting chain.
Please click HERE to learn how to make any hat pattern for any head size!
Crochet Hat Ribbing
Start with the color brown (DMC 111)
Row 1: Make a chain of 6, starting from the 2nd ch from the hook 1 hdc in each st, ch 1, turn (5 sts)
Row 2 – 40: 1 hdc in BLO in each st, ch 1, turn
I made 40 rows as that is what worked for my hat. Please adjust the number of rows depending on the person’s head you make this hat for.
After row 40, fold the ribbing in half and sl st the ends together.
Crochet Hat Pattern
Still using Brown for one more round.
Crochet 54 sc’s evenly around the ribbing (this number will need to be adjusted according to the size of the ribbing you made; pick a number (multiple of 5, plus 4) that is larger than the number of rows you just made), sl st to the first st.
If you have a different number than 54 sts, please see below how I decreased every 5th row. First eliminated 4 sts, and then all the other decreasing rows, I eliminated 5 sts per round. So you will need to make the decreases evenly around.
Fasten off Brown and start with Green (DMC color 08)
Round 1 – 4: ch 2, 1 dc in each st all around, sl st to the first st
Round 5: ch 2, *1 dc dec, 1 dc in the next 12 sts, 1 dc dec, 1 dc in the next 11 sts, repeat from * one more time, sl st to the first st (50 sts)
Round 6 – 9: ch 2, 1 dc in each st all around, sl st to the first st
Round 10: ch 2, 1 dc dec, 1 dc in the next 8 sts, repeat from * till the end of the round, sl st to the first st (45 sts)
Round 11 – 14: ch 2, 1 dc in each st all around, sl st to the first st
Round 15: ch 2, 1 dc dec, 1 dc in the next 7 sts, repeat from * till the end of the round, sl st to the first st (40 sts)
Round 16 – 19: ch 2, 1 dc in each st all around, sl st to the first st
Round 20: ch 2, 1 dc dec, 1 dc in the next 6 sts, repeat from * till the end of the round, sl st to the first st (35 sts)
Round 21 – 24: ch 2, 1 dc in each st all around, sl st to the first st
Round 25: ch 2, 1 dc dec, 1 dc in the next 5 sts, repeat from * till the end of the round, sl st to the first st (30 sts)
Round 26 – 29: ch 2, 1 dc in each st all around, sl st to the first st
Round 30: ch 2, 1 dc dec, 1 dc in the next 4 sts, repeat from * till the end of the round, sl st to the first st (25 sts)
Round 31 – 34: ch 2, 1 dc in each st all around, sl st to the first st
Round 35: ch 2, 1 dc dec, 1 dc in the next 3 sts, repeat from * till the end of the round, sl st to the first st (20 sts)
Round 36 – 39: ch 2, 1 dc in each st all around, sl st to the first st
Round 40: ch 2, 1 dc dec, 1 dc in the next 2 sts, repeat from * till the end of the round, sl st to the first st (15 sts)
Round 41 – 44: ch 2, 1 dc in each st all around, sl st to the first st
Round 45: ch 2, 1 dc dec, 1 dc in the next st, repeat from * till the end of the round, sl st to the first st (10 sts)
Round 46 – 49: ch 2, 1 dc in each st all around, sl st to the first st
Round 50: ch 2, 1 dc dec till the end of the round, sl st to the first st (5 sts)
Round 51 – 54: ch 2, 1 dc in each st all around, sl st to the first st
Fasten off and weave in the ends.
In the end, the Christmas Tree Hat Scarf will or better should look like the image below.

Crochet Ornaments
I used 4 different colors for the ornaments, but the pattern is the same for each.
Make 10 circles of each of these colors: 05, 06, 42, 92
Make a magic ring and place 12 dc’s inside, pull the ring tide, and sl st to the first st.
Fasten off. Don’t weave in the ends yet as you will use the ends to attach the ornaments to the hat scarf.

Star for the top of the Christmas Tree Hat
Use the color 92
Make 2 stars
Round 1: Make a magic ring and plus 5 times this repeat inside the circle before pulling tide: 2 dc’s, ch 1
Then sl st to the first st.
Round 2: *Ch 5, 1 sc in the 2nd ch from the hook, 1 hdc in the next, 1dc in the next 2 chs, sl st to the next chain space you created in round 1, repeat from * 4 more times
Fasten off.
Once you have both stars, sew them together so they become thicker and sew the star to the tip of the Christmas Tree Hat Scarf.

Crochet Light String using Surface Crochet
Use the color 09
Use the surface slip stitch as far as you can (due to the hat scarf getting thinner at the tip). Crochet the surface slip stitch in spirals all around the Christmas Tree Hat Scarf evenly.
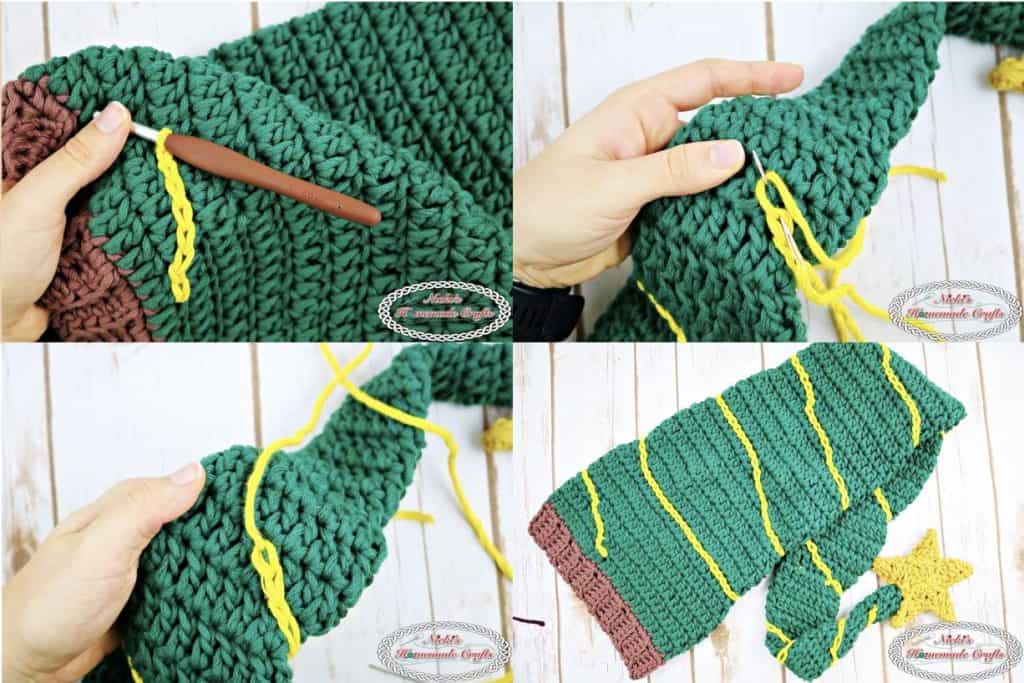
Once you can do the surface slip stitch anymore, use a tapestry needle to finish it up at the tip using the same stitch just made with a tapestry needle.
Attaching the ornaments
I used hot glue to make it easier and faster, but you can sew them on as well.
First, use your hook and pull one of the ends of the ornament thru and tie the ends. Cut off as much as possible and hot glue the ends and the ornament to the Hat Scarf.

Optional battery-operated LED lights
I added some light to mine by tying them to the inside of my hat scarf and letting the lights poke through the Christmas Tree Hat.
Be sure to join my Crochet Facebook Group and show off your Christmas Tree Hat. I would love to admire them and cheer you on as you’re working on creating it and after you finished it.
I’m also always here to support you through this and any other pattern and tutorial. Simply ask in my group and me and other amazing and kind crocheters will help you along.
If you love this pattern, please use the social media share buttons above or below and share this pattern link with the world and your friends.

That way you will find it easily again when you need it and you also provide the world and your friends with the ability to gain extra crochet knowledge as well. And to top it off, you help me as it allows me to create more content that you love already and want to see more of – free crochet patterns and tutorials. So, thank you for sharing.
If you love my crochet patterns and the way I teach, I would suggest subscribing to my newsletter below as I share new patterns, tutorials, and special announcements often.


This looks awesome!