10 Essential Crochet Amigurumi Tips for Beginners
This post includes affiliate links.
10 essential amigurumi tips for crochet beginners is a list of basic techniques you need to master to make the cutest crochet toys.
Little Daisy excitedly sprints up a long flight of stairs to the old cottage at the end of the road. She is holding a large piece of paper with a drawing on. She knocks loudly and holds up the paper in the air patiently waiting for the door to open.
It takes her a while to come to the door and open it as her legs are not as young as they used to be. She is greeted by the sweet smell of double chocolate cookies Daisy’s mom baked for her. “Can you please make me this toy Mrs Brown?” Daisy says impatiently.
Mrs Brown was well known throughout the village for her excellent skills in toy making. All the children in the village would design and draw their own toys and she would bring them to life with her hook and yarn.
Teaching someone the essential crochet amigurumi tips was dream come true
“You are so clever Mrs Brown” says little Daisy with a big grin on her face. I wish I could make toys like you. “I can teach you one day if you want Daisy? First, you have to master the 10 basic techniques for making cute crochet toys.”

10 Essential Amigurumi Tips for Crochet Beginners
1. Crochet Magic Ring
Majority of crochet amigurumi patterns start with instruction to create a magic circle. This technique is a total game changer when it comes to neat looking crochet toys. The main reason for using a magic circle is that you can close the starting chain very tightly.
This helps especially if you don’t want your toy stuffing poking out and want a neat looking amigurumi toy. It is an important skill to have and once you master it, you will not go back! I have included a handy video tutorial on Crochet Magic Circle on my website.

2. Alternative Crochet Magic Ring
I know that sometimes practicing a new stitch or skill takes time to get perfect. The trouble I find with traditional crochet magic rings is that they always have a small gap in the middle. The gap is minimal but still too big when it comes to crocheting toys.
If you struggle a little with the magic circle, check out my tutorial for an Alternative Crochet Magic Ring. This technique starts with traditional four chain stitches and slip stitching into first chain to create a ring to crochet into. However, in my handy tutorial I show you how to close this ring tightly without it ever coming apart.

3. Invisible single crochet decrease
Crocheting amigurumi toys consists of quite a lot of shaping. This is achieved by increasing and decreasing at specific points. To make toy parts bigger, you work two stitches into same stitch to increase the total stitch count. The make parts smaller you need to decrease or work two stitches together into one.
However, working two stitches together in traditional way is often very visible and creates an eye sore on crocheted toy. I use Invisible Single Crochet Decrease every time I make a toy. It is a very clever crochet amigurumi tip that will help you prevent those ugly gaps that are created when crocheting two single crochet stitches together to make one.

4. Invisible join for closing crochet amigurumi rounds
This is a super simple technique but it will elevate your crochet projects to another level. We all want our seams to look neat and tidy. Traditionally you would use a slip stitch to close off a round.
This join is very visible and causes an issue especially when changing colours. With my quick How To Sew An Invisible Join For Crochet Rounds Easily tutorial you will have neat and invisible joins that will make your crochet amigurumi look beautiful.

5. How to close crochet amigurumi tip
I have mentioned in the first tip that having a tightly closed magic circle is important. But what about when you finish the crochet toy part and need to close it securely?
The way amigurumi is constructed, especially heads or other sphere shapes, you will be most likely left with a little hole consisting of six stitches. Check out THIS TUTORIAL on what to do beyond ‘fasten off’ and how to easily close up your piece in a few simple steps.

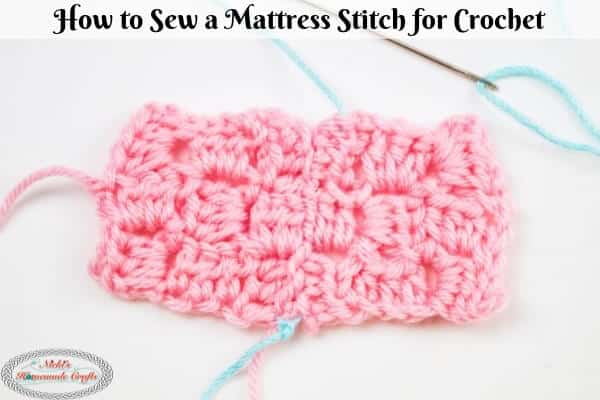
6. Mattress stitch
There are only very few amigurumi crochet patterns that don’t require you to sew different pieces together. Sometimes, sewing pieces together can make or break a project. Apart from pinning all the parts together first and adjusting them until you are happy with the overall look, I have another great tip.
To securely sew the crochet toy parts together, I recommend mattress stitch. This is by far the neatest and not so obvious way to sew the pieces together. The Mattress Stitch prevents a seam from being seen. It creates an amazing invisible join between two crochet pieces.
7. How to weave ends perfectly
Toys are meant to be played with. So, not surprisingly there is a lot of tugging and hugging and squeezing going on. I can not imagine anything worse than yarn ends coming undone! It would be a disaster as the crochet amigurumi toy would most likely fall apart.
There are a lot of tutorials out there and I must tell you I tried most of them! However, none of them lived up to my expectations. Therefore, I have put together crochet amigurumi tips on How to Weave Ends in Perfectly that will never come undone!

8. All about the safety eyes
Once you have put together your crochet toy, it is time to bring it to life. Creating a face for your toy is just as important as crocheting and sewing the parts together. Choosing the perfect eye option can be challenging.
THIS POST shows you all the different types of eyes you can choose to finish off your amigurumi. It walks you through safety eyes, embroidered or crocheted eyes and helps you decide which is the right option for you.

9. Embroidered face crochet amigurumi tip
Embroidering eyes and faces for your amigurumi is a great way to give them lots of personality. I recommend doing this before stuffing your amigurumi. It is much easier this way.
Although you have a better idea of what the face looks like after you’ve finished your amigurumi, it’s a lot harder to make clean stitches and fasten off your face thread. IN THIS POST you will find lots more tips and tricks on how to embroider a cute face on your crochet amigurumi.

10. How to crochet around beads
This is a really fun technique that might seems more difficult than it really is! Crocheting around beads can come in handy when making jewellery, baby toys, pacifier chains or baby teething toys. THIS BLOG POST has a step by step photo tutorial showing you the crochet tips.

Mrs Brown, Mrs Brown little Daisy is calling at the door. Look what I made to look I made it. Mrs Brown opens the door and is greeted by the perfect crochet circle Daisy has practised over the last week.

Now you have mastered the 10 essential crochet amigurumi tips you can get inspired and choose your next project from my 10 Free Cute Crochet Amigurumi Patterns round up. These are some of the cutest crochet amigurumi toys around!
If you found this post helpful and know other amigurumi beginners, why not share it with them? Use the social media buttons or pin it on Pinterest to come back to later!
If you want to keep up to date with the latest crochet patterns and tutorials I release, sign up to my newsletter below or come and join my Facebook group! I would love to connect!


